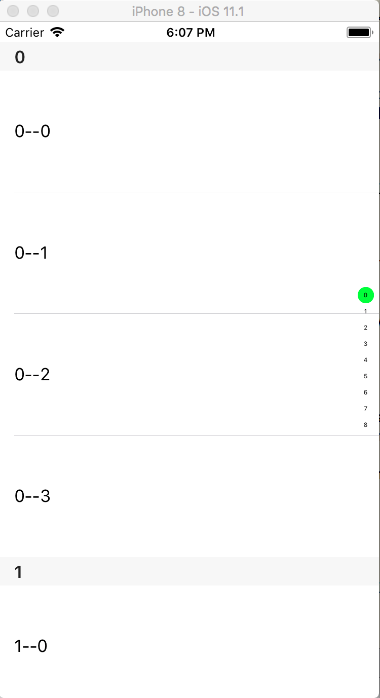
现在要实现一个跟微信的sectionIndexView 一样的索引条。本来想用系统的sectionIndexView,但是发现系统的 sectionIndexView 可定制性太差。网上搜了搜也没找到比较满意的,于是就自己写了一个。可以先看一下效果
主要的功能
- 通过索引条定位位置,这里是定位的section
- 点击索引条时,会有指示器放大显示
- 被选中的item 高亮显示
- 滚动tableview时,索引条对应更新
主要功能就是这些,其中会有一些细节的处理,在下面会结合到代码详细叙述。
从界面上看,需要一个靠右侧的视图来承载索引内容,这个就是我们需要的开发的 indexView。
在indexView需要竖列分布所有的索引内容,至于间隔和大小这个就按实际情况设定。indexView上的每个元素会有两种状态:普通(未选中)和高亮(已选中)。
还有一个放大指示器,主要是因为索引条比较小,操作的时候手指会盖住索引视图,所以在对索引条操作的时候添加放大指示器显示当前选中的索引。
indexView 有两种操作,点击选择和滑动选择。
在选择的过程中指示器选址选中的索引内容,并且位置也要对应到相应的索引元素的位置。
选中对应的索引之后,tableview 要滚动到相应的位置。
tableview 滚动的时候,更新索引视图但不显示指示器。
indexView 需要一个代理协议。这个协议有两个方法:一个必须选的方法来获取数据;另一个可选方法来回调选中事件,至于这个 complete 后面会说到他的作用。
@protocol DDIndexViewDelegate <NSObject>

- (NSArray <NSString *>*)titlesForIndexView:(DDIndexView *)indexView;
@optional
- (void)indexView:(DDIndexView *)indexView didSelectedIndex:(NSInteger)index complete:(void (^)(NSInteger finalSelectedIndex))complete;

@end
数据的问题解决了,下面就是布局了。通过代理拿到数据之后,直接进行简单的循环布局。
这里布局用的是 Label ,因为所有的操作都是通过touch事件触发的。
设置 tag 之后,在后面更新 Label 状态(背景颜色)的时候,直接通过 tag 获取。
- (void)renderUI {
    _titleArray = [self.delegate titlesForIndexView:self];

    for (NSInteger i = 0; i < _titleArray.count; i ++) {
        UILabel *label = [[UILabel alloc] init];
        label.text = _titleArray[i];
        label.frame = CGRectMake(0, i * kItemWidth, kItemWidth, kItemWidth);
        label.font = [UIFont systemFontOfSize:6];
        label.textAlignment = NSTextAlignmentCenter;
        label.tag = i + 1000;
        label.layer.cornerRadius = kItemWidth/2.0;
        label.clipsToBounds = YES;
        [self addSubview:label];
    }
}
由于我这里的 indexView 的位置是默认在视图右侧居中的位置,所以在设置一下自身的 frame。
- (void)layoutSubviews {
    [super layoutSubviews];
    CGFloat height = _titleArray.count * kItemWidth;
    self.frame = CGRectMake(CGRectGetWidth(self.superview.bounds) - kItemWidth - 5, (CGRectGetHeight(self.superview.bounds) - height)/2.0, kItemWidth + 5, height);
}
这个指示器需要一个 imageView (显示背景图片)和 一个Label (显示索引内容),用于没有交互,直接把Label 放在 imageView 上。
整个指示器可以直接放在 window 上,在操作的时候添加到视图,操作结束的时候移除视图。
首先需要监听 view 的 touch 事件。更新 index 视图和指示器,同时记录一下操作状态(touching)。
- (void)touchesBegan:(NSSet<UITouch *> *)touches withEvent:(UIEvent *)event {
    _touching = YES;
    [self handleTouches:touches];
    [self showIndicator];
}
- (void)touchesMoved:(NSSet<UITouch *> *)touches withEvent:(UIEvent *)event {
    _touching = YES;
    [self handleTouches:touches];
    [self showIndicator];
}

- (void)touchesEnded:(NSSet<UITouch *> *)touches withEvent:(UIEvent *)event {
    _touching = NO;
    [self hideIndicator];
    [self updateSelectedIndex:_finalSelectedIndex];
}
- (void)touchesCancelled:(NSSet<UITouch *> *)touches withEvent:(UIEvent *)event {
    _touching = NO;
    [self hideIndicator];
    [self updateSelectedIndex:_finalSelectedIndex];
}
处理 touch 事件,更新 index view。这里通过当前 touch 的位置来确定选中的索引元素。
- (void)handleTouches:(NSSet<UITouch *> *)touches{
    UITouch *touch = [touches anyObject];
    CGPoint touchPoint = [touch locationInView:self];
    NSInteger selectedIndex = touchPoint.y / kItemWidth;
    if (selectedIndex >=0 && selectedIndex < _titleArray.count) {
        _finalSelectedIndex = selectedIndex;
        _selectedItem.backgroundColor = [UIColor clearColor];
        _selectedItem = [self viewWithTag:selectedIndex + 1000];
        _selectedItem.backgroundColor = [UIColor greenColor];
        _indicatorLabel.text = _titleArray[selectedIndex];

        if (![self.delegate respondsToSelector:@selector(indexView:didSelectedIndex:complete:)]) {
            return;
        }
        __weak typeof(self) wSelf = self;
        [self.delegate indexView:self didSelectedIndex:selectedIndex complete:^(NSInteger finalSelectedIndex) {
            __weak typeof(wSelf) sSelf = wSelf;
            sSelf.finalSelectedIndex = finalSelectedIndex;
        }];

    }
}
这里说一下delegate 回调回来的 finalSelectedIndex 的作用。假如现在有这样的一个场景,就是选中index view 上的最后一个元素的时候,tableview其实滚不到对应的section。就像demo 中那样,当选中 8 的时候,tableview 滚不到第8个 section。那这个时候如果 indexView 上的 8 还是选中状态的话就不是很合适。这个时候,indexView上的 7 应该是选中的状态。
其实在操作indexView 的时候,我们并不能确定 tableview 能否滚动到对应的位置,所以在操作之后,需要 tableview 告诉 indexView 这个操作到底能滚到哪里。如果 tableview 没有给回调,那就默认能滚到选择的位置,那么 indexView 上点击的元素就是高亮;如果有回调,那么 indexView 就要把指定的元素高亮。
tableview 中需要处理的就是,现在显示的到底是哪个section?这里可以监听 contentOffset ,通过 contentOffset 确定最上面的 indexPath ,然后用 indexPath.section 来更新 indexView。
- (nullable NSIndexPath *)indexPathForRowAtPoint:(CGPoint)point;
这里有个问题要注意一下,tableview 的 contentOffset 会自动偏移。
这种状态下的 contentOffset 是 -20,有导航栏就是 66 了。也就是所我们不能直接用 contentOffset ,需要一个转换。
CGPoint p = CGPointMake(0, scrollView.contentOffset.y - _startContentOffset.y);
NSIndexPath *indexPath = [self.tableView indexPathForRowAtPoint:p];
[_indexView updateSelectedIndex:indexPath.section];
这里记录一下初始的 contentOffset ,把这个当作初始值,这样后面的数据就会是我们预期的数据。
还有一个注意点就是 startContentOffset 的记录时机。不要在 viewDidLoad 取值,要在 viewDidLayoutSubviews 中取值。
- (void)viewDidLayoutSubviews {
    [super viewDidLayoutSubviews];
    _startContentOffset = self.tableView.contentOffset;
}
指示器就比较简单了,直接放在 window 上就好了。为了防止重复添加,可以用类别给 window 添加一个 indicatorView。
@interface UIWindow (DDIndicatorView)
@property (nonatomic, strong) UIView *indicatorView;
@end

static const char *  kDDIndicatorView = "kDDIndicatorView";
@implementation UIWindow (DDIndicatorView)
- (void)setIndicatorView:(UIView *)indicatorView {
    objc_setAssociatedObject(self, kDDIndicatorView, indicatorView, OBJC_ASSOCIATION_RETAIN);
}
- (UIView *)indicatorView {
    return objc_getAssociatedObject(self, kDDIndicatorView);
}
@end
还有一个位置的问题,将 selectedItem 的 frame 转化到 window 上之后就能获取到指示器的 frame了。
- (void)showIndicator {
    UIWindow *window = [UIApplication sharedApplication].delegate.window;
    if (!window.indicatorView) {
        [window addSubview:_indicatorView];
        _indicatorView.alpha = 0.0;
        [UIView animateWithDuration:0.35 animations:^{
            _indicatorView.alpha = 1.0;
        }];
        window.indicatorView = _indicatorView;
    }
    CGRect rect = [self convertRect:_selectedItem.frame toView:window];
    CGFloat width = CGRectGetWidth(_indicatorView.bounds);
    CGFloat height = CGRectGetHeight(_indicatorView.bounds);
    _indicatorView.frame = CGRectMake(CGRectGetMinX(rect) - width - 10, CGRectGetMidY(rect) - height/2.0, width, height);
}
为了节省事件,可能会直接取找别人的轮子,但不是每次都能找到合适的,对于自己力所能及的事情还是自己动手试试会比较好。
从问题的分析到功能的实现,有的东西也是一点点尝试出来的。里面涉及到细节问题也是在做的过程中发现的,如果只是简单的用别人的轮子可能这些问题自己很那会发现。


