Giter Site home page Giter Site logo

phlippe / uvadlc_notebooks Goto Github PK

View Code? Open in Web Editor NEW
2.1K 27.0 520.0 185.49 MB

Repository of Jupyter notebook tutorials for teaching the Deep Learning Course at the University of Amsterdam (MSc AI), Fall 2023

Home Page: https://uvadlc-notebooks.readthedocs.io/en/latest/

License: MIT License

Jupyter Notebook 100.00%
deep-learning tutorials uvadlc pytorch pytorch-lightning tutorial flax jax optax

uvadlc_notebooks's Introduction

UvA Deep Learning Tutorials

Note: To look at the notebooks in a nicer format, visit our RTD website: https://uvadlc-notebooks.readthedocs.io/en/latest/

Course website: https://uvadlc.github.io/
Course edition: Fall 2023 (Nov. 01 - Dec. 24) - Being kept up to date
Recordings: YouTube Playlist
Author: Phillip Lippe

For this year's course edition, we created a series of Jupyter notebooks that are designed to help you understanding the "theory" from the lectures by seeing corresponding implementations. We will visit various topics such as optimization techniques, transformers, graph neural networks, and more (for a full list, see below). The notebooks are there to help you understand the material and teach you details of the PyTorch framework, including PyTorch Lightning. Further, we provide one-to-one translations of the notebooks to JAX+Flax as alternative framework.

The notebooks are presented in the first hour of every group tutorial session. During the tutorial sessions, we will present the content and explain the implementation of the notebooks. You can decide yourself whether you just want to look at the filled notebook, want to try it yourself, or code along during the practical session. The notebooks are not directly part of any mandatory assignments on which you would be graded or similarly. However, we encourage you to get familiar with the notebooks and experiment or extend them yourself. Further, the content presented will be relevant for the graded assignment and exam.

The tutorials have been integrated as official tutorials of PyTorch Lightning. Thus, you can also view them in their documentation.

How to run the notebooks

On this website, you will find the notebooks exported into a HTML format so that you can read them from whatever device you prefer. However, we suggest that you also give them a try and run them yourself. There are three main ways of running the notebooks we recommend:

  • Locally on CPU: All notebooks are stored on the github repository that also builds this website. You can find them here: https://github.com/phlippe/uvadlc_notebooks/tree/master/docs/tutorial_notebooks. The notebooks are designed so that you can execute them on common laptops without the necessity of a GPU. We provide pretrained models that are automatically downloaded when running the notebooks, or can manually be downloaded from this Google Drive. The required disk space for the pretrained models and datasets is less than 1GB. To ensure that you have all the right python packages installed, we provide a conda environment in the same repository (choose the CPU or GPU version depending on your system).

  • Google Colab: If you prefer to run the notebooks on a different platform than your own computer, or want to experiment with GPU support, we recommend using Google Colab. Each notebook on this documentation website has a badge with a link to open it on Google Colab. Remember to enable GPU support before running the notebook (Runtime -> Change runtime type). Each notebook can be executed independently, and doesn't require you to connect your Google Drive or similar. However, when closing the session, changes might be lost if you don't save it to your local computer or have copied the notebook to your Google Drive beforehand.

  • Snellius cluster: If you want to train your own (larger) neural networks based on the notebooks, you can make use of the Snellius cluster. However, this is only suggested if you really want to train a new model, and use the other two options to go through the discussion and analysis of the models. Snellius might not allow you with your student account to run Jupyter notebooks directly on the gpu_shared partition. Instead, you can first convert the notebooks to a script using jupyter nbconvert --to script ...ipynb, and then start a job on Snellius for running the script. A few advices when running on Snellius:

    • Disable the tqdm statements in the notebook. Otherwise your slurm output file might overflow and be several MB large. In PyTorch Lightning, you can do this by setting progress_bar_refresh_rate=0 in the trainer.
    • Comment out the matplotlib plotting statements, or change :code:plt.show() to plt.savefig(...).

Tutorial-Lecture alignment

We will discuss 7 of the tutorials in the course, spread across lectures to cover something from every area. You can align the tutorials with the lectures based on their topics. The list of tutorials is:

  • Guide 1: Working with the Snellius cluster
  • Tutorial 2: Introduction to PyTorch
  • Tutorial 3: Activation functions
  • Tutorial 4: Optimization and Initialization
  • Tutorial 5: Inception, ResNet and DenseNet
  • Tutorial 6: Transformers and Multi-Head Attention
  • Tutorial 7: Graph Neural Networks
  • Tutorial 8: Deep Energy Models
  • Tutorial 9: Autoencoders
  • Tutorial 10: Adversarial attacks
  • Tutorial 11: Normalizing Flows on image modeling
  • Tutorial 12: Autoregressive Image Modeling
  • Tutorial 15: Vision Transformers
  • Tutorial 16: Meta Learning - Learning to Learn
  • Tutorial 17: Self-Supervised Contrastive Learning with SimCLR

Feedback, Questions or Contributions

This is the first time we present these tutorials during the Deep Learning course. As with any other project, small bugs and issues are expected. We appreciate any feedback from students, whether it is about a spelling mistake, implementation bug, or suggestions for improvements/additions to the notebooks. Please use the following link to submit feedback, or feel free to reach out to me directly per mail (p dot lippe at uva dot nl), or grab me during any TA session.

If you find the tutorials helpful and would like to cite them, you can use the following bibtex:

@misc{lippe2024uvadlc,
   title        = {{UvA Deep Learning Tutorials}},
   author       = {Phillip Lippe},
   year         = 2024,
   howpublished = {\url{https://uvadlc-notebooks.readthedocs.io/en/latest/}}
}

uvadlc_notebooks's People

Contributors

alextimans avatar alpz avatar awe-sim avatar balajiai avatar david-knigge avatar ddgoede avatar dependabot[bot] avatar dymil avatar emergenz avatar gabri95 avatar ilzeamandaa avatar imahnshekhzadeh avatar jacobhepkema avatar kristosh avatar lkhphuc avatar luckyrandom avatar mkofinas avatar nrox avatar phlippe avatar pitmonticone avatar psteinb avatar roxot avatar samuelepapa avatar talk1ngdog avatar thesofakillers avatar

Stargazers

 avatar  avatar  avatar  avatar  avatar  avatar  avatar  avatar  avatar  avatar  avatar  avatar  avatar  avatar  avatar  avatar  avatar  avatar  avatar  avatar  avatar  avatar  avatar  avatar  avatar  avatar  avatar  avatar  avatar  avatar  avatar  avatar  avatar  avatar  avatar  avatar  avatar  avatar  avatar  avatar  avatar  avatar  avatar  avatar  avatar  avatar  avatar  avatar  avatar  avatar  avatar  avatar  avatar  avatar  avatar  avatar  avatar  avatar  avatar  avatar  avatar  avatar  avatar  avatar  avatar  avatar  avatar  avatar  avatar  avatar  avatar  avatar  avatar  avatar  avatar  avatar  avatar  avatar  avatar  avatar  avatar  avatar  avatar  avatar  avatar  avatar  avatar  avatar  avatar  avatar  avatar  avatar  avatar  avatar  avatar  avatar  avatar  avatar  avatar  avatar

Watchers

 avatar  avatar  avatar  avatar  avatar  avatar  avatar  avatar  avatar  avatar  avatar  avatar  avatar  avatar  avatar  avatar  avatar  avatar  avatar  avatar  avatar  avatar  avatar  avatar  avatar  avatar  avatar

uvadlc_notebooks's Issues

[Question] Multi-head attention init in Tutorial 6

Tutorial: 6

Describe the bug
Wouldn't say it is a bug, but something that I find strange and wanted to bring up.
For the multi-head attention, I really like the explanation you give about scaling the attention logits before applying the softmax in order to keep the variance manageable. From what I understand we want to keep the variance of keys, queries (and values?) close to 1 and that is why you would initialize the $W_Q$, $W_K$ and $W_V$ matrices using Xavier initialization.

In Cell 5 we use Xavier initialization but we initialize the entire qkv_proj which holds all three matrices for all heads.
I think that it would be more in line with theory if we initialize this way:

nn.init.normal_(self.qkv_proj, mean=0., std=np.sqrt(2 / (input_dim + embed_dim // n_heads)))

With large embed_dim and small n_heads I don't think it really makes that much difference, but I would be happy to hear your thoughts about it.

Additional context
As always great content. Thanks a lot for sharing : )

[Question] Squeeze and Split flows in Tutorial 11

Tutorial: 11

Describe the bug
Not a bug, but instead some questions regarding the exact implementation of the Squeeze and Split flows.
I somehow managed to dig up the official implementation of the realnvp model in the tensorflow archives (here) and there are some differences.
Not sure if these differences are actually relevant, but still would be happy to discuss them.

To Reproduce (if any steps necessary)
Squeeze
In notebook 11, cell 18 the reshape for Squeeze is implemented as:

z = z.permute(0, 1, 3, 5, 2, 4)

But here they implement it somewhat different. Note that this is in tensorflow and the image dims are (H, W, C), i.e. channels last. The equivalent in pytorch would be:

z = z.permute(0, 3, 5, 1, 2, 4)

The difference is that your spatial dimensions would be intermixed with your channel dimensions.

Split
The second question is regarding splitting in multi-scale architectures.
You can see here that after they squeeze and do the channelwise coupling they perform an unsqueeze and then squeeze again but using a different pattern.
Now, the squeeze_2x2_ordered .... I really don't know why it is written this way. Essentially what it does is:

z = z.reshape(N, C, H//2, 2, W//2, 2)
z = z.permute(0, 3, 5, 1, 2, 4)
on = torch.stack((z[:, 0, 0], z[:, 1, 1]))
off = torch.stack((z[:, 0, 1], z[:, 1, 0]))

So if you take a look at the squeeze_operation.svg image, instead of keeping the first two channels and evaluating the last two channels, you would keep the first and the last channel and evaluate the middle two.

So for both the Squeeze and Split I am wondering does it really matter if we do it one way or the other. And what was their motivation for doing it in such a complicated way?

Channelwise
My final question is regarding the channelwise coupling layer. As presented in the paper, this transformation of spatial dimensions to channel dimensions seems somewhat redundant. To me it looks like we could achieve the exact same result by doing a row-wise coupling, so what is the point, am I missing something ?

x = torch.rand((1, 3, 32, 32))
N, C, H, W = x.shape
network = lambda x: torch.hstack((x, x)) # identity function
channelwise = lambda C: (torch.arange(C) % 2).reshape(C, 1, 1)
rowwise = lambda H: (torch.arange(H) % 2).reshape(1, H, 1)

flow1 = [
    SqueezeFlow(),
    CouplingLayer(network, channelwise(4*C), c_in=1),
    CouplingLayer(network, 1 - channelwise(4*C), c_in=1),
    CouplingLayer(network, channelwise(4*C), c_in=1),
]
S = SqueezeFlow()

z1, idj = x, 0
for f in flow1:
    z1, idj = f(z1, idj)
z1, _ = S(z1, idj, reverse=True)

flow2 = [
    CouplingLayer(network, rowwise(H), c_in=1),
    CouplingLayer(network, 1 - rowwise(H), c_in=1),
    CouplingLayer(network, rowwise(H), c_in=1),
]
z2, idj = x, 0
for f in flow2:
    z2, idj = f(z2, idj)

print((z1==z2).all())

Additional context
I tried to keep it small and simple. I hope the questions make sense.
Anyway, I love the content! It was really helpful! Thanks a lot for sharing : )

[Not a Bug, Clarification Required] Validation Step for EBMs (Tutorial 8)

Tutorial: 8

Describe the bug
In the validation part of the code, it is mentioned that the validation/test step depends on what we want to do with the EBM. Could you elaborate a bit more on that? And is the current implementation done keeping in mind generation as an objective?

To Reproduce (if any steps necessary)
Steps to reproduce the behavior:

  1. Go to 'https://uvadlc-notebooks.readthedocs.io/en/latest/tutorial_notebooks/tutorial8/Deep_Energy_Models.html#Training-algorithm'
  2. Scroll down to 'validation_step()'
  3. See comments in the first 2 lines

Expected behavior
More clarity on the statement.

Tutorial 10: Tabulate Syntax error

Tutorial 10: -1 (Fill-in number of tutorial)

Describe the bug
I am expecting to receive a tabulate format of result but getting syntax error

To Reproduce (if any steps necessary)
Simply running the Google Colab notebook as attached.

Expected behavior
Suppose to produce a table of results

Screenshots
image

Runtime environment (please complete the following information):

  • Colab
  • CPU only

Additional context
I tried debugging by changing ["results"] to [result] but that didn't seem to work.

Could you please advise if you have any solution to the above problem?

Multihead Attention

It seems like the implementation of MultiheadAttention is not consistent with the "Multi-Head Attention" figure.
In particular, the projection:
self.qkv_proj = nn.Dense(3*self.embed_dim,...)
Should actually be:
self.qkv_proj = nn.Dense(3*self.embed_dim*self.num_heads,...)
Am I missing something?

[this would also require to change the line:
values = values.reshape(batch_size, seq_length, self.embed_dim)
to:
values = values.reshape(batch_size, seq_length, -1)
]
Thanks.

Doubt in GNN tutorial

Tutorial 7 -
Hey thanks for these wonderful notebooks. I was going through the GNN code especially the GAT section and just to be sure I understood everything correctly i replicated everything for your special case.

    a_input = torch.cat([torch.index_select(input=node_feats_flat, index=edge_indices_row, 
           dim=0), torch.index_select(input=node_feats_flat, index=edge_indices_col, dim=0)
            ], dim=-1) 

    # Calculate attention MLP output (independent for each head)
    attn_logits = torch.einsum('bhc,hc->bh', a_input, self.a)
    attn_logits = self.leakyrelu(attn_logits)

In this line you stack the features of the nodes in each edge so say we have two nodes
i, j we get a 2x2 matrix corresponding to them represented as
[[a, b] , [c, d]] and we have the attention weights [[w, x] , [y, z]]. When we do the einsum operation we get a 2x1 matrix [[aw+bx, cy+dz]]. This is the first doubt shouldnt it be [aw+bx+cy+dz] according to the equation as for each i, j we have one value. If we have two heads then the a matrix should have shape 2x2*d where d=2 for our case

But going further down keeping the same calculations as above. After the attention probabilities.

node_feats = torch.einsum('bijh,bjhc->bihc', attn_probs, node_feats) which is this line

which can be expanded into where ap is the attention probabilites and feats is the node features after the linear projection

       for i in range(4):
           p1 = ap[i, :, 0]
           p2 = ap[i, :, 1]
  
           f1 = feats[:, 0, :].squeeze() ## dimension 1 
           f2 = feats[:, 1, :].squeeze() ##ย dimension 2 
           p1.shape , f1.shape, f2.shape

           print(torch.tensor([(torch.dot(p1, f1), torch.dot(p2, f2))]))

we see that the results is obtained by taking the two different probabilites from different heads and taking the dot product with two different dimensions of the feature matrix, but each head should operate on both the dimensions of the node features or atleast I hope it should. I check the output at each intermediate stage to be sure that it matches the results from the notebook you provide. Am i missing something

Just a question

Tutorial: -5

Describe the bug
In Kaiming's published paper On ResNet and many other implementations of "PreActResNetBlock", there is not an activation applied in "self.downsample".

I fully understand your structure works well (or even better in some cases), but I am not sure what's your consideration

To Reproduce (if any steps necessary)
N/A

Expected behavior
N/A

Screenshots
image

Runtime environment (please complete the following information):
N/A

Additional context
Cell 3 in https://uvadlc-notebooks.readthedocs.io/en/latest/tutorial_notebooks/tutorial5/Inception_ResNet_DenseNet.html

Incorrect normalization factor in attention

PS: There is actually no error in the normalization. This comment is an attempt at correcting the initial, incorrectly reported "error" (and is now consistent with the response just below).

Tutorial: 6

Describe the bug

The normalization in scaled_dot_product() doesn't use the correct dimension and is thus in general wrong.

To Reproduce (if any steps necessary)

This can be seen by printing d_k.

Expected behavior

The normalization quantity d_k should in fact be the "hidden" dimension of the queries or keys.

Thus,

def scaled_dot_product(q, k, v, mask=None):
    d_k = q.size()[-1]

is correct.

Torch Geometric Google Colab

Tutorial: -7

Describe the bug

The current torch version on Google Colab is 1.9.x. This is currently incompatible with the previously installed + imported PyTorch Geometric packages.

To Reproduce (if any steps necessary)
Steps to reproduce the behavior:

Running the notebook as is.

Expected behavior

PyTorch Geometric and it's companion packages should be installed.

Screenshots
N/A

Runtime environment (please complete the following information):

This applies for Google Colab, but is applicable anytime torch 1.9 is used instead of a prior one.

Additional context

Updating the cell as follows:

# torch geometric try: import torch_geometric except ModuleNotFoundError: # You might need to install those packages with specific CUDA+PyTorch version. # The following ones below have been picked for Colab (Jun 2021). # See https://pytorch-geometric.readthedocs.io/en/latest/notes/installation.html for details !pip install torch-scatter -f https://pytorch-geometric.com/whl/torch-1.9.0+cu101.html !pip install torch-sparse -f https://pytorch-geometric.com/whl/torch-1.9.0+cu101.html !pip install torch-cluster -f https://pytorch-geometric.com/whl/torch-1.9.0+cu101.html !pip install torch-spline-conv -f https://pytorch-geometric.com/whl/torch-1.9.0+cu101.html !pip install torch-geometric import torch_geometric import torch_geometric.nn as geom_nn import torch_geometric.data as geom_data

fixes the issue for me.

Tutorial 11 : Runtime error in train_flow function

Thank you for your great tutorials!

I tried tutorial 11 on my laptop (it has no gpu.)
and I got a runtime error in train_flow function.
Its error message said map_location in torch.load should be set.
So I modified
ckpt = torch.load(pretrained_filename)
to
ckpt = torch.load(pretrained_filename, map_location=device).

I guess this modification is good for PCs without gpu.

Thank you.

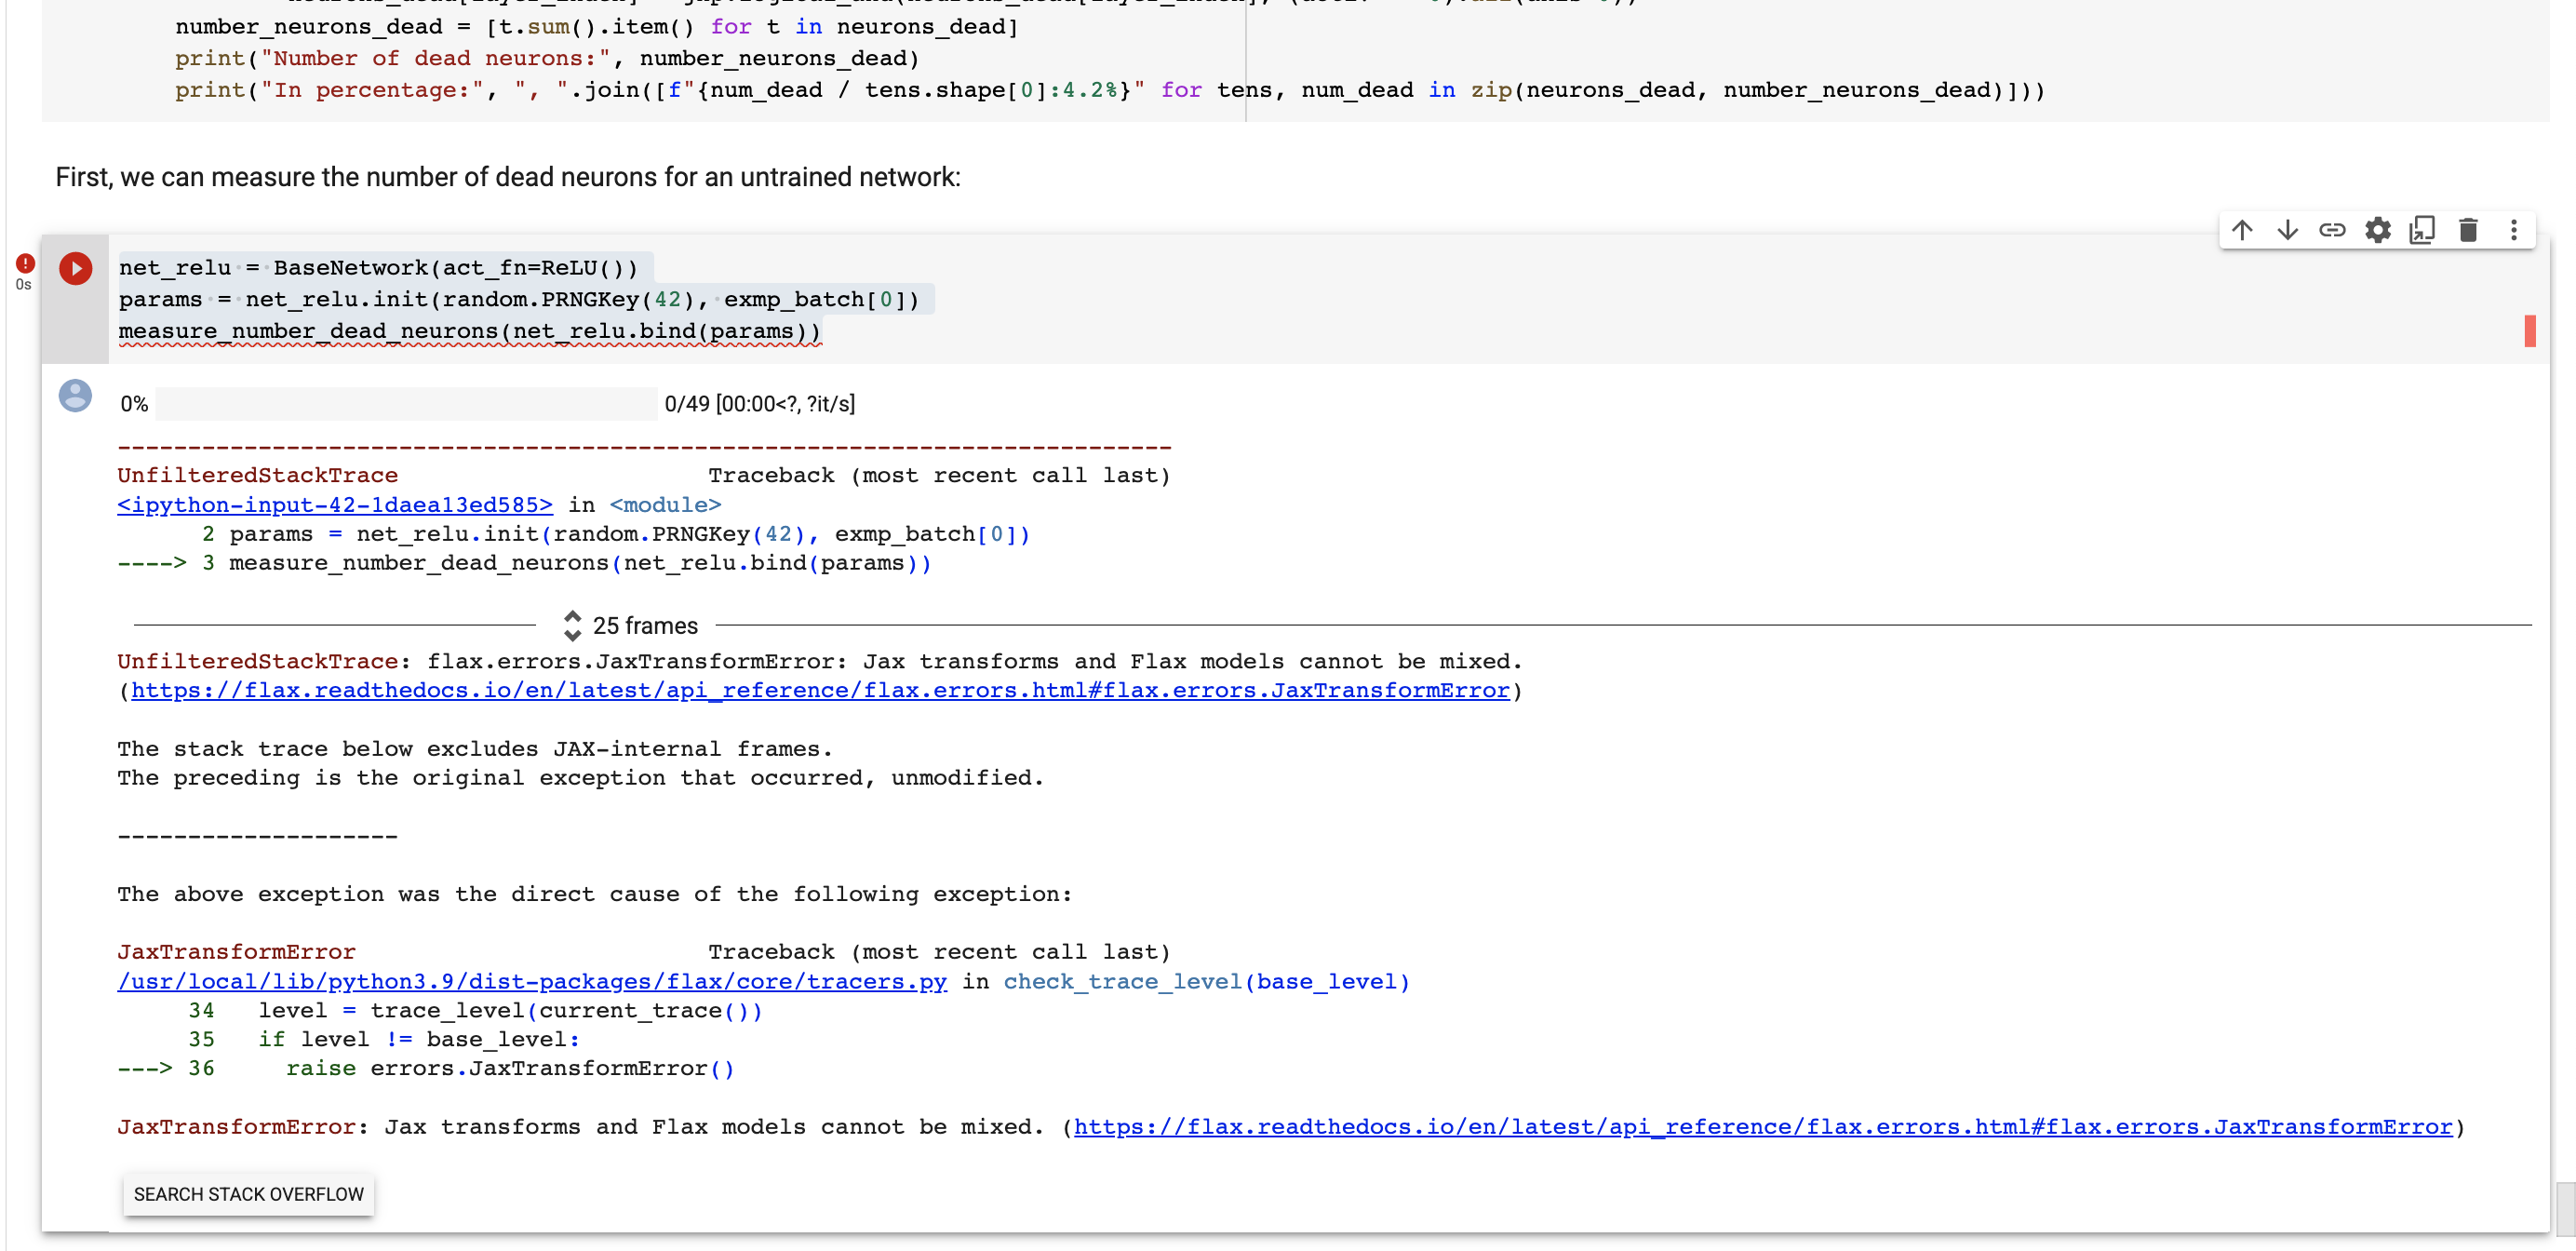
jax tutorial 3 (activaton fn): code to compute dead neurons fails

Tutorial: -1 (Fill-in number of tutorial)

https://uvadlc-notebooks.readthedocs.io/en/latest/tutorial_notebooks/JAX/tutorial3/Activation_Functions.html#Finding-dead-neurons-in-ReLU-networks

Describe the bug
A clear and concise description of what the bug is.

net_relu = BaseNetwork(act_fn=ReLU())
params = net_relu.init(random.PRNGKey(42), exmp_batch[0])
measure_number_dead_neurons(net_relu.bind(params))

produces

---------------------------------------------------------------
<img width="1384" alt="Screenshot 2023-03-17 at 4 55 18 PM" src="https://user-images.githubusercontent.com/4632336/226071121-a66f4084-a60a-4d16-b8ed-05be59696b9b.png">
------------
UnfilteredStackTrace                      Traceback (most recent call last)
[<ipython-input-42-1daea13ed585>](https://localhost:8080/#) in <module>
      2 params = net_relu.init(random.PRNGKey(42), exmp_batch[0])
----> 3 measure_number_dead_neurons(net_relu.bind(params))

25 frames
UnfilteredStackTrace: flax.errors.JaxTransformError: Jax transforms and Flax models cannot be mixed. (https://flax.readthedocs.io/en/latest/api_reference/flax.errors.html#flax.errors.JaxTransformError)

The stack trace below excludes JAX-internal frames.
The preceding is the original exception that occurred, unmodified.

--------------------

The above exception was the direct cause of the following exception:

JaxTransformError                         Traceback (most recent call last)
[/usr/local/lib/python3.9/dist-packages/flax/core/tracers.py](https://localhost:8080/#) in check_trace_level(base_level)
     34   level = trace_level(current_trace())
     35   if level != base_level:
---> 36     raise errors.JaxTransformError()

JaxTransformError: Jax transforms and Flax models cannot be mixed. (https://flax.readthedocs.io/en/latest/api_reference/flax.errors.html#flax.errors.JaxTransformError)

Screenshots
If applicable, add screenshots to help explain your problem.

Runtime environment (please complete the following information):

Colab

Screenshot 2023-03-17 at 4 55 18 PM

Another dataset

Hello, how can I use some another dataset like, cifar100 or MNIST, in tutorial 15?

Tutorial 12: Vertical and horizontal convolution stacks

Hi,
Thanks for sharing such a great notebook! I have a question about the vertical and horizontal convolution stacks in tutorial 12. Based on your explanation:

The vertical convolution is not allowed to work on features from the horizontal convolution. In the feature map of the horizontal convolutions, a pixel contains information about all of the "true" pixels on the left. If we apply a vertical convolution which also uses features from the right, we effectively expand our receptive field to the true input which we want to prevent. Thus, the feature maps can only be merged for the horizontal convolution.

I'm still confused about why for horizontal convolution we need to add horiz_conv(horiz_img) + vert_img but for vertical convolution, we only need vert_conv(vert_img).

Would appreciate if you can explain more about this!

[Question] Tutorial 9: no activation function after the encoder FC layer

Hello,

I have a question regarding the activation functions in the Autoencoders guide.
In the "Tutorial 9: Deep Autoencoders" notebook the Encoder layers are defined by the code:

self.net = nn.Sequential(
    nn.Conv2d(num_input_channels, c_hid, kernel_size=3, padding=1, stride=2), # 32x32 => 16x16
    act_fn(),
    ...
    nn.Conv2d(2*c_hid, 2*c_hid, kernel_size=3, padding=1, stride=2), # 8x8 => 4x4
    act_fn(),
    nn.Flatten(), # Image grid to single feature vector
    nn.Linear(2*16*c_hid, latent_dim)
)

while the Decoder consists of a Linear layer followed by deconvolutions:

self.linear = nn.Sequential(
    nn.Linear(latent_dim, 2*16*c_hid),
    act_fn()
)
self.net = nn.Sequential(
    ...
)

I see that there is no activation function after the Linear layer in the Encoder. I have tried adding act_fn() right after it and got significantly worse results within the same number of training steps. So, is it generally a bad idea to add a non-linear activation function between two Fully Connected layers in an Autoencoder?

Masking in transformer tutorial

Tutorial: 16

Describe the bug
Passing the masks looks like it's supported in the Transformers tutorial, but it actually doesn't work.
The key of the issue is that the MultiheadAttention module expects a mask of 2 dimensions (batch_size, seq length) but the scaled_dot_product expects the mask of the same dimension as logits (batch_size, num_heads, seq_length, seq_length)

To Reproduce (if any steps necessary)
Steps to reproduce the behavior:

  1. Go to cell '## Test MultiheadAttention implementation'
  2. Add a line to add a sequence mask, mask = random.bernoulli(m_rng, shape=(3, 16), and pass it to the apply fn out, attn = mh_attn.apply({'params': params}, x, mask=mask
  3. Run the cell to see the error: ValueError: Incompatible shapes for broadcasting: shapes=[(3, 16), (), (3, 4, 16, 16)] in jnp.where line of scaled_dot_product.

Expected behavior
The MultiheadAttention should transform 2D mask into 4D mask. The following lines in the __call__ function fix the code:

 if mask is not None:
          mask = jnp.stack([mask] * self.num_heads, axis=-1)
          mask = jnp.stack([mask] * seq_length,axis=-1)
          mask = mask.transpose(0, 2, 1, 3)
          mask *= mask.transpose(0, 1, 3, 2)

Runtime environment (please complete the following information):

  • Checked on Google Colab

I've modified the colab to produce variable length sequences and pass the sequence mask and verified that it works. It's interesting to see that to solve this problem with variable length, two layers are needed: one to estimate the distance to end-of-sequence token, and another one to attend in reverse. Feel free to use it to update the code if it's useful: https://colab.research.google.com/drive/1kDoYuwoFSJ1OqnrFHLwW-zAIkZhEwBNs?usp=sharing

dataloder issues with jax tutoiral 9

Tutorial: -1 (Fill-in number of tutorial)

https://uvadlc-notebooks.readthedocs.io/en/latest/tutorial_notebooks/JAX/tutorial9/AE_CIFAR10.html

I have to set num_workers=1 for the pytorch dataloaders, otherwise the code that comptues embeddings
(used in https://uvadlc-notebooks.readthedocs.io/en/latest/tutorial_notebooks/JAX/tutorial9/AE_CIFAR10.html#Finding-visually-similar-images) fails on GPU colab.

Also, I had to comment out jax.jit in the encode funtion to avoid error 'flax + jax dont mix'.

def embed_imgs(trainer, data_loader):
    # Encode all images in the data_laoder using model, and return both images and encodings
    img_list, embed_list = [], []
    
    #@jax.jit
    def encode(imgs):
        return trainer.model_bd.encoder(imgs)
    
    for imgs, _ in data_loader:
    #for imgs, _ in tqdm(data_loader, desc="Encoding images", leave=False):
        z = encode(imgs)
        z = jax.device_get(z)
        imgs = jax.device_get(imgs)
        img_list.append(imgs)
        embed_list.append(z)
    return (np.concatenate(img_list, axis=0), np.concatenate(embed_list, axis=0))

code style: jax tutorial 3 (activation fns)

https://uvadlc-notebooks.readthedocs.io/en/latest/tutorial_notebooks/JAX/tutorial3/Activation_Functions.html

I suggest you use this more jaxonic way of getting per-example gradients :)

def get_grads(act_fn, x):
    """
    Computes the gradients of an activation function at specified positions.
    
    Inputs:
        act_fn - An module or function of the forward pass of the activation function.
        x - 1D input array. 
    Output:
        An array with the same size of x containing the gradients of act_fn at x.
    """
   # return jax.grad(lambda inp: act_fn(inp).sum())(x) # obscure
    return jax.vmap(jax.grad(act_fn))(x)

A bug in tutorial 7

Tutorial: 7

Describe the bug
Thanks for such an explicit tutorial for GNN.
In the code section of GATLayer function,

edge_indices_row = edges[:,0] * batch_size + edges[:,1]
edge_indices_col = edges[:,0] * batch_size + edges[:,2]

I'm not very sure whether this is a bug or I misunderstand it.
I think batch_size should be replaced with num_nodes to get the correct index.

Tutorial #6: Set Anomaly Detection using Transformer

Tutorial: 6 (Transformers & Attention)

Describe the bug
While creating the dataset for Set Anomaly Detection problem, there is a bug in how we are skipping the anomaly class. In the given notebook we use:

class SetAnomalyDataset(data.Dataset):
    ...
    def sample_img_set(self, anomaly_label):
        ...
        if set_label >= anomaly_label:    ## ๐Ÿ†˜ here we should be using == instead of >=
            set_label += 1

Expected behavior
In the above code snippet we should be using == instead of >= to skip the anomaly class while randomly selecting the main class of the set.

Screenshots
image

Runtime environment (please complete the following information):

  • Google Colab
  • GPU

Tensorboard shows the same result after specifying a new `logdir` in jupyter notebook

Hi @phlippe ,

First, thank you so much for these wonderful notebooks!

Following tutorial5, I used the following lines to open a tensorboard for one log directory in a Jupyter notebook:

%load_ext tensorboard
%tensorboard --logdir saved_models/tutorial5/GoogleNetLocal/lightning_logs/version_2/

In another cell below, I wanted to open another board for a different directory using
%tensorboard --logdir ./saved_models/tutorial5/ResNetLocal/lightning_logs/version_0/
However, it still shows the previous board as shown below. I was wondering why it doesn't create a new board for the second directory?

Thank you very much for your help!

image

Possible typo in Tutorial 6

Tutorial: 6

Describe the bug
It seems that there is a typo in Milti-Head markdown cell:

We refer to this as Multi-Head Attention layer with the learnable parameters $W_{1...h}^{Q}\in\mathbb{R}^{D\times d_k}$, $W_{1...h}^{K}\in\mathbb{R}^{D\times d_k}$, $W_{1...h}^{V}\in\mathbb{R}^{D\times d_v}$, and $W^{O}\in\mathbb{R}^{h\cdot d_k\times d_{out}}$ ($D$ being the input dimensionality). Expressed in a computational graph, we can visualize it as below (figure credit - Vaswani et al., 2017).

Here instead of $W^{O}\in\mathbb{R}^{h\cdot d_k\times d_{out}}$, it probably should say $W^{O}\in\mathbb{R}^{h\cdot d_v\times d_{out}}$

As the output is stacked V vectors of d_v dimensions.

Screenshots
If applicable, add screenshots to help explain your problem.
The screenshot from original paper:
Screenshot from 2022-12-25 01-31-38

Specifying the mask in Tutorial 6 (MHA)

Tutorial: -1 (6)

Describe the bug
This is more of a clarification question than a bug. First of all, thanks for the excellent tutorial documentation. It's been very clear overall.

The reason I'm reaching out is to ask if a little more explanation could be provided on how and where to insert and apply the key padding mask to the attention_weights. Specifically, I have a Tensor of the form [True True True False False] for every sequence in the batch ([Batch, SeqLen]), with False marking padding tokens.

However, scaled_dot_product shown below wants the mask to have the following dimensions: [Batch, Head, SeqLen, SeqLen]. To this end, I have simply expanded key padding mask in the row dimension (using, key_padding_mask.view(bsz, 1, 1, seqlen).expand(-1, num_heads, seqlen, -1)), yielding the following square [SeqLen, SeqLen] mask for a sequence:

[[True True True False False],
[True True True False False],
[True True True False False],
[True True True False False],
[True True True False False]]

I do this somewhere upstream, in the forward definition of TransformerPredictor. Next, the same mask is fed all the way down to scaled_dot_product where it is then used to mask out False tokens, rendering the attn_logits -9e15 where there used to be a False. However, in contrast to a previous attempt using length-normalized sequences, the model does not manage to learn. This makes me wonder whether the above implementation is not how it was meant to be designed. Am I missing anything important here?

def scaled_dot_product(q, k, v, mask=None):
d_k = q.size()[-1]
attn_logits = torch.matmul(q, k.transpose(-2, -1))
attn_logits = attn_logits / math.sqrt(d_k)
if mask is not None:
attn_logits = attn_logits.masked_fill(mask == 0, -9e15)
attention = F.softmax(attn_logits, dim=-1)
values = torch.matmul(attention, v)
return values, attention

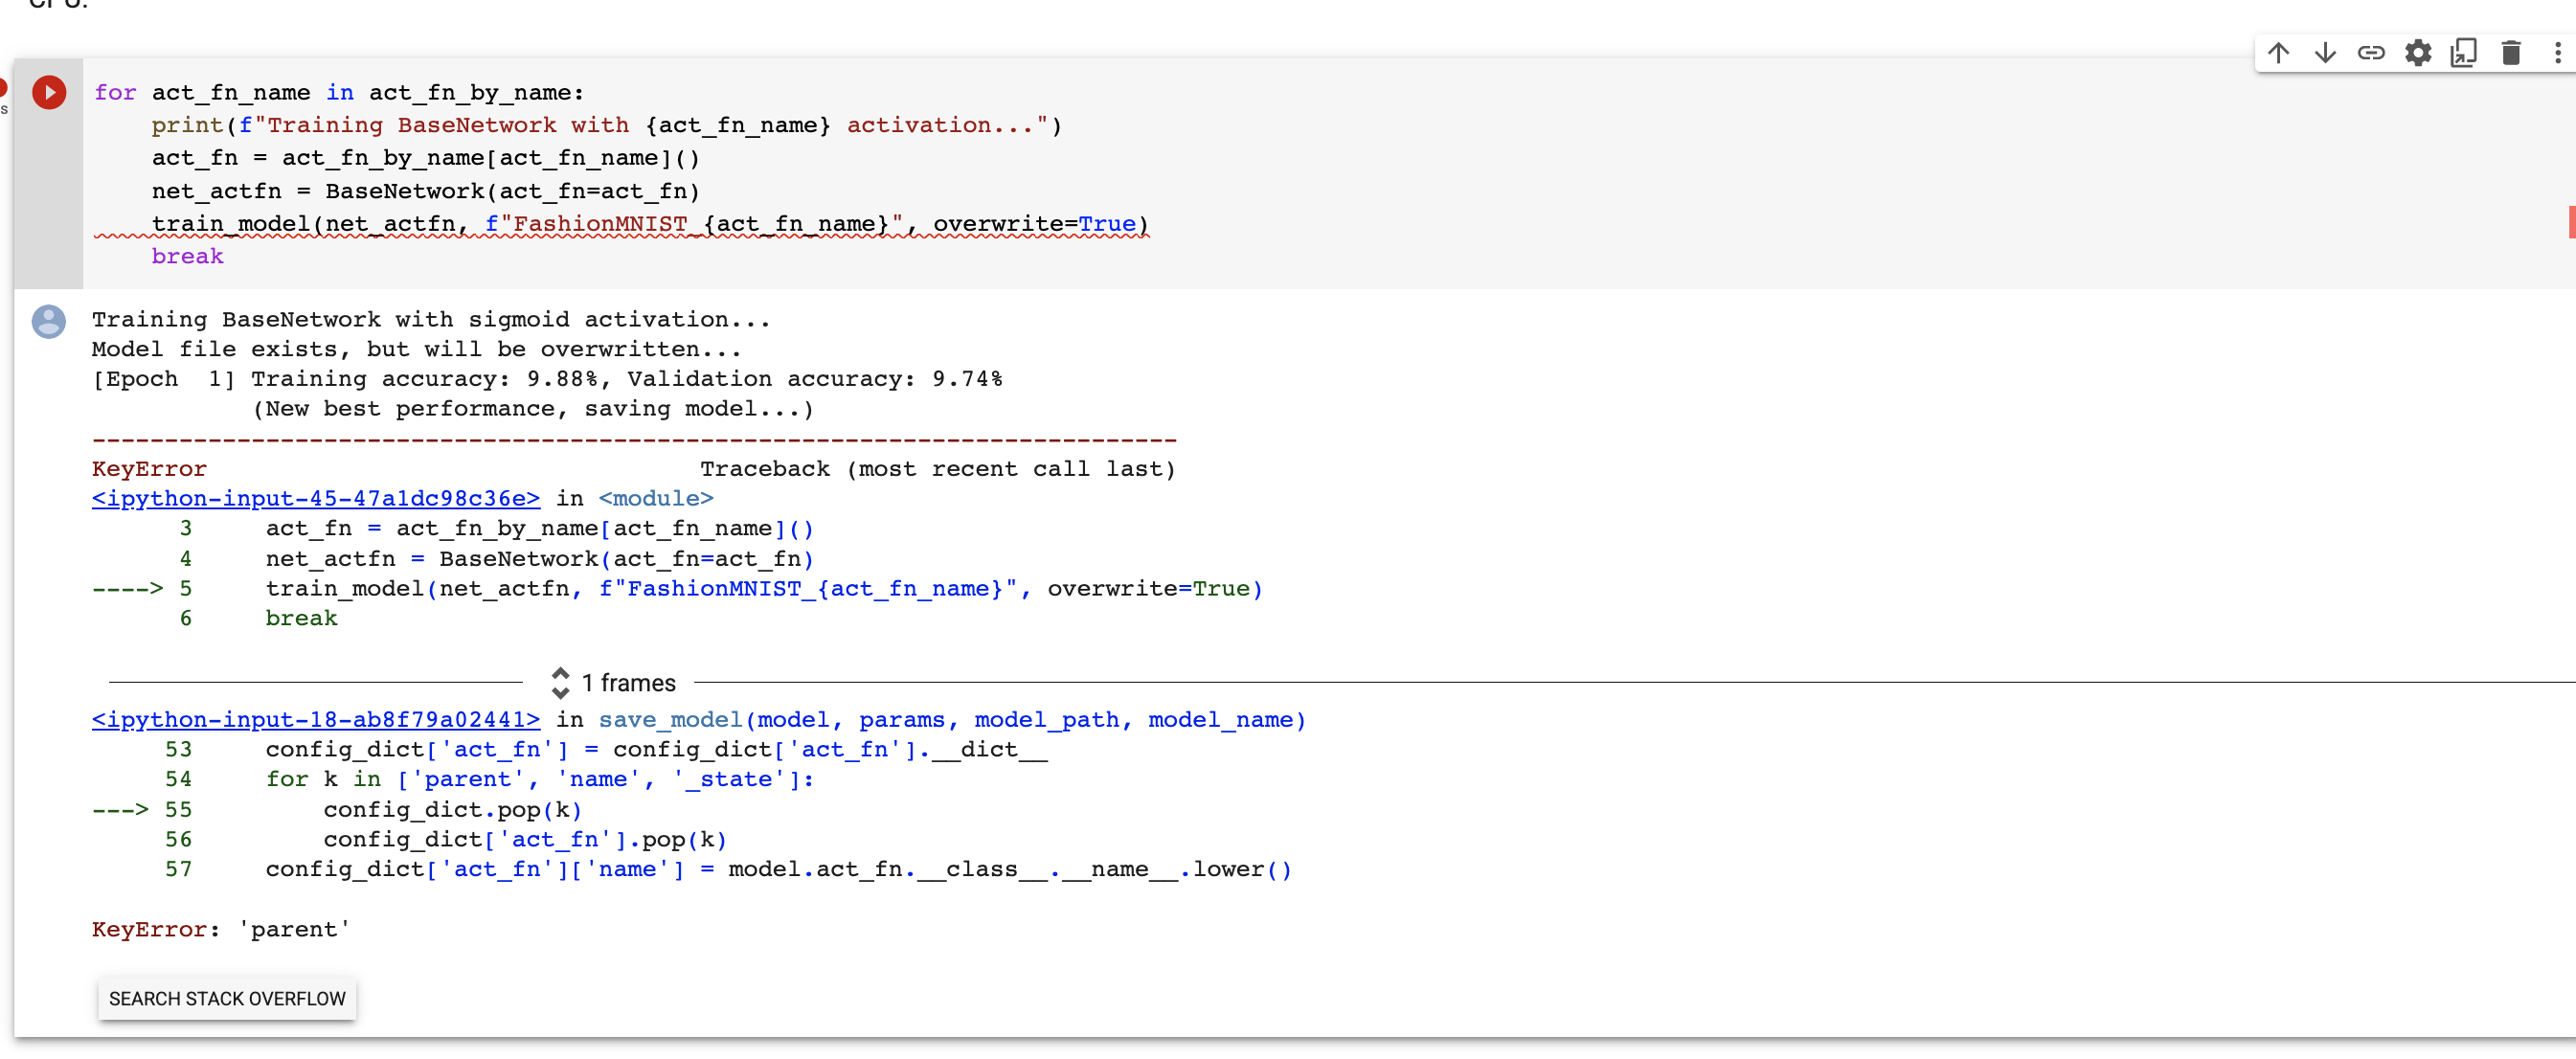
jax tutorial 3 (act fn): model saving code fails

Tutorial: -1 (Fill-in number of tutorial)

https://uvadlc-notebooks.readthedocs.io/en/latest/tutorial_notebooks/tutorial3/Activation_Functions.html#Training-a-model

Describe the bug
A clear and concise description of what the bug is.

This fails if you set overwrite=True ie force it to train and save , rather than use existing checkpoints.

for act_fn_name in act_fn_by_name:
    print(f"Training BaseNetwork with {act_fn_name} activation...")
    act_fn = act_fn_by_name[act_fn_name]()
    net_actfn = BaseNetwork(act_fn=act_fn)
    train_model(net_actfn, f"FashionMNIST_{act_fn_name}", overwrite=True)
    break

The error may be due to act_fn not having names...
This is the message

Training BaseNetwork with sigmoid activation...
Model file exists, but will be overwritten...
[Epoch  1] Training accuracy: 9.88%, Validation accuracy: 9.74%
	   (New best performance, saving model...)
---------------------------------------------------------------------------
KeyError                                  Traceback (most recent call last)
[<ipython-input-45-47a1dc98c36e>](https://localhost:8080/#) in <module>
      3     act_fn = act_fn_by_name[act_fn_name]()
      4     net_actfn = BaseNetwork(act_fn=act_fn)
----> 5     train_model(net_actfn, f"FashionMNIST_{act_fn_name}", overwrite=True)
      6     break

1 frames
[<ipython-input-18-ab8f79a02441>](https://localhost:8080/#) in save_model(model, params, model_path, model_name)
     53     config_dict['act_fn'] = config_dict['act_fn'].__dict__
     54     for k in ['parent', 'name', '_state']:
---> 55         config_dict.pop(k)
     56         config_dict['act_fn'].pop(k)
     57     config_dict['act_fn']['name'] = model.act_fn.__class__.__name__.lower()

KeyError: 'parent'

Colab

Screenshot 2023-03-17 at 4 59 18 PM

Tutorial 11 : Dequantization and quantization process

Thank you for your great tutorials!

I'm tring tutorial 11 and have 2 questions on the dequatization and the quantization process (codes in 6th - 8th cells).

  • You mentioned, between 7th and 8th cells, that the test fails because of numerical inaccuracy. Is it really correct?

I found 3 ldj updates for dequantization process and 2 for quantization process. I guess this means the quantization process is not theoritically invert of the dequantization process.
This is because scaling to prevent boundaries 0 and 1 for the dequantization process in sigmoid function in the 6th cell.

z = z * (1 - self.alpha) + 0.5 * self.alpha

I add codes in sigmoid function for quantization process:

ldj -= np.log(1 - self.alpha) * np.prod(z.shape[1:])
z = (z - 0.5 * self.alpha) / (1 - self.alpha)

With these code, the test succeeded.

Smaller values(z < self.alpha) can also be shifted to z = self.alpha, I guess.
This does not require ldj update.
And, of course, because the test fail is not serious and ldj update is very small, we can ignore this.

  • The figure, output of 8th cell, shows the probability distribution after dequantization. Is the figure is correct?

The area of -0.5 < z < 0.5 is larger than 1.5, I guess. It means all area is much larger than 1. And I found plotted "prob" array in 8th cell is [1, 1, ..., 1].
In the cell, prior array is assumed 1 for each value means uniform distribution.
So, the "plot" array should be normalized before muliplied by the "prob" array:

prob = prob * prior[out] / quants

Theoritically, the figure shows prob = e^{-z}/(1+e^{-z})^2.
The output of the modification looks like e^{-z}/(1+e^{-z})^2.

Thank you.

Tutorial 16: Few Shot Sampling Tasks Clarification

Hi!

Thank you very much for creating this great resource and making it publicly available. It is very helpful.

One thing is that for the few shot tasks, the classes should be distinct within a task. Looking at the code at class FewShotBatchSampler, I think the current sampler does not ensure that Currently, I think the classes selected within a task could be the same.

For e.g. say I have 10 classes (with 20,000 images/class) in the training set and I want to sample 5-way 4-shot training tasks. I think the current sampler may choose the same class multiple times within the same task. I think randomly selecting N_way classes from self.class_list may not be accurate. Maybe class_batch = self.class_list[it*self.N_way:(it+1)*self.N_way] # Select N classes for the batch could be changed to correct for this.

Please correct me if I've misunderstood something.
Thanks

Loss should be real - fake in Tutorial 8

Tutorial: 8

Describe the bug
The loss function used in the implementation of 'DeepEnergyModel()' in tutorial 8 (cdiv_loss) does not match the loss described earlier in the algorithm. It should be: cdiv_loss = real_out.mean() - fake_out.mean(), not the other way around.

To Reproduce (if any steps necessary)
Steps to reproduce the behavior:

  1. Go to Tutorial 8
  2. Scroll down to Training Algorithm
  3. See error in Algorithm 2 vs code in cell 6.

Expected behavior
cdiv_loss = real_out.mean() - fake_out.mean()

How to predict a Single Image after Model is trained?

Hey,

Wonderful Repo!

I have trained a protoMAML network from scratch on food dateset. Model is trained.
SO now if I want to predict a single Image, so that to ask it falls into which category, there is no way described in the notebook to do that?

Can you please let me know how can I do that?
In short, I have trained on 81 classes of food and now I want to pass an Image and see how model gives confidence accuracy (TOP -5).

Please Help!

the content is perfect (a word is misspelled)

Thank all the authors. You did a good job and I like your job very much.
In week 8 energy model chapter, there is a sentence that
The fundamental idea of energy-based models is that you can turn any function that predicts values larger than zero into a probability distribution by dviding by its volume
I think that, dviding means dividing.

normalizing flows questions

Tutorial: -> 11

Describe the bug
I do not understand the values of ldj for the following code snippet @dequantization .
In the code below i have [numbered] some lines for ease of reference.

class Dequantization(nn.Module):
  def __init__(self, alpha=1e-5, quants=256):
      """
      Inputs:
          alpha - small constant that is used to scale the original input.
                  Prevents dealing with values very close to 0 and 1 when inverting the sigmoid
          quants - Number of possible discrete values (usually 256 for 8-bit image)
      """
      super().__init__()
      self.alpha = alpha
      self.quants = quants

  def forward(self, z, ldj, reverse=False):
      if not reverse:
          z, ldj = self.dequant(z, ldj)
          z, ldj = self.sigmoid(z, ldj, reverse=True)
      else:
          z, ldj = self.sigmoid(z, ldj, reverse=False)
          z = z * self.quants
          ldj += np.log(self.quants) * np.prod(z.shape[1:])
          z = torch.floor(z).clamp(min=0, max=self.quants-1).to(torch.int32)
      return z, ldj

  def sigmoid(self, z, ldj, reverse=False):
      # Applies an invertible sigmoid transformation
      if not reverse:
          ldj += (-z-2*F.softplus(-z)).sum(dim=[1,2,3]) --------- [5]
          z = torch.sigmoid(z)
          # Reversing scaling for numerical stability
          ldj -= np.log(1 - self.alpha) * np.prod(z.shape[1:])
          z = (z - 0.5 * self.alpha) / (1 - self.alpha)
      else:
          z = z * (1 - self.alpha) + 0.5 * self.alpha  # Scale to prevent boundaries 0 and 1
          ldj += np.log(1 - self.alpha) * np.prod(z.shape[1:])
          ldj += (-torch.log(z) - torch.log(1-z)).sum(dim=[1,2,3]) --------------- [4]
          z = torch.log(z) - torch.log(1-z)
      return z, ldj

  def dequant(self, z, ldj):
      # Transform discrete values to continuous volumes
      z = z.to(torch.float32)
      z = z + torch.rand_like(z).detach()
      z = z / self.quants
      ldj -= np.log(self.quants) * np.prod(z.shape[1:])
      return z, ldj

Let us start with the smallest function dequant :

    def dequant(self, z, ldj):
        # Transform discrete values to continuous volumes
        z = z.to(torch.float32)
        z = z + torch.rand_like(z).detach()  # ------ [1]
        z = z / self.quants # ---------- [2]
        ldj -= np.log(self.quants) * np.prod(z.shape[1:]) # ----------- [3]
        return z, ldj

First, line [1] is converting discrete z to continuous z by adding random uniform noise. We can do that because a few lines above we prove they are essentially the same distributions. ( p(x) == E(p(x+u)) if u~U(0,1] )
Second, the line [2] is dividing z by quants (self explanatory )
Third, the line [3] calculates log-det-jacobian (ldj). I think ldj will be simply log(1/quants) or -log(quants). What is prod(z.shape[1:]) doing over there? Then, why is it not present in lines [4] and [5]?

Tutorial 2 :

Tutorial: 2 (Introduction to PyTorch)

Describe the bug
The overlay rendered in cell [59] is incorrect. It works for the given XOR dataset. But if you change the dataset to OR or AND (which are not rotationally symmetric), it doesn't work anymore.

To Reproduce (if any steps necessary)
Steps to reproduce the behavior:

  1. Go to cell [41].
  2. Replace label = (data.sum(dim=1) == 1).to(torch.long) with label = (data.sum(dim=1) != 0).to(torch.long) (OR) or label = (data.sum(dim=1) == 2).to(torch.long) (AND).
  3. Execute all cells between [41] and [59]
  4. You'll find that the overlay generated in cell [59] does not reflect the active dataset correctly, even though accuracy is 100%.

Expected behavior
A clear and concise description of what you expected to happen.

Screenshots
If applicable, add screenshots to help explain your problem.

Runtime environment (please complete the following information):

  • Local computer or Google Colab?
  • Run on CPU only or GPU?

Additional context
Add any other context about the problem here.

Question regarding image transforms in SimCLR Tutorial

In Tutorial 17, SimCLR implementation; you've mentioned that you didn't use color distortion incase of train image transforms. Because it changes the color distribution which is an important feature for classification.
But you've used RandomGrayscale(p=0.2) in the train image transforms. Converting an RGB image to Grayscale image changes the color distribution right?

Also can you point to the resource which tells that color distribution is an important feature?

Tutorial 6: error in the `MultiheadAttention.forward` method

Tutorial: 6

Describe the bug
In the MultiheadAttention.forward method, the line:

        values = values.reshape(batch_size, seq_length, embed_dim)

should read:

        values = values.reshape(batch_size, seq_length, self.embed_dim)

The embed_dim should not come from the input tensor, i.e. instead of:

        batch_size, seq_length, embed_dim = x.size()

we should probably have something like:

        batch_size, seq_length, _ = x.size()

or

        batch_size, seq_length, input_dim = x.size()

To Reproduce (if any steps necessary)
Steps to reproduce the behavior:

  1. Go to the In [5]: cell, the one containing class MultiheadAttention(nn.Module):
  2. Run it
  3. Insert a cell under it
  4. Run the following:
batch_size = 3
seq_len = 11
input_dim = 13
num_heads = 19
embed_dim = 17 * num_heads

mha = MultiheadAttention(input_dim, embed_dim, num_heads)

input_tensor = torch.rand((batch_size, seq_len, input_dim))
values = mha(input_tensor)

values.shape

which yields the following error:

RuntimeError                              Traceback (most recent call last)
[<ipython-input-50-38c850c37259>](https://localhost:8080/#) in <module>
      8 
      9 input_tensor = torch.rand((batch_size, seq_len, input_dim))
---> 10 values = mha(input_tensor)
     11 
     12 values.shape

1 frames
[<ipython-input-49-45be71448f04>](https://localhost:8080/#) in forward(self, x, mask, return_attention)
     36         values = values.permute(0, 2, 1, 3) # [Batch, SeqLen, Head, Dims]
     37         # values = values.reshape(batch_size, seq_length, embed_dim)
---> 38         values = values.reshape(batch_size, seq_length, embed_dim)
     39         o = self.o_proj(values)
     40 

RuntimeError: shape '[3, 11, 13]' is invalid for input of size 10659

Expected behavior
After making the suggested change, the output is:

torch.Size([3, 11, 323])

which is what I was expecting to get.

Runtime environment (please complete the following information):
Google Colab, both CPU and GPU.

Tutorial 17: The loss will not change after a few epochs

Thank you for your great tutorial, I want to use your tutorial to make some modifications and apply it to my work, here I will need to use some Transforms from MONAI, but I found that the loss of the program will not change after a few epochs , is there any suggestion here?
Thanks in advance!

import warnings
warnings.filterwarnings("ignore", category=UserWarning)
import os, sys, glob
import torch
import torch.nn as nn
import torch.nn.functional as F
import torch.optim as optim
from pytorch_lightning.loggers import TensorBoardLogger
from pytorch_lightning import LightningModule, Trainer, seed_everything
from pytorch_lightning.callbacks import LearningRateMonitor, ModelCheckpoint
from monai.data import CacheDataset, ThreadDataLoader
from monai.transforms import (
    Compose,
    EnsureType,
    ToDevice,
    RandSpatialCropSamples,
)
from torchvision.models import resnet18
from torchvision.datasets import STL10
from torchvision import transforms

class ContrastiveTransformations(object):
    def __init__(self, base_transforms, n_views=2):
        self.base_transforms = base_transforms
        self.n_views = n_views
    def __call__(self, x):
        return [self.base_transforms(x) for i in range(self.n_views)]

class SimCLR(LightningModule):
    def __init__(self, hidden_dim, lr, temperature, weight_decay, batch_size, max_epochs=500):
        super().__init__()
        self.save_hyperparameters()
        assert self.hparams.temperature > 0.0, 'The temperature must be a positive float!'
        # Base model f(.)
        self.convnet = resnet18(pretrained=False, num_classes=4*hidden_dim)  # Output of last linear layer
        # The MLP for g(.) consists of Linear->ReLU->Linear
        self.convnet.fc = nn.Sequential(
            self.convnet.fc,  # Linear(ResNet output, 4*hidden_dim)
            nn.ReLU(inplace=True),
            nn.Linear(4*hidden_dim, hidden_dim)
        )

    def prepare_data(self):
        unlabeled_data = STL10(root='datasets', split='unlabeled', download=False,
                               transform=transforms.Compose([transforms.ToTensor()]))
        train_data_contrast = STL10(root='datasets', split='train', download=False,
                                    transform=transforms.Compose([transforms.ToTensor()]))
        train_files = list()
        test_files = list()
        for i,data in enumerate(unlabeled_data):
            if i >= 10000:
                break
            img, _ = data
            train_files.append(img)
        test_files = [img for img,_ in train_data_contrast]

        contrast_transforms = [
            EnsureType(),
            ToDevice(device='cuda:0'),
            RandSpatialCropSamples(roi_size=(50,50), num_samples=2, random_size=False, random_center=True),
            ]

        self.train_ds = CacheDataset(
            data=train_files, 
            transform=Compose(contrast_transforms),
            cache_rate=1.0,
            copy_cache=False,
            num_workers=4
        )

        self.test_ds = CacheDataset(
            data=test_files, 
            transform=Compose(contrast_transforms),
            cache_rate=1.0, 
            copy_cache=False,
            num_workers=4
        )

    def train_dataloader(self):
        return ThreadDataLoader(self.train_ds, 
                                num_workers=0, 
                                batch_size=self.hparams.batch_size, 
                                shuffle=True)

    def val_dataloader(self):
        return ThreadDataLoader(self.test_ds, 
                                num_workers=0, 
                                batch_size=self.hparams.batch_size,
                                shuffle=False)

    def configure_optimizers(self):
        optimizer = optim.AdamW(self.parameters(),
                                lr=self.hparams.lr,
                                weight_decay=self.hparams.weight_decay)
        lr_scheduler = optim.lr_scheduler.CosineAnnealingLR(optimizer,
                                                            T_max=self.hparams.max_epochs,
                                                            eta_min=self.hparams.lr/50)
        return [optimizer], [lr_scheduler]

    def info_nce_loss(self, batch, mode='train'):
        # imgs = torch.cat(batch['image'], dim=0)
        imgs = batch
        
        # Encode all images
        feats = self.convnet(imgs)
        
        # Calculate cosine similarity
        cos_sim = F.cosine_similarity(feats[:,None,:], feats[None,:,:], dim=-1)
        # Mask out cosine similarity to itself
        self_mask = torch.eye(cos_sim.shape[0], dtype=torch.bool, device=cos_sim.device)
        cos_sim.masked_fill_(self_mask, -9e15)
        # Find positive example -> batch_size//2 away from the original example
        pos_mask = self_mask.roll(shifts=cos_sim.shape[0]//2, dims=0)
        # InfoNCE loss
        cos_sim = cos_sim / self.hparams.temperature
        nll = -cos_sim[pos_mask] + torch.logsumexp(cos_sim, dim=-1)
        nll = nll.mean()

        # Logging loss
        self.log(mode+'_loss', nll)
        # Get ranking position of positive example
        comb_sim = torch.cat([cos_sim[pos_mask][:,None],  # First position positive example
                              cos_sim.masked_fill(pos_mask, -9e15)],
                              dim=-1)
        sim_argsort = comb_sim.argsort(dim=-1, descending=True).argmin(dim=-1)
        # Logging ranking metrics
        self.log(mode+'_acc_top1', (sim_argsort == 0).float().mean())
        self.log(mode+'_acc_top5', (sim_argsort < 5).float().mean())
        self.log(mode+'_acc_mean_pos', 1+sim_argsort.float().mean())

        return nll

    def training_step(self, batch, batch_idx):
        return self.info_nce_loss(batch, mode='train')

    def validation_step(self, batch, batch_idx):
        self.info_nce_loss(batch, mode='val')


if __name__ == '__main__':
    seed_everything(42)
    tb_logger = TensorBoardLogger(save_dir='logs', name='SimCLR')
    checkpoint_dir = os.path.join(tb_logger.save_dir, tb_logger.name, 'version_%d'%tb_logger.version,'checkpoints')
    max_epochs = 500
    trainer = Trainer(gpus=[0],
                      max_epochs=max_epochs,
                      logger=tb_logger,
                      enable_progress_bar=True,
                      enable_checkpointing=True,
                      num_sanity_val_steps=1,
                      callbacks=[ModelCheckpoint(save_weights_only=True,
                                                 save_top_k=5,
                                                 mode='max', 
                                                 monitor='val_acc_top5',
                                                 dirpath=checkpoint_dir,
                                                 filename='{epoch:04d}-{val_acc_top5:.2f}'),
                                 LearningRateMonitor('epoch')])

    net = SimCLR(
        batch_size=128,
        hidden_dim=128, 
        lr=5e-4, 
        temperature=0.07, 
        weight_decay=1e-4, 
        max_epochs=max_epochs)
    
    trainer.fit(net)

Not even using monai, just splitting the transforms of STL10 into two parts, resulting in no change in loss.

import warnings
warnings.filterwarnings("ignore", category=UserWarning)
import os, sys, glob
import torch
import torch.nn as nn
import torch.nn.functional as F
import torch.optim as optim
from pytorch_lightning.loggers import TensorBoardLogger
from pytorch_lightning import LightningModule, Trainer, seed_everything
from pytorch_lightning.callbacks import LearningRateMonitor, ModelCheckpoint
from torchvision.models import resnet18
from torchvision.datasets import STL10
from torchvision import transforms
from torch.utils.data import DataLoader

class ContrastiveTransformations(object):
    def __init__(self, base_transforms, n_views=2):
        self.base_transforms = base_transforms
        self.n_views = n_views
    def __call__(self, x):
        return [self.base_transforms(x) for i in range(self.n_views)]

class SimCLR(LightningModule):
    def __init__(self, hidden_dim, lr, temperature, weight_decay, batch_size, max_epochs=500):
        super().__init__()
        self.save_hyperparameters()
        assert self.hparams.temperature > 0.0, 'The temperature must be a positive float!'
        # Base model f(.)
        self.convnet = resnet18(pretrained=False, num_classes=4*hidden_dim)  # Output of last linear layer
        # The MLP for g(.) consists of Linear->ReLU->Linear
        self.convnet.fc = nn.Sequential(
            self.convnet.fc,  # Linear(ResNet output, 4*hidden_dim)
            nn.ReLU(inplace=True),
            nn.Linear(4*hidden_dim, hidden_dim)
        )

    def prepare_data(self):

        self.unlabeled_data = STL10(root='datasets', split='unlabeled', download=False,
                                    transform=transforms.Compose([transforms.ToTensor()]))
        self.train_data_contrast = STL10(root='datasets', split='train', download=False,
                                         transform=transforms.Compose([transforms.ToTensor()]))
        
        self.contrast_transforms = ContrastiveTransformations(base_transforms=transforms.Compose([
            transforms.Normalize((0.5,), (0.5,))
            ]))

    def train_dataloader(self):
        return DataLoader(self.unlabeled_data, batch_size=self.hparams.batch_size, shuffle=True,
                          drop_last=True, pin_memory=True, num_workers=4)

    def val_dataloader(self):
        return DataLoader(self.train_data_contrast, batch_size=self.hparams.batch_size, shuffle=False,
                          drop_last=False, pin_memory=True, num_workers=4)

    def configure_optimizers(self):
        optimizer = optim.AdamW(self.parameters(),
                                lr=self.hparams.lr,
                                weight_decay=self.hparams.weight_decay)
        lr_scheduler = optim.lr_scheduler.CosineAnnealingLR(optimizer,
                                                            T_max=self.hparams.max_epochs,
                                                            eta_min=self.hparams.lr/50)
        return [optimizer], [lr_scheduler]

    def info_nce_loss(self, batch, mode='train'):
        imgs, _ = batch

        _imgs = list()
        for i in imgs:
            img = self.contrast_transforms(i)
            _imgs.append(img[0].unsqueeze(0))
            _imgs.append(img[1].unsqueeze(0))
                
        imgs = torch.cat(_imgs, dim=0)

        # Encode all images
        feats = self.convnet(imgs)
        
        # Calculate cosine similarity
        cos_sim = F.cosine_similarity(feats[:,None,:], feats[None,:,:], dim=-1)
        # Mask out cosine similarity to itself
        self_mask = torch.eye(cos_sim.shape[0], dtype=torch.bool, device=cos_sim.device)
        cos_sim.masked_fill_(self_mask, -9e15)
        # Find positive example -> batch_size//2 away from the original example
        pos_mask = self_mask.roll(shifts=cos_sim.shape[0]//2, dims=0)
        # InfoNCE loss
        cos_sim = cos_sim / self.hparams.temperature
        nll = -cos_sim[pos_mask] + torch.logsumexp(cos_sim, dim=-1)
        nll = nll.mean()

        # Logging loss
        self.log(mode+'_loss', nll)
        # Get ranking position of positive example
        comb_sim = torch.cat([cos_sim[pos_mask][:,None],  # First position positive example
                              cos_sim.masked_fill(pos_mask, -9e15)],
                              dim=-1)
        sim_argsort = comb_sim.argsort(dim=-1, descending=True).argmin(dim=-1)
        # Logging ranking metrics
        self.log(mode+'_acc_top1', (sim_argsort == 0).float().mean())
        self.log(mode+'_acc_top5', (sim_argsort < 5).float().mean())
        self.log(mode+'_acc_mean_pos', 1+sim_argsort.float().mean())

        return nll

    def training_step(self, batch, batch_idx):
        return self.info_nce_loss(batch, mode='train')

    def validation_step(self, batch, batch_idx):
        self.info_nce_loss(batch, mode='val')


if __name__ == '__main__':
    seed_everything(42)
    tb_logger = TensorBoardLogger(save_dir='logs', name='SimCLR')
    checkpoint_dir = os.path.join(tb_logger.save_dir, tb_logger.name, 'version_%d'%tb_logger.version,'checkpoints')
    max_epochs = 500
    trainer = Trainer(gpus=[0],
                      max_epochs=max_epochs,
                      logger=tb_logger,
                      enable_progress_bar=True,
                      enable_checkpointing=True,
                      num_sanity_val_steps=1,
                      callbacks=[ModelCheckpoint(save_weights_only=True,
                                                 save_top_k=5,
                                                 mode='max', 
                                                 monitor='val_acc_top5',
                                                 dirpath=checkpoint_dir,
                                                 filename='{epoch:04d}-{val_acc_top5:.2f}'),
                                 LearningRateMonitor('epoch')])

    net = SimCLR(
        batch_size=128,
        hidden_dim=128, 
        lr=5e-4, 
        temperature=0.07, 
        weight_decay=1e-4, 
        max_epochs=max_epochs)
    
    trainer.fit(net)

Typo

Tutorial 6:

Next, we will look at how to apply the multi-head attention blog inside the Transformer architecture.

Do you mean block?

__init__() got an unexpected keyword argument 'progress_bar_refresh_rate'

Could you please help with this line of code. I tried pip install progress_bar but it did not work.
results = {}
for num_imgs_per_label in [10, 20, 50, 100, 200, 500]:
sub_train_set = get_smaller_dataset(train_feats_simclr, num_imgs_per_label)
_, small_set_results = train_logreg(batch_size=64,
train_feats_data=sub_train_set,
test_feats_data=test_feats_simclr,
model_suffix=num_imgs_per_label,
feature_dim=train_feats_simclr.tensors[0].shape[1],
num_classes=10,
lr=1e-3,
weight_decay=1e-3)
results[num_imgs_per_label] = small_set_results
Thanks and regards.

Train vs Test dataset reconstructions for Autoencoder

In the Tutorial 9 when comparing latent dimensionality, the plots show reconstruction results on the train dataset. If the model overfits (for example, if someone decides to make the model bigger) train image reconstruction quality might become misleading. I recommend using test dataset images for that experiment.

Regarding QKV in vision transformer

Tutorial: -15

Hi

In this tutorial tutorial 15 for vision transformer in pytorch

I observed query, key and value being same in the attention block.
x = x + self.attn(inp_x, inp_x, inp_x)[0]

In tutorial 6 , the query, key and value are recieved from a projection.
qkv = self.qkv_proj(x)

In another vision transformer implementation https://towardsdatascience.com/implementing-visualttransformer-in-pytorch-184f9f16f632 the queries, values and keys are received from a projection.

I tried to find the source code of pytorch function multiheadattention. It seems like projection for query value and key is not applied in definition as input tensor is same for query, key and value.

I wanted to know if I should manually project the input embedding to query, key and value them before forward passing to attention.

Thanks

Typo in JAX tutorial 2

Tutorial: 2 (JAX)

Describe the bug
There's a missing word in the jaxpr section on line 536: "The jaxpr representation is not BLANK, but rather an intermediate compilation stage of JAX."

jax tutorial 4 (init/opt): fails to init model on GPU

Tutorial: -1 (Fill-in number of tutorial)

https://uvadlc-notebooks.readthedocs.io/en/latest/tutorial_notebooks/JAX/tutorial4/Optimization_and_Initialization.html#Constant-initialization

Describe the bug
A clear and concise description of what the bug is.

This line fails

model, params = init_simple_model(get_const_init_func(c=0.005))

producing

--------------------------------------------------------------------------
XlaRuntimeError                           Traceback (most recent call last)
[<ipython-input-14-eb8cfd8e667a>](https://localhost:8080/#) in <module>
      7 
      8 #model, params = init_simple_model(get_const_init_func(c=0.005))
----> 9 model, params = init_simple_model(nn.linear.default_kernel_init)
     10 visualize_gradients(model, params)
     11 visualize_activations(model, params, print_variance=True)

24 frames
[<ipython-input-10-072d6886ae7a>](https://localhost:8080/#) in init_simple_model(kernel_init, act_fn)
      2     model = BaseNetwork(act_fn=act_fn,
      3                         kernel_init=kernel_init)
----> 4     params = model.init(random.PRNGKey(42), exmp_imgs)
      5     return model, params

[/usr/local/lib/python3.9/dist-packages/jax/_src/random.py](https://localhost:8080/#) in PRNGKey(seed)
    134     raise TypeError("PRNGKey accepts a scalar seed, but was given an array of"
    135                     f"shape {np.shape(seed)} != (). Use jax.vmap for batching")
--> 136   key = prng.seed_with_impl(impl, seed)
    137   return _return_prng_keys(True, key)

...

[/usr/local/lib/python3.9/dist-packages/jax/_src/dispatch.py](https://localhost:8080/#) in backend_compile(backend, built_c, options, host_callbacks)
   1034   # TODO(sharadmv): remove this fallback when all backends allow `compile`
   1035   # to take in `host_callbacks`
-> 1036   return backend.compile(built_c, compile_options=options)
   1037 
   1038 _ir_dump_counter = itertools.count()

XlaRuntimeError: INTERNAL: RET_CHECK failure (external/org_tensorflow/tensorflow/compiler/xla/service/gpu/gpu_compiler.cc:641) dnn != nullptr

The problem also would occur in https://uvadlc-notebooks.readthedocs.io/en/latest/tutorial_notebooks/JAX/tutorial3/Activation_Functions.html
if the training was actually triggered, since it is the same model and data.

To Reproduce (if any steps necessary)

To try to isolate the problem, I created this minimal colab.
This just tries to initialize the network using a batch of MNIST images.
It works on CPU but not GPU.

Recommend Projects

  • React photo React

    A declarative, efficient, and flexible JavaScript library for building user interfaces.

  • Vue.js photo Vue.js

    ๐Ÿ–– Vue.js is a progressive, incrementally-adoptable JavaScript framework for building UI on the web.

  • Typescript photo Typescript

    TypeScript is a superset of JavaScript that compiles to clean JavaScript output.

  • TensorFlow photo TensorFlow

    An Open Source Machine Learning Framework for Everyone

  • Django photo Django

    The Web framework for perfectionists with deadlines.

  • D3 photo D3

    Bring data to life with SVG, Canvas and HTML. ๐Ÿ“Š๐Ÿ“ˆ๐ŸŽ‰

Recommend Topics

  • javascript

    JavaScript (JS) is a lightweight interpreted programming language with first-class functions.

  • web

    Some thing interesting about web. New door for the world.

  • server

    A server is a program made to process requests and deliver data to clients.

  • Machine learning

    Machine learning is a way of modeling and interpreting data that allows a piece of software to respond intelligently.

  • Game

    Some thing interesting about game, make everyone happy.

Recommend Org

  • Facebook photo Facebook

    We are working to build community through open source technology. NB: members must have two-factor auth.

  • Microsoft photo Microsoft

    Open source projects and samples from Microsoft.

  • Google photo Google

    Google โค๏ธ Open Source for everyone.

  • D3 photo D3

    Data-Driven Documents codes.