A Netatmo Weather Station Web-APP for Raspberry Pi & official Raspberry touchscreen.
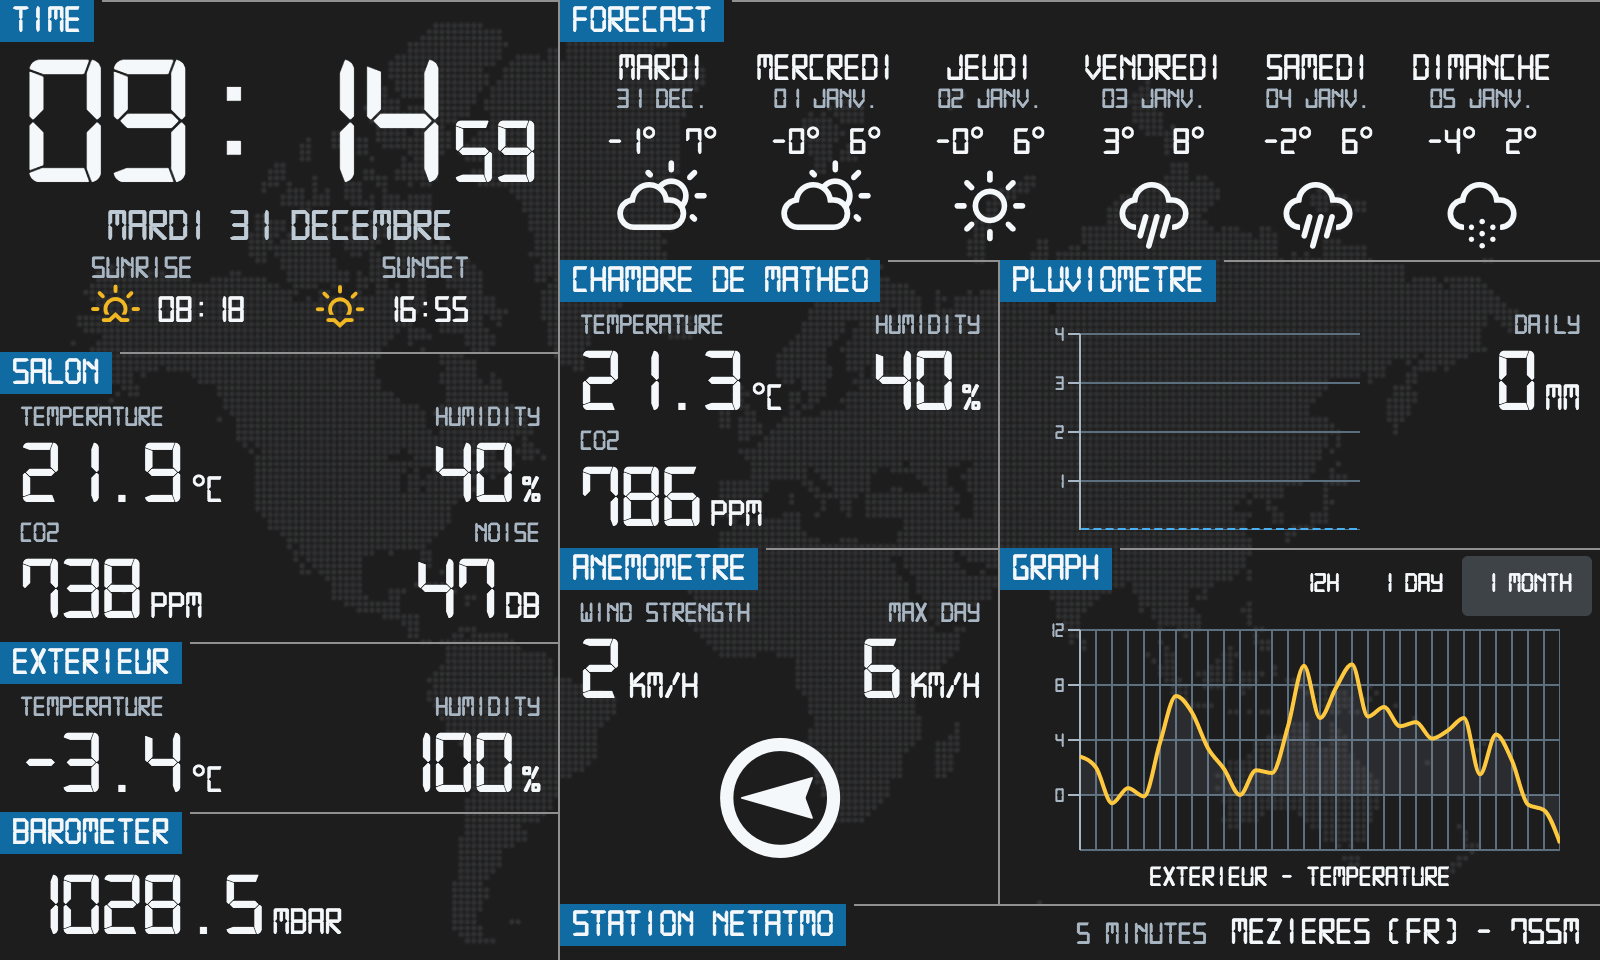
For my Netatmo Weather Station I was looking for a display information to have a quick look of the measures done by the station. I looked at the WEB to find something but finally did not find what I was really looking for. Then, I decided to use one of my Pi to develop a small touch application and finally share a part of my work.
This is a rewrite of a first version of my APP which included Netatmo API, Google Calendar API, Swiss Weather forecast API and WebcamTravel API. For this public release I removed Google Calendar API, WebcamTraval API and change Swiss Weather API by Dark Sky API. The first proposal can be found in the Netatmo forum
This project is a Web APP write in Javascript / Typescript with ReactJS, Redux for the frontend and ExpressJS for the backend.
The main focus of this app is :
- Must works well with a Raspberry Pi 3
- Optimized for a official Raspberry Pi touch monitor 7" (800x480)
- Design to use 5 Netatmo modules (MAIN, OUTDOOR, INDOOR, RAIN and WIND)
First you will need to have NodeJS and yarn installed in your main computer and then follow the next steps.
- Clone the repo
- Install yarn dependencies packages (Becareful, if you use a Debian based distributions yarn is usually to old in the official repository, install yarn via npm.
npm install -g yarnwill always the last version and fix the issue) - Create a new .env file with API keys
- Build and run the DEV server
git clone https://github.com/Gulivertx/cbatmo.git
cd cbatmo
yarnCopy the file .env.dist to .env in the root project folder. Edit the new file and fill your Netatmo information and OpenWeather information.
If you do not have these, you have to create new credentials to Netatmo developer and
OpenWeather. All are free.
To build the app and start the DEV server just use the command yarn run watch.
The DEV server will only start if in the file .env the variable APP_ENV is set to dev.
If everything works fine you should be able to reach the application from your favorite browser http://localhost:3000. To have the correct display size you must change your browser to handle a resolution of 800x480. In Chrome you have to open the chrome-dev-tools, set the display to responsive and choose a resolution of 800x480.
Now your can start to modify any files, webpack will rebuild automatically your changes, just refresh the web-browser to see you changes. Enjoy !!!
If the repo is not already cloned do th same steps as development.
git clone https://github.com/Gulivertx/cbatmo.git
cd cbatmo
yarnCopy the file .env.dist to .env if it is not already created and edit it by filling your Netatmo information and Dark Sky information.
Change the first variable APP_ENV=dev to APP_ENV=prod.
DEPRECATED, this is still working but do a build that is not necessary anymore when you never build the app yourself
If you work from a MacOS or Linux OS you can use the script deploy.sh to auto build, auto deploy CBatmo to your Raspberry. To use this script you
need to configure your Raspberry Pi. Just be sure that the followings things are configured correctly in your Raspberry:
- SSH server running
- sudo configured and allow the user to run commands without any password
Edit the file rpi/cbatmo.service and change the WorkingDirectory where cbatmo will be installed (should by /user/YOUR_USERNAME/cbatmo).
In a Raspbian it should by /user/pi/cbatmo, in an ArchLinux it should be /user/alarm/cbatmo. Now modifiy the user and group of your
Raspberry user. For the Raspbian use pi as user and group. For Archlinux use alarm as user and group.
Now run the script :
cd rpi
./deploy.sh
Follow the steps asked by the script and at the end you should have a working instance of CBatmo deployed to your Raspberry and running.
From your computer web-browser try to reach your Raspberry Pi by filling the ip address with port 3000 of your raspberry ex.: http://10.0.0.10:3000.
For Windows user there is no deploy script, then you have to follow these steps.
Be sure to set the variable APP_ENV to prod in the .env file. Then build the app:
yarn run buildAt the end of the build process you will find new files in public folder and a new index.ejs in the folder views.
Edit the file rpi/cbatmo.service and change the WorkingDirectory where cbatmo will be installed (should by /user/YOUR_USERNAME/cbatmo).
In a Raspbian it should by /user/pi/cbatmo, in an ArchLinux it should be /user/alarm/cbatmo. Now modifiy the user and group of your
Raspberry user. For the Raspbian use pi as user and group. For Archlinux use alarm as user and group.
The best way to transfer the app to your Raspberry is to create an archive. Create for instance a ZIP file with 7Zip call cbatmo.zip and add the following contents inside:
- public
- rpi
- views
- .env
- package.json
- server.js
- yarn.lock
Do not add the node_modules folder !!. Clients, logs, and screenshots is not necessary to run the app on your Pi.
To transfer the archive, you can just copy and paste it with an USB key, or if your are comfortable with ssh/sftp just use it. Uncompress the archive in the Pi, you must be logged to your Pi inside a console or thru SSH:
cd WHERE_CBATMO.ZIP_IS
unzip cbatmo.zip
cd cbatmo
yarn install --production
sudo cp rpi/cbatmo.service /etc/systemd/system/
sudo systemctl enable cbatmo.service
sudo systemctl restart cbatmo.service
This steps install server dependencies, create a new cbatmo Systemd init script, launch this init script which will start automatically the web server in the Raspberry boot.
To verify if the server is running you can run this command systemctl status cbatmo.service. You must a get a result like this:
* cbatmo.service - CBatmo WEB server
     Loaded: loaded (/etc/systemd/system/cbatmo.service; enabled; vendor preset: disabled)
     Active: active (running) since Mon 2019-12-30 09:52:10 CET; 2s ago
   Main PID: 357 (node)
      Tasks: 18 (limit: 1150)
     Memory: 32.9M
     CGroup: /system.slice/cbatmo.service
             |-357 node /usr/bin/yarn start
             `-369 /usr/bin/node server.js

Dec 30 09:52:10 picbatmo systemd[1]: Started CBatmo WEB server.
Dec 30 09:52:11 picbatmo CBatmo[357]: yarn run v1.21.1
Dec 30 09:52:11 picbatmo CBatmo[357]: $ node server.js
Dec 30 09:52:12 picbatmo CBatmo[369]: Server running on http://localhost:3000 as production
From your computer web-browser try to reach your Raspberry Pi by filling the ip address with port 3000 of your raspberry ex.: http://10.0.0.10:3000.


