Garden Irrigation Controller base on ESP-8266
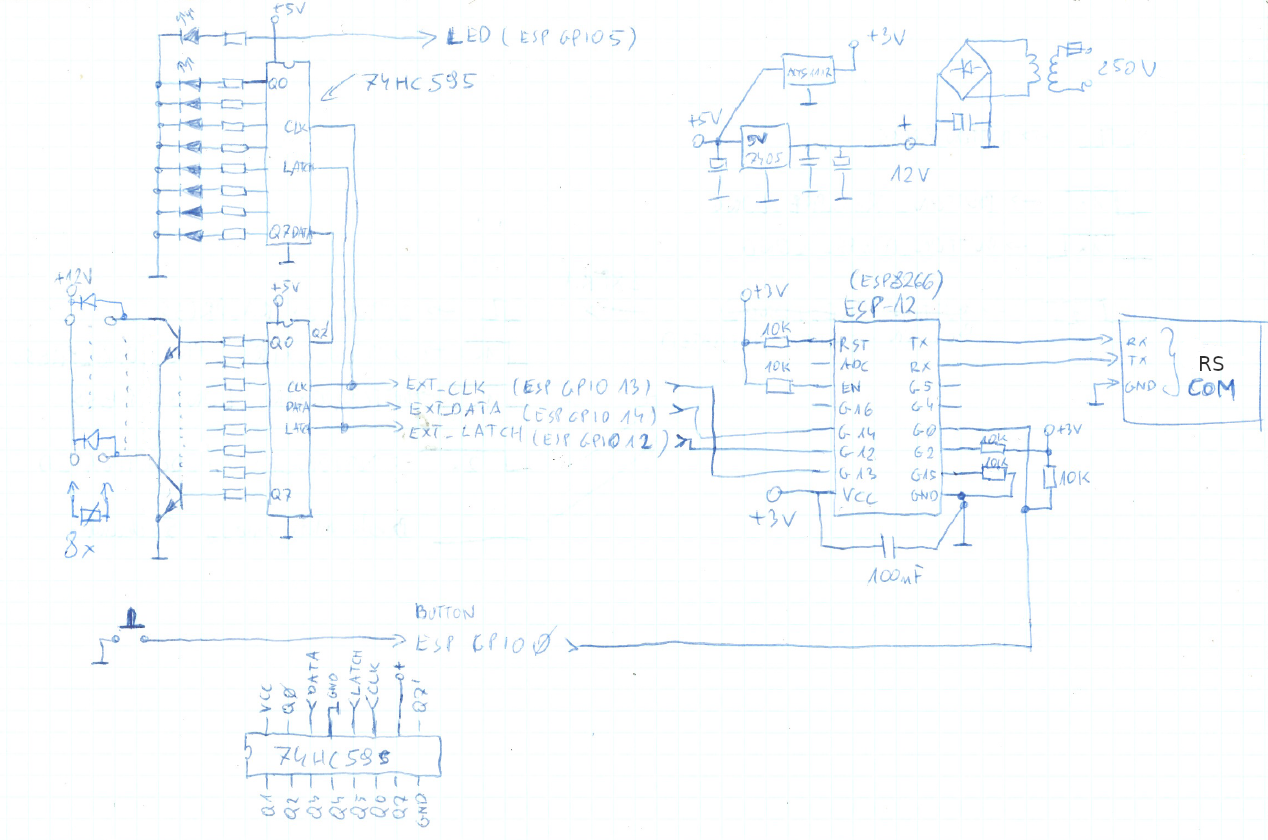
This project was created for my private garden. Base on ESP8266 module and two simple ttl switch registers 74HC595 for extend output ports. Device has 8 channels output, with 8 green leds for indicates witch channel is active, and one led for weather indicator. As input is only one button with long press detect. You can select which channel will be active by pressing, or by long press you can active automation irrigation.
- REST api
- all custom configs are store in EEPROM
- Wheater forecast integration
- Collecting 24h average rainfall
- Set how long time channel have to be active, enable and dissable channel, set time to active (24h notation), and how many times all channels will be activated (loops)
- NTP (Network Time Protocol) integration
- Siply manual interface
- SID and password for your network can be set only in config file
- There is no authentication for REST api (you need to be in the same network)
- configuration of rain treshold (in mm) that device deactive irrigarion and config of api wheather (like api key and city) can be set only in config file
- you need read IP address from RS port, or figureout this yourself (form you router or any network scanning tools like nmap)
-
http://{IP}/api?ch=0&val=1 - take on specific channel 0 (and take off any others).
-
http://{IP}/api?command=startAuto - activate irrication process (the same as timer do)
-
http://{IP}/api?command=activate - activated the timer (for set specyfic time like 20:30 for example)
-
http://{IP}/api?command=deactivate - deactived the timer (no automation run)
-
http://{IP}/api?command=click - the same as button click on case
-
http://{IP}/api?command=off - stop all channels and processes
-
http://{IP}/state - at the moment it is not finish yet.
-
http://{IP}/api?command=config&arg=a,b,c,d,ch0,ch1,ch2,ch3,ch4,ch5,ch6,ch7
all numbers should be 0 to 255 (one byte)
a - channel active mask (decimal number)
b - how many times loop have to be run (one loop is ch0 ... ch7). Can't be zero.
c - houers
d - minutes
c:d - it is the time as timer run irrigation process (in 24h notation).
ch0 - ch7 - time in 10 x seconds to run channel active. For example 60 meand 600 seconds = 10 minutes.
http://192.168.1.170/api?command=config&arg=31,2,22,30,60,60,60,60,150,150,150,150
- 31,- mask 31 -> 0x1F : channel 7,6,5 is dissabled
- 2,- after activated it will take two times, means: ch0 ch1 ch2 ch3 ch4 ch0 ch1 ch2 ch3 ch4 and stop
- 22,30 - it means irrigation will run at 22:30 (10:30p.m.)
- ,60,60,60,60, - channels 0 to 3 will run for 10 minutes
- 150,150,150,150 - and channels 4 to 7 will run for 25 minutes
This version was built for 12V DC electrovalves. Most garden installation are design for 24V AC electrovalve, and in this case you need use 12V DC relays for control electrovalve, or develop new solution.
(sorry about schematic, I don't have time to use CAD)
-
Setup your Arduino IDE. see https://randomnerdtutorials.com/esp32-http-get-open-weather-map-thingspeak-arduino/ section Prerequisites
-
get your API KEY and your location for weather forecast on https://openweathermap.org/ .
see instruction on https://randomnerdtutorials.com/esp32-http-get-open-weather-map-thingspeak-arduino/ section: "Using OpenWeatherMap API"
...after that modify WEATHER_GET define in configConst.h
-
set your WiFi SID and password in configConst.h
-
set your time GMT offset in seconds, see GMT_OFFSET const in configConst.h
