In that repository I'm collecting my notes and artifacts on testing on how to integrate a simple TIBCO BWCE integration application with the cloud based monitoring and profiling system provided by Data Dog.
For background information and considerations on integration appliahction observability please have a look at the article Do you have an Observability Strategy for your Integration Applications? on the blogging platform medium.com.
Idea of the tests was to prove the basic idea to add the Datadog instrumenation library DD-Agent to TIBCO BWCE application containers to enable the JVM monitoring on the DataDog platform.
Datadog is a provider for cloud based APM and observability services. Because of its ability to integrate many different products and platforms from on-premises to cloud hosted services it is used by large enterprises to manage their complex IT environments. For test purposes Datadog offers a free but limited test account. It is meant to be used by developers or operations people to test their applications with the integration to the central monitoring dashboarding solution.
Step 1: Register for a free test account.
Hint: After the first unrestricted trail, there is a limited free plan offered. The free plan was sufficient for my testing.
Datadog uses an agent approach to collect metrics and logs from monitored components. For APM we need to instruct the instrumentation to pass metrics to a DD-Agent which acts as proxy for passing collected data to the central infrastructure. The DD-Agent must be authenticated on the central infrastructure to tell it what account the details are belonging to.
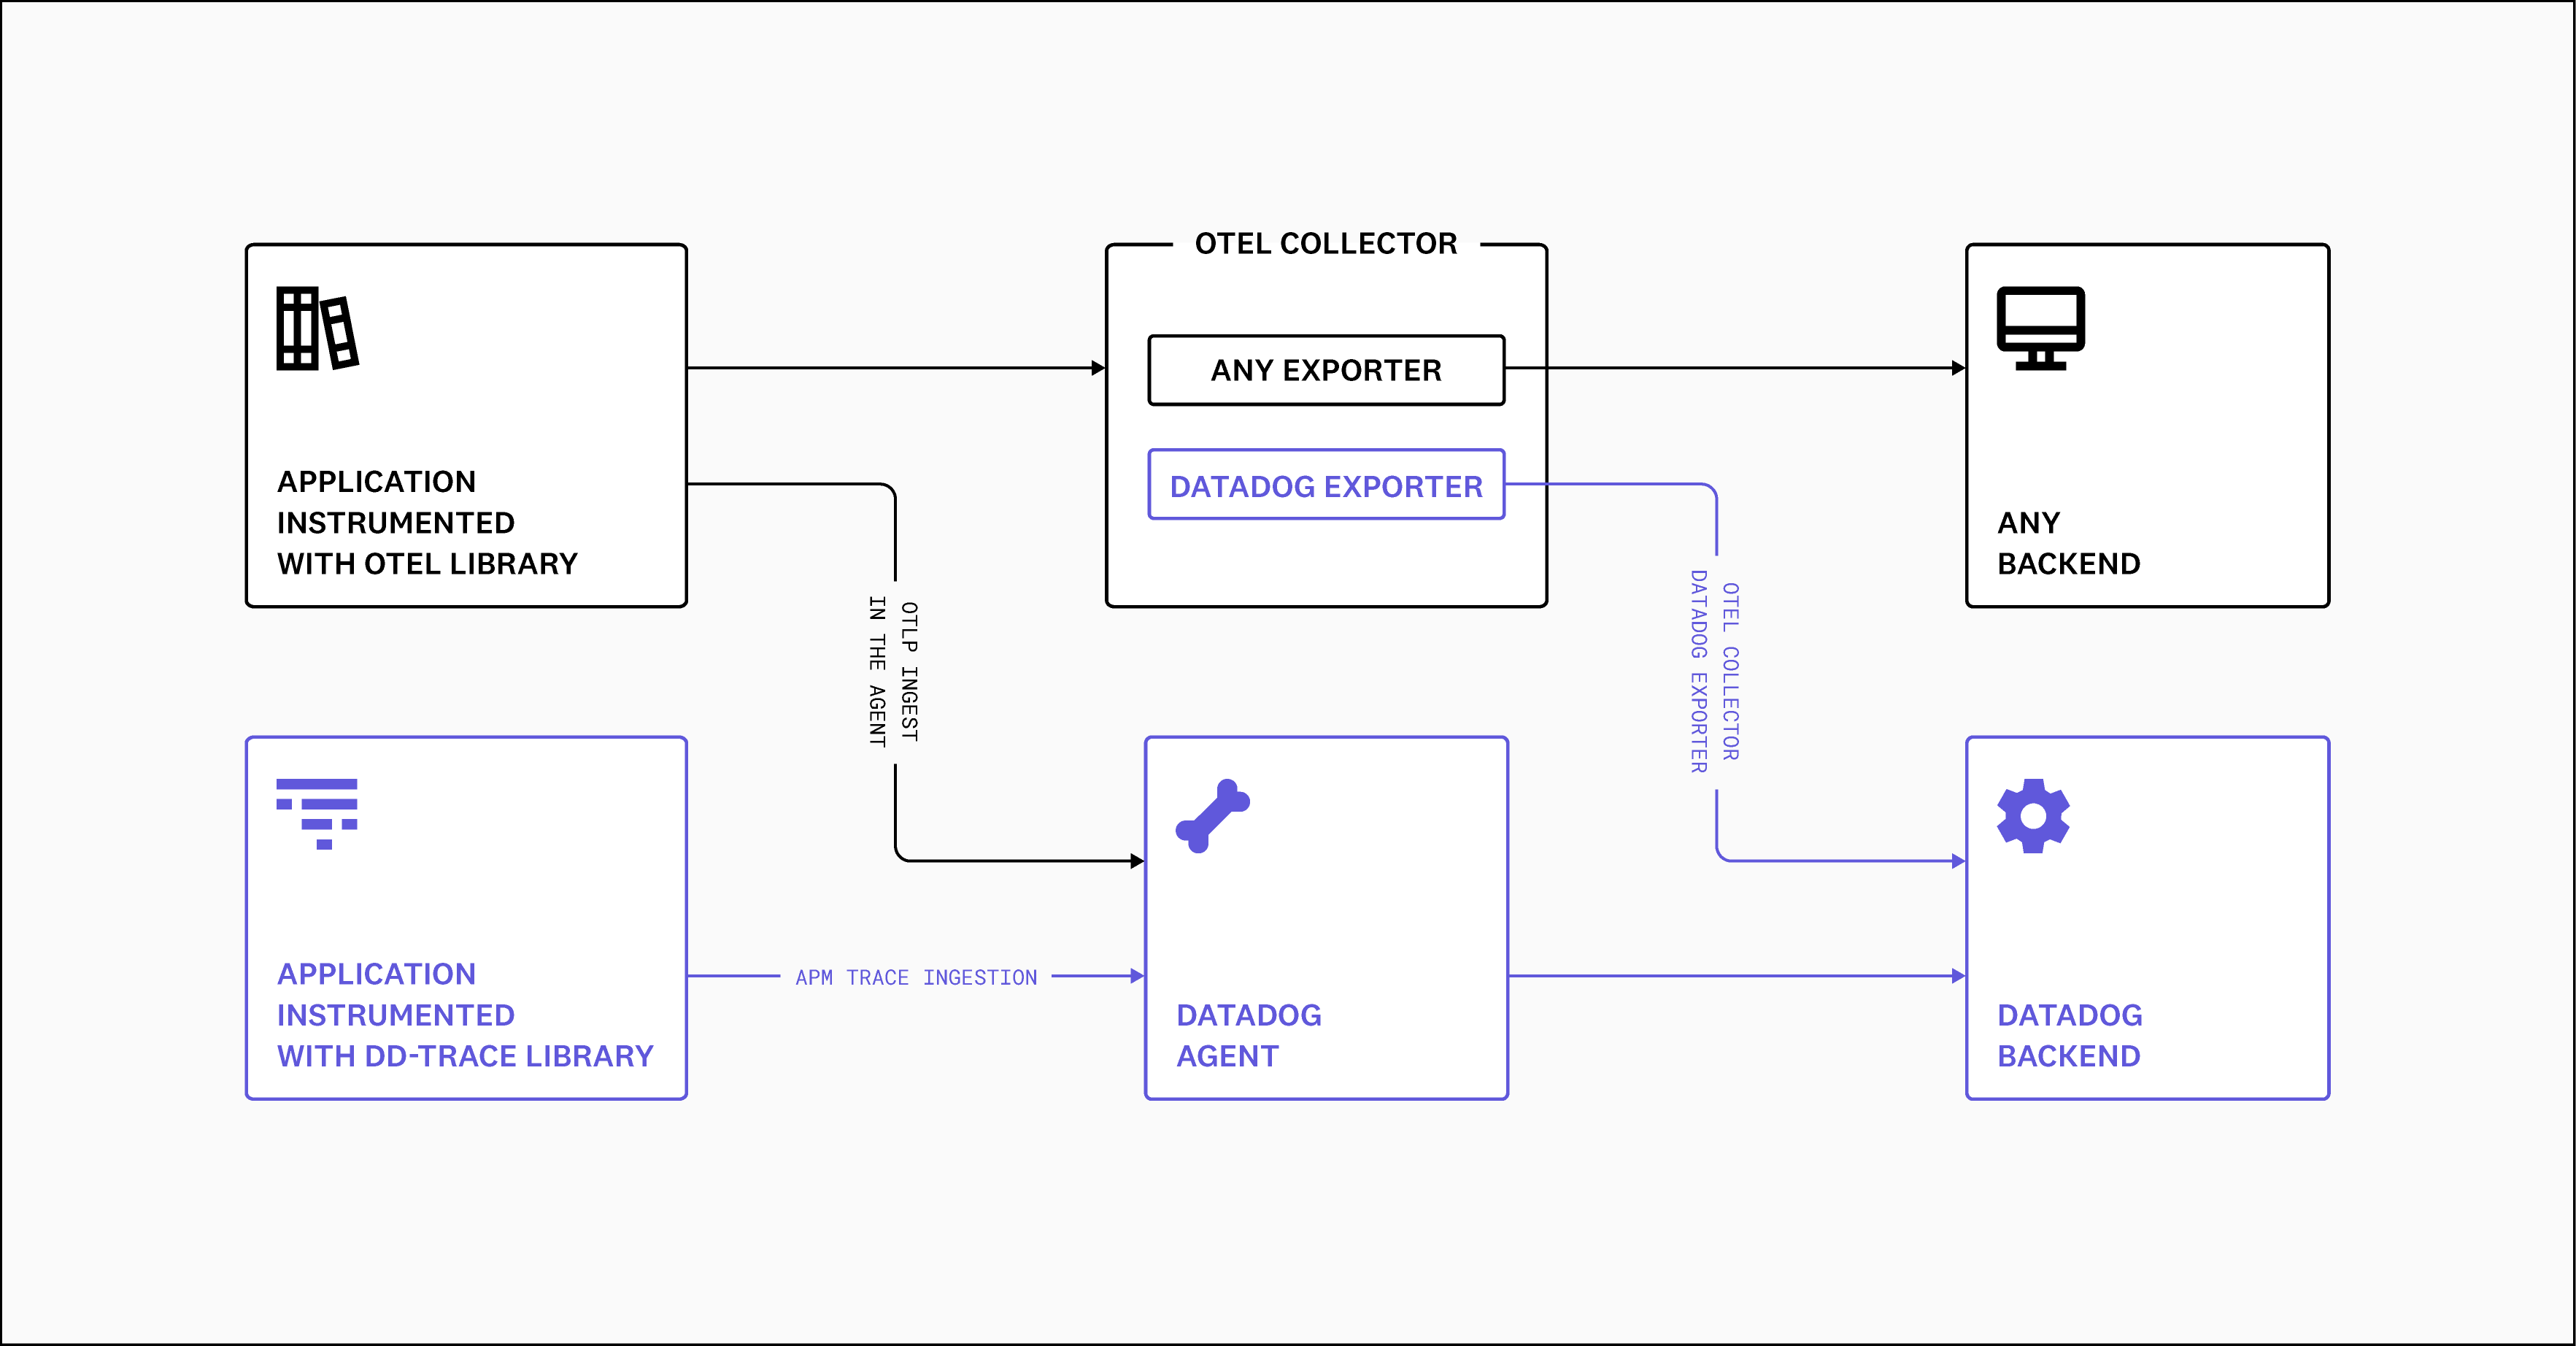
I was basically folowing the Datadog provided instructions Tracing Java Applications. The componentes needed for Datadog integration are shown on the DD overview for OpenTelemtry.
Step 2: Create an Datadog API access key for your test account: Datadog → Organization Settings → API Keys
Hint: Make sure you are using the right cloud region. For me its "EU1".
Step 3: Prepare configuration for DD-Agent
Create a config file with name dd-agent.conf:
# Datadog Account Details
DATADOG_API_KEY=<your-datadog-api-key>
DATADOG_SITE="datadoghq.eu"
Step 4: Starting DD-Agent as Docker container
The sample is starting DD agent with all its possibilities. It enables the agent to discover other containers running on the same docker deamon and enables OLTP as well as the proxy for APM monitoring of individual applications. That's OK for testing. You need to adopt it for you needs!
./startDatadogAgent.sh
# check the container status
docker ps -a
Login to the Datadog Web-UI and check the dashboards. It should show metrics collected by dd-agent running on your docker deamon. It will show details for all running containers.
The Datadog agent container can be stopped after test be executing ./stopDatadogAgent.sh.
Part of this repos is a small sample Java HTTP server application. Thanks to the original author on LOGICBIG Tutorials!
Step 5: Compile the application and build a docker image
I'm using a JVM application and want to instrument it to send metrics via my locally running DD-Agent container to the Datadog cloud. That means I need to package my Java application with the JVM and the DD intrsumentation library. This is what the Dockerfile includes.
We need to decide what docker base image we like to use and install a preferred JVM on it or we select a pre-built docker image that already provides the needed JVM. To keep it simple I have decided to use an OpenJDK 11 image for my sample. A quick search on DockerHub showed that the official OpenJDK images are discontinoued. A suitable replacement can be the Temurin images. I will use OpenJDK 11 as base imge: https://hub.docker.com/_/eclipse-temurin. It seems these images are widely used and do have a good reputation.
Some infos on Dockerfile: First I'm refereing to a base docker image that already includes a Java 11 runtime (eclipse-temurin:11). Next, I'm compiling and adding the Java sample application and pulling-in the Datadog Java library directly from the official Datadog resources via wget command. The last steps are just the definition of default values for some environment variables as well as telling Docker how the application must be started if a container is instantiated from this image. The environment variables are just for documentation and simple testing.
That application packaging makes sure the JVM within a container is always started with the Datadog instrumentation and the needed configuration options are passed to the JVM process to allow it to connect to the DD-Agent and emmit measures created from the instrumentation.
Adopt the environment variables on Makefile to match your environment and run the application:
make compile
make build
Step 6: Start an instance of the test application as container
make run
make clean
Now, send some test calls to produce metrics data for Datadog.
curl -X GET \
 -H "Accept: text/html,application/xhtml+xml,application/xml;" \
 --url http://localhost:8500/example?sample=test

# reply should be:
This is the response at /example?sample=test
The application std-out logs show the call details:
-- headers --
Accept=[text/html,application/xhtml+xml,application/xml;]
Host=[localhost:8500]
User-agent=[curl/7.68.0]
-- principle --
null
-- HTTP method --
GET
-- query --
sample=test
Step 7: Generating some "load" to see some statistics on Datadog
# Linux CLI (bash)
for i in {1..200}; \
do \
  curl -X GET \
    --header "Accept: text/html,application/xhtml+xml,application/xml;" \
    --header "X-Call-Counter: ${i}" \
	--url http://localhost:8500/example?sample=test; \
	echo ""; \
	sleep "0.$(( ${RANDOM} % 10 ))"; \
done
As we will run a JVM based application server that requires a lot of settings provided as Java system properties, application parameters as well as environment variables. The system properties are used to control the JVM behaviour for resource usage. One of the important settings is the Java heap size. Next are parameters that influence the application server inner workings and might also be used to tell an application on that platform about parameter values it should use at runtime. Those settings might be endpoints for 3rd party services or monitoring systems. Environment variables might also be used by an application to get its own parametrizations. For TIBCO BWCE there are other options how to provide application runtime settings. One of them is to point the application engine to a parameter file of key-value pairs: <file-name>.substvar. Those files are meant to be used for different (staging) environments.
For more details on TIBCO BusinessWorks Container Edition (BWCE) please consult the TIBCO product documentation.
The BWCE application build process for creating BWCE docker application images is a two step approach. The idea is to first create a BWCE base image. That image will include all needed artifacts: JVM, DD-Java-Library and optional BWCE Plugins as needed. The second build step uses another Dockerfile and adds the application as well as any customer enhancements (jar files) to form a runable BWCE integration application.

Step 8: Creating the BWCE base image
The artifacts needed for the demo application base image are located in folder bwce-base-image. This time the Dockerfile is referring to the TIBCO proposed base image debian:bullseye-slim. That is because the TIBCO BWCE runtime package comes with a suitable JRE packed with the BusinessWorks application server.
Unfortunately, the product does not support adding instrumentation libraries. This option was not considered by the engineering team. JVM instrumentation libraries need to be loaded first if a Java process is starting. Therefore, the JVM is expecting those libraries via a special syntax. Here the sequence is defiened and therefore important. As a consequence the JVM process start must be changed to fit our needs for adding a the DD-Java library.
Two enhancements were made to tweak the BWCE images:
- As the JVM is not directly started, but bunch of scripts are executed first to arrange anything for the BW engine to have a dedicated BW AppNode, one of the scripts will be enhanced to add the needed change. - file: dd-patch-bwappnode.sh
- Dockerfile for the base image was enhanced to copy a patch into the image - a shell script that will manipulate the JVM startup call to include the DD-Java library.
The BWCE startup script call sequence is:
/scripts/start.sh
--+-> /scripts/setup.sh   <=== copy all BW node files, unpack configs and substvar files etc.
  |  - must be enhanced for dd-intstrumentation
  |  - several config parameters to connect to dd-agent on another container
  |  - XX:...
  |  - D....
  |  (patch 1: runn the patch 2 right after BWCE installation on a new container)
  |
  +-+-> /tmp/tibco.home/bw*/*/bin/startBWAppNode.sh
    |   /tmp/tibco.home/bwce/2.7/bin/startBWAppNode.sh
    |
    +--> /tmp/tibco.home/bw*/*/bin/bwappnode
	 /tmp/tibco.home/bwce/2.7/bin/bwappnode
	 (apply patch 2 for adding DD config parameters and adopt the JVM start for adding an instrumentaion lib)
         Line 33: startup of the JVM for BW App Node   <== here we need to add the instrumentation for Datadog
Remark: Options on how to tweak the BWCE base image include:
- option 1) downloading the DD-Java library before building the base image to have it later available building the base image
- option 2) downloading the DD-Java library during docker image build process (requires internet connection from build server)
- option 3) unpack the BWCE runtime archive; add the DD-Java library; edit the start script; create a new BWCE runntime archive
Now the base image must be built:
cd ./bwce-base-image
docker build -t tibco/bwce-dd:latest .
# verification
docker image ls tibco/bwce:latest
Step 9: Creating a BWCE application image
Now the BW Application must be bundled into a docker image to be able to run a BWCE application. So we need a sample BWCE application. A simple Hello World REST application was created. From Business Studio for BusinessWorks, the BW/BWCE IDE, the application was exported as EAR file.
The artifacts are available at directory ./bwce-sample-app/SimpleServerDemo_1.0.0.ear.
To create a Docker image another Dockerfile is required. This time it is simply referin to the created BWCE base image and adds the application EAR file.
Building the application image:
cd ./bwce-sample-app
docker build -t simple-bwserver-demo:latest .
# verification
docker image ls simple-bwserver-demo:latest
Step 10: Starting a BWCE application instance
All is prepared now. An application instance can be started as container now. Our prepared appliaction and its runtime components need some configuration parameters to operate:
- JVM - DD-Java Libaray ← OK, solved by the patch
- DD-Java Lib: several environment variables are expected for configuration of the instrumentation and the DD-Agent to pass the metrics and/or logs to ← OK, environment variables can be passed at container startup
- BW application server engine: parameters expected as Java properties in the format
-Dpromerty=value← OK, the BWCE startup script is expecting those as one environment variableBW_JAVA_OPTS - BW Integration application parameters: The BW engine supports several ways how to provide parameter values to an BW application. The configfile.substvar files are used for taht purpose. ← OK: In context of containers it could be a preferred way to pass parameters as environement variables es well and refer to the variable names on the application configuration as references
#OS-ENV-VARIABLE-NAME#. The BW engine will resolve those entries with the actual OS variable values provided to the container. (see parameter APP_PARAM_HELLO_NAME below)
Starting a BWCE application as Docker container:
docker run --rm -ti \
  -p 8088:8088/tcp \
  -e APP_NAME_ON_DD=simple-bwserver-demo2 \
  -e APP_VERSION_ON_DD=1.1.b \
  -e APP_ENV_ON_DD=pre-prod-test \
  -e DD_AGENT_URL="http://192.168.49.1:8126" \
  -e BW_PROFILE="docker" \
  -e APP_PARAM_HELLO_NAME="Tester" \
  --name bwservice \
  simple-bwserver-demo:latest
Calling the BW application (REST service) to create some metrics for Datadog:
curl -i http://localhost:8088/hello
As OpenTelemtry support is already built into BWCE support for OLTP only needs to be enabled on BW engine level. The Datadog Agent also comes with OLTP support. Therefore its just a matter of starting the container application accordingly.
Step 11: Starting a BWCE application instance with OpenTelemtry enabled
First start the DD-Agent with OLTP support startDatadogAgent.sh:
docker run -d \
 --name dd-agent \
 --rm \
 -v /var/run/docker.sock:/var/run/docker.sock:ro \
 -v /proc/:/host/proc/:ro \
 -v /opt/datadog-agent/run:/opt/datadog-agent/run:rw \
 -v /sys/fs/cgroup/:/host/sys/fs/cgroup:ro \
 -p 8125:8125/udp \
 -p 8126:8126/tcp \
 -p 4317:4317/tcp \
 -p 4318:4318/tcp \
 -e DD_API_KEY=${DATADOG_API_KEY} \
 -e DD_SITE=${DATADOG_SITE} \
 -e DD_LOGS_ENABLED=true \
 -e DD_LOGS_CONFIG_CONTAINER_COLLECT_ALL=true \
 -e DD_OTLP_CONFIG_RECEIVER_PROTOCOLS_HTTP_ENDPOINT=0.0.0.0:4318 \
 gcr.io/datadoghq/agent:7
Now run the BWCE application with pointing its OLTP exports to the DD-Agent.
docker run --rm -ti \
  -p 8088:8088/tcp \
  -e BW_ENGINE_THREADCOUNT=4 \
  -e BW_LOGLEVEL=WARN \
  -e BW_JAVA_OPTS="-Dbw.engine.opentelemetry.enable=true -Dbw.engine.opentelemetry.span.exporter.endpoint=http://192.168.49.1:4317" \
  -e APP_NAME_ON_DD=simple-bwserver-demo3 \
  -e APP_VERSION_ON_DD=1.1.b \
  -e APP_ENV_ON_DD=pre-prod-test \
  -e DD_AGENT_URL="http://192.168.49.111:8126" \
  -e OTEL_EXPORTER_OTLP_ENDPOINT="http://192.168.49.1:4318" \
  --name bwservice-ot \
  simple-bwserver-demo:latest
Hint: The same OpenTelemtry configuration can be used to integrate with Jaeger: open source, end-to-end distributed tracing for tracing the application. → Article: Jaeger Tracing: A Friendly Guide for Beginners
