Python package and Command Line Tool for state-of-the-art face detection and face landmark points localization. It gathers the techniques implemented in dlib and mtcnn, which can be easily switched between by setting a parameter in the FaceDetector class instantiation (dlib_5 is default if no technique is specified, use dlib_5 for dlib with 5 landmarks and dlib_68 for dlib with 68 landmarks).
First install C compiler: sudo apt-get install cmake, g++
Then this package: pip install face-detector
from face_detector import FaceDetector

img_addr = "path/to/image.[jpg/png/jpeg ...]"

# First parameter in FaceDetector constructor specifies face detection method (dlib: fl_5 or fl_68, mtcnn is default: mtcnn)
face_detector = FaceDetector()
faces = face_detector.get_faces(img_addr)

# Or to get the most prominent face in photo
main_face = face_detector.get_main_face(img_addr)

# Show image with bounding boxes and landmarks
import cv2
img = cv2.imread(img_addr)

for face in faces:
   bb = face.bounding_box
   landmarks = face.landmarks
   cv2.rectangle(img, (int(bb.x), int(bb.y)), (int(bb.x + bb.w), int(bb.y+bb.h)), (0, 255, 0), 1)
   for l in landmarks:
        cv2.circle(img, (l.x, l.y), 2, (0,0,255))

    cv2.imshow('img', img)
    cv2.waitKey(0)
    cv2.destroyAllWindows()
foo@bar:~$ facedetector /home/foo/images/Yasser_Arafat.jpgThe previous command will display the image passed in arguments with a bounding box wrapping every face in the image. Fig. 1 shows the image displayed.

Fig. 1 Face detections as outputted by facedetector command line tool
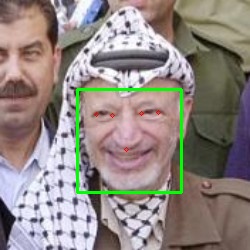
Fig. 2 Face detections and landmarks as outputted by facedetector with -l (--landmarks) and -j (--only-main-face) options
foo@bar:~$ facedetector /home/foo/images/Yasser_Arafat.jpg -j -o /tmp/output.jpg -lThe previous command adds -j, -l and -o options, which capture the main face in the photo, adds landmark points and output the image with bounding boxes to the specified path, respectivelly. It also display the image in Fig. 2.