Next.js project starter template for PT. Accelist Lentera Indonesia
-
Pure Next.js: Zero framework customization
-
TypeScript + ESLint configured: type-check and lint as you type!
-
Visual Studio Code breakpoint and debugging configured
-
Responsive dashboard with sidebar template
-
PageComponent Type: Supports variable layout -
The Twelve-Factor App principled: Multi-Stage Docker build
-
AppSettingsAPI: Supports Runtime Environment Variables for Kubernetes deployment -
Plug-and-play OpenID Connect integrations to standard providers (Such as Keycloak, IdentityServer, OpenIddict, FusionAuth, etc.)
-
API Gateway for proxying HTTP requests to back-end web API bypassing CORS
-
Automatic progress bar during page navigation
-
Convenient Fetch API wrapper and SWR Fetcher implementation
-
Enabled container builds on GitHub Action
-
Batteries included:
-
Enterprise-level React components by Ant Design
-
Thousands of utility classes powered by Tailwind CSS with
classNameIntelliSense in React components -
Simple atomic React state management using Jotai
-
Thousands of icons by FontAwesome 6
-
TypeScript object schema validation with Zod
-
Simple form validation with React Hook Form, designed to be integrated with Ant Design and Zod
-
-
Provide sane defaults for the most common security headers
Download The Template as Zip File
Unzip and rename the folder to your actual project name.
Run npm ci in the project root folder, then npm run dev
The web app should be accessible at http://localhost:3000
To display ESLint errors in Visual Studio Code, install the official ESLint extension by Microsoft.
To display Tailwind CSS IntelliSense in Visual Studio Code, install the official Tailwind CSS IntelliSense extension.
Place reusable React components in this folder.
It is recommended to develop using function components with hooks instead of class components.
Components should be styled with one of these techniques, sorted from the most recommended to the least recommended:
- Tailwind CSS utility classes in
classNameprop for best website performance.
// These websites provide Tailwind CSS components:
// https://tailwindui.com/all-access
// https://tailwind-elements.com
// https://flowbite.com

<button type="button" className="inline-block px-6 py-2.5 bg-blue-600 text-white font-medium text-xs leading-tight uppercase rounded shadow-md hover:bg-blue-700 hover:shadow-lg focus:bg-blue-700 focus:shadow-lg focus:outline-none focus:ring-0 active:bg-blue-800 active:shadow-lg transition duration-150 ease-in-out">Button</button>
💡 Tailwind CSS should be used to make reusable components. Projects should always strive to have many reusable React components, each using many Tailwind CSS base classes (easier to maintain), rather than having many global CSS classes which are used everywhere (harder to maintain). This concept is called Utility-First: https://tailwindcss.com/docs/utility-first
- Local CSS Modules specific to certain components or pages should be placed next to the corresponding
.tsxfiles instead (e.g.components/Button.module.cssnext tocomponents/Button.tsx). Tailwind CSS features such astheme(),screen(), and@applycan be used here.
CSS Modules should only be used to develop very small, reusable components ONLY when Tailwind CSS base classes cannot do the job. Avoid using CSS Modules to style most of the application components!! https://tailwindcss.com/docs/reusing-styles#avoiding-premature-abstraction
- Global Stylesheets: place plain
.cssfiles instylesfolder and import them fromglobals.cssto apply them to all pages and components.
⚠️ Due to the global nature of stylesheets, and to avoid conflicts, they may not be imported from pages / components.
Place reusable plain JS functions in this folder.
In Next.js, a page is a default-exported React Component from a .js, .jsx, .ts, or .tsx file in the pages directory. Each page is associated with a route based on its file name.
Example: If
pages/about.tsxis created, it will be accessible at/about.
Next.js supports pages with dynamic routes. For example, if a file is called pages/posts/[id].tsx, then it will be accessible at posts/1, posts/2, etc.
Read more about pages: https://nextjs.org/docs/basic-features/pages
Read more about dynamic routes: https://nextjs.org/docs/routing/dynamic-routes
Next.js uses the App component to initialize pages which can be overridden to allow:
-
Persisting layout between page changes
-
Keeping state when navigating pages
-
Inject additional data into pages
This template ships with _app.tsx file which implements some of the above-mentioned behaviors, including additional features:
-
Progress bar on navigation
-
OpenID Connect provider configuration
Read more about custom
App: https://nextjs.org/docs/advanced-features/custom-app
Next.js can serve static files, like images, under a folder called public in the root directory. Files inside public can then be referenced by your code starting from the base URL (/).
Read more about static files: https://nextjs.org/docs/basic-features/static-file-serving
Place type declarations in this folder. For example: interface or type or .d.ts files.
ESLint configuration file for TypeScript and Next.js (next/core-web-vitals including react and react-hooks ESLint plugins).
Read more about ESLint configuration: https://eslint.org/docs/user-guide/configuring/
| Rules | Documentation |
|---|---|
| TypeScript | https://www.npmjs.com/package/@typescript-eslint/eslint-plugin |
| React | https://www.npmjs.com/package/eslint-plugin-react |
| React Hooks | https://www.npmjs.com/package/eslint-plugin-react-hooks |
| Next.js | https://nextjs.org/docs/basic-features/eslint#eslint-plugin |
The package.json file is a manifest for the project. It is where npm store the names and versions for all the installed packages. The package.json shipped with the template describes the following (but not limited to) metadata:
-
privateif set totrueprevents the app to be accidentally published onnpm -
scriptsdefines a set of scripts runnable vianpm run -
dependenciessets a list of npm packages installed as runtime dependencies -
devDependenciessets a list of npm packages installed as development dependencies, which are not installed in Production environments.
Read more about
package.json: https://docs.npmjs.com/cli/v8/configuring-npm/package-json https://nodejs.dev/learn/the-package-json-guide
package-lock.json is automatically generated for any operations where npm modifies either the node_modules tree, or package.json. It describes the exact tree that was generated, such that subsequent installs can generate identical trees, regardless of intermediate dependency updates. This file is intended to be committed into source repositories.
Read more about
package.lock.json: https://docs.npmjs.com/cli/v8/configuring-npm/package-lock-json https://nodejs.dev/learn/the-package-lock-json-file
Restoring packages should be done using npm ci NOT npm install command to prevent accidentally modifying the package.json and package.lock.json
The presence of a tsconfig.json file in a directory indicates that the directory is the root of a TypeScript project. The tsconfig.json file specifies the root files and the compiler options required to compile the project.
The tsconfig.json shipped with the template has been fine-tuned for strict Next.js project type-checking.
List of all supported TypeScript compiler options: https://www.typescriptlang.org/tsconfig https://www.typescriptlang.org/docs/handbook/compiler-options.html
For custom advanced configuration of Next.js (such as webpack), next.config.js in the root of the project directory (next to package.json) can be modified.
next.config.js is a regular Node.js module and gets used by the Next.js server and build phases. It is not included in the browser build.
Read more: https://nextjs.org/docs/api-reference/next.config.js/introduction
Read more about custom webpack configuration: https://nextjs.org/docs/api-reference/next.config.js/custom-webpack-config
npm run buildnpx cross-env \
NODE_ENV='production' \
NEXTAUTH_URL='https://www.my-website.com' \
NEXTAUTH_SECRET='e01b7895a403fa7364061b2f01a650fc' \
BACKEND_API_HOST='https://demo.duendesoftware.com' \
OIDC_ISSUER='https://demo.duendesoftware.com' \
OIDC_CLIENT_ID='interactive.public.short' \
OIDC_SCOPE='openid profile email api offline_access' \
npm run startDO NOT FORGET to randomize
NEXTAUTH_SECRETvalue for Production Environment with https://generate-secret.vercel.app/32 oropenssl rand -base64 32
To use SSL Certificates, simply use reverse proxy such as NGINX or Traefik.
This template ships with Dockerfile and .dockerignore for building the app as a standard container image. To proceed, please install Docker or any OCI container CLI such as podman in your machine. (The examples given will use Docker)
To build the container image, use this command:
docker build -t my-app .Run this command on the same directory level as
Dockerfilefile.
Note that all
.envand.env.*files are listed as ignored files in.dockerignoreto prevent unwanted Environment Variables leaking to Production environment.
When running container locally, it is recommended to create a dedicated network for containers inside to connect to each other:
docker network create my-networkdocker run \
-e NEXTAUTH_URL="https://www.my-website.com" \
-e NEXTAUTH_SECRET="e01b7895a403fa7364061b2f01a650fc" \
-e BACKEND_API_HOST="https://demo.duendesoftware.com" \
-e OIDC_ISSUER="https://demo.duendesoftware.com" \
-e OIDC_CLIENT_ID="interactive.public.short" \
-e OIDC_SCOPE="openid profile email api offline_access" \
-p 80:80 \
--network my-network \
--restart always \
--name my-container \
-d my-appDO NOT FORGET to randomize
NEXTAUTH_SECRETvalue for Production Environment with https://generate-secret.vercel.app/32 oropenssl rand -base64 32
Next.js allows using process.env to read Environment Variables, but it is not suitable for container-based deployment because the Environment Variables are burned during build-time (non-changeable).
This technique does not adhere to The Twelve-Factor App methodology: a release is defined as a combination of a build (i.e. Container) + a config (i.e. Environment Variables).
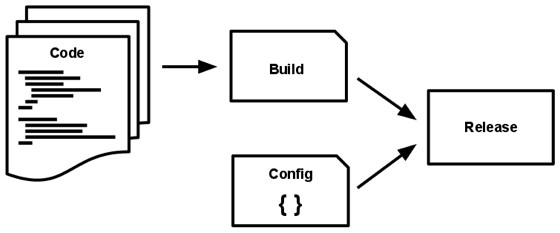
For this reason, Runtime Configuration is recommended to be used instead.
This project template ships AppSettings API as a high-level abstraction of the runtime Environment Variables:
Environment Variables --> appsettings.js --> next.config.js --> AppSettings
The values of Environment Variables are sourced differently depending on how the app is being run:
- Development environment using
npm run dev: values will be obtained from.envfiles such as.env.developmentor.env.local
Read more about Environment Variables Load Order: https://nextjs.org/docs/basic-features/environment-variables#environment-variable-load-order
- Production environment using container (build with
Dockerfileand.dockerignorein this template): values will be obtained from Machine Environment Variables supplied via-eor--envflag.
Read more about Environment Variables in Docker: https://docs.docker.com/engine/reference/commandline/run/#set-environment-variables--e---env---env-file
module.exports = {
    backendApiHost: process.env['BACKEND_API_HOST'] ?? '',
    oidcIssuer: process.env['OIDC_ISSUER'] ?? '',
    oidcClientId: process.env['OIDC_CLIENT_ID'] ?? '',
    oidcScope: process.env['OIDC_SCOPE'] ?? '',
};
The Environment Variables added in appsettings.js will be added to the serverRuntimeConfig field in next.config.js file and are only available on the server-side code. (in getServerSideProps or in API routes)
Read more for explanation about this behavior: https://www.saltycrane.com/blog/2021/04/buildtime-vs-runtime-environment-variables-nextjs-docker/
Import the AppSettings object from getServerSideProps to read registered Environment Variables and pass it down to the page as props. For example:
import { AppSettings } from '../functions/AppSettings';

const MyPage: Page<{
    myEnv: string
}> = ({ myEnv }) => {
    return (
        <div>
            <p>
                {myEnv}
            </p>
        </div>
    );
}

export default MyPage;

export async function getServerSideProps() {
    return {
        props: {
            myEnv: AppSettings.current.myEnv
        },
    }
}
⚠️ Doing this will expose the environment variable to the browser / end-user. Exercise caution.
💡 Sensitive environment variables should only be used as part of a Web API, either in the back-end project (e.g. ASP.NET Core) or in the Next.js API Routes.
The Page interface shipped with this project template extends the standard React.FunctionComponent interface, with an additional static property named layout. The layout property allows attaching a render function which returns the layout for a specific page.
The below example illustrates how to develop a layout function and attach it to a page:
// components/MyLayout.tsx

import React from "react";

const MyLayout: React.FC = ({ children }) => {
    return (
        <React.Fragment>
            <main>
                {children}
            </main>
        </React.Fragment>
    );
}

// This layout pattern enables state persistence because the React component tree is maintained between page transitions.
// With the component tree, React can understand which elements have changed to preserve state.
export const WithMyLayout = (page: React.ReactElement) => <MyLayout>{page}</MyLayout>;
// pages/MyPage.tsx
import { Page } from '../types/Page';
import { WithMyLayout } from '../components/MyLayout';
const MyPage: Page = () => {
return (
<div>
<h1>Hello World!</h1>
</div>
);
}
MyPage.layout = WithMyLayout;
export default MyPage;Read more about Per-Page Layouts: https://nextjs.org/docs/basic-features/layouts#per-page-layouts
This template ships with a lightweight, sane-but-opinionated wrapper around Fetch API which integrates with RFC 7807 Problem Details.
const {
    fetchGET,
    fetchPOST,
    fetchPUT,
    fetchPATCH,
    fetchDELETE
} = useFetchWithAccessToken();

const { data, error, problem } = await fetchGET<ProductListItem[]>('http://my-app.test/api/v1/products');

const { data, error, problem } = await fetchPOST<CreateProductResponse>('http://my-app.test/api/v1/products', {
    name: 'Software X'
});

// tryFetchJson is a lower-level fetch wrapper used by above functions
const { data, error, problem } = await tryFetchJson<CityListItem[]>('http://my-app.test/api/v1/cities', {
    method: 'GET',
    headers: {
        ...DefaultApiRequestHeader,
    },
});
⚠️ useFetchWithAccessTokenis a hook and it can ONLY be called from the top-level code block of React function components. https://reactjs.org/docs/hooks-rules.html#only-call-hooks-at-the-top-level
The wrapper serializes HTTP request body (second parameter of POST / PUT / PATCH methods) as JSON and expects strictly JSON response from the Web API.
When response.ok (status in the range 200–299), data will have the data type passed to the generic of the Fetch API.
When not response.ok,
-
problemmay contain an object describing a RFC 7807 Problem Details based on ASP.NET CoreValidationProblemDetailsclass. -
When that is not the case,
problemcan be a generic JSON object (values accessible via index syntax:problem['someData']) or simply astringif the response body is not JSON (useif (typeof problem === 'object')to check).
Unlike Fetch API, these wrappers will not throw. If an unhandled exception has occurred when performing the HTTP request, error will contain the caught exception.
The functions returned from useFetchWithAccessToken use these default HTTP request headers:
{
    'Content-Type': 'application/json',
    'Cache-Control': 'no-cache',
    'Pragma': 'no-cache',
    'Expires': '0',
}
When the function is called inside the <Authorize> component context, it will automatically append Authorization: Bearer ACCESS_TOKEN header into the HTTP request.
💡 Contrary to the function name, it is safe to use
useFetchWithAccessTokenoutside<Authorize>component context.
If advanced solution is required, such as sending non-JSON or FormData request bodies or accepting non-JSON responses, the above Fetch API wrappers cannot be used. (Use the base Fetch API or XMLHttpRequest instead)
// Example: PUT File to AWS S3 presigned URL
var xhr = new XMLHttpRequest();
xhr.open('PUT', presignedUrl, true);
xhr.setRequestHeader('Content-Type', file.type);
xhr.onload = () => {
    if (xhr.status === 200) {
        // success
    } else {
        // problem
    }
};
xhr.onerror = () => {
    // error
};
xhr.upload.onprogress = (e) => {
    if (e.lengthComputable) {
        var percent = Math.round((e.loaded / e.total) * 100)
        // Update UI progress bar here
        // Use lodash.throttle to control state change frequency
        // https://lodash.com/docs/4.17.15#throttle
        // For example: const updateProgressBar = useCallback(throttle(setProgressBar, 300), []);
    }
};
// `file` is a File object
// https://developer.mozilla.org/en-US/docs/Web/API/File
xhr.send(file);This template ships with a default SWR Fetcher implementation based on above Fetch API wrapper.
const swrFetcher = useSwrFetcherWithAccessToken();
const { data, error } = useSWR('/api/be/api/Values', swrFetcher);
⚠️ useSwrFetcherWithAccessTokenanduseSWRare hooks and they can ONLY be called from the top-level code block of function components. https://reactjs.org/docs/hooks-rules.html#only-call-hooks-at-the-top-level
💡 Contrary to the function name, it is safe to use
useSwrFetcherWithAccessTokenoutside<Authorize>component context.
HTTP requests initiated from a browser are restricted to the same domain (Same-Origin Policy) and the same protocol (HTTPS requests must be performed from web pages with HTTPS URL).
For example,
https://front-end.appaccessinghttp://back-end.app/api/datawill fail by default.
To ease development against microservices, this template ships an implementation of API Gateway which allows bypassing Same-Origin Policy by proxying HTTP requests through the Next.js server. The API Gateway is implemented using API Routes for Next.js.
The content
/pages/api/be/[...apiGateway].tsfile:
import Proxy from 'http-proxy';
import type { NextApiRequest, NextApiResponse } from 'next';
import { AppSettings } from '../../../functions/AppSettings';

// Great way to avoid using CORS and making API calls from HTTPS pages to back-end HTTP servers
// Recommendation for projects in Kubernetes cluster: set target to Service DNS name instead of public DNS name
const server = Proxy.createProxyServer({
    target: AppSettings.current.backendApiHost,
    // changeOrigin to support name-based virtual hosting
    changeOrigin: true,
    xfwd: true,
    // https://github.com/http-party/node-http-proxy#proxying-websockets
    ws: false,
});

server.on('proxyReq', (proxyReq, req) => {
    // Proxy requests from /api/be/... to http://my-web-api.com/...
    const urlRewrite = req.url?.replace(new RegExp('^/api/be'), '');
    if (urlRewrite) {
        proxyReq.path = urlRewrite;
    } else {
        proxyReq.path = '/';
    }
    proxyReq.removeHeader('cookie');
    // console.log(JSON.stringify(proxyReq.getHeaders(), null, 4));
    console.log('HTTP Proxy:', req.url, '-->', AppSettings.current.backendApiHost + urlRewrite);
});

const apiGateway = async (req: NextApiRequest, res: NextApiResponse) => {
    const startTime = new Date().getTime();

    server.web(req, res, {}, (err) => {
        if (err instanceof Error) {
            throw err;
        }

        throw new Error(`Failed to proxy request: '${req.url}'`);
    });

    res.on('finish', () => {
        const endTime = new Date().getTime();
        console.log(`HTTP Proxy: Finished ${res.req.url} in ${endTime - startTime}ms `);
    })
}

export default apiGateway;

export const config = {
    api: {
        externalResolver: true,
        bodyParser: false
    },
}
The above implementation allows forwarding from the Next.js API Route to the actual back-end API URL. For example: /api/be/api/Values is forwarded to the http://back-end/api/Values
// Fetch data from http://back-end/api/Values
const { data, error } = useSWR('/api/be/api/Values', swrFetcher);
For clarity, it is recommended to create separate API Routes for different back-end microservices. (e.g. /api/employees, /api/products, etc.)
When deployed in Kubernetes, the target host can be declared as a valid RFC 1035 label name instead of a public DNS to enable managing microservices using Kubernetes CoreDNS.
For example, if the target host name is my-service, then the back-end web API can be declared as a ClusterIP or LoadBalancer Service with the same name and is reachable from the Next.js API Gateway via http://my-service:
apiVersion: v1
kind: Service
metadata:
  name: my-service
spec:
  selector:
    app: DemoBackEndWebApi
  ports:
    - protocol: TCP
port: 80TODO
TODO
TODO
TODO
This template ships with Visual Studio Code step debugging support. Simply press F5 to start debugging.
When only client-side debugging is required, ensure npm run dev is already running and choose the Next.js: Debug Client-Side launch configuration. Breakpoint can now be placed in source code lines which run in the browser-side.
When server-side debugging is required, ensure npm run dev is NOT running and choose the Next.js: Debug Full-Stack launch configuration. Breakpoint can now be placed in source code lines which runs in the server-side, in addition to the browser-side.
The debug configuration can be selected from the Run & Debug Sidebar (CTRL + SHIFT + D)
The debugging experience is set to use the new Chromium-based Microsoft Edge by default (which should be installed by default in newer Windows 10 and Windows 11). If this is not desirable, feel free to modify the .vscode/launch.json file.
To enrich the React development experience, install the official React Developer Tools extension in the browser used for debugging.
This project template ships with GitHub Action workflow for Docker Images enabled. Example: https://github.com/accelist/nextjs-starter/actions
When a commit is pushed or a merge request is performed against the master or main branch, a container image will be built. If a commit is pushed, then the container image will also be pushed into the GitHub Container Registry of the project as master or main tag.
Upon tagging a commit (if using GitHub web, go to Releases page then draft a new release) with version number string such as v1.0.0 (notice the mandatory v prefix), a new container image will be built and tagged as the version number (in this example, resulting in 1.0.0 image tag, notice the lack of v prefix) and latest.
The container images are available via the project GitHub Container Registry. For example:
docker pull ghcr.io/accelist/nextjs-starter:masterIf working with private repository (hence private container registry), create a new GitHub personal access token with read:packages scope to allow downloading container images from Kubernetes cluster.
TODO add guide for adding GitHub access token to Kubernetes for pulling from private registry: https://kubernetes.io/docs/tasks/configure-pod-container/pull-image-private-registry/
TODO add Deployment and Services
yamlhere with Environment Variables
Upon launching development server via npm run dev, git pre-commit hook will be installed into the local repository.
This hook will perform TypeScript and ESLint checks when a developer attempts to commit into the git repository and fail the commit if any errors are detected.


