PaperTTY
![]()
This is an experimental command-line driven Python module to render the contents of a Linux virtual terminal (/dev/tty[1-63]) or standard input onto a Waveshare e-Paper display. See list of supported displays.
Note: Testing has been minimal and I probably forgot something, so 'caveat utilitor'.
Note: I am also not affiliated with Waveshare in any way.
Some features
- Designed to be used with a Raspberry Pi and Raspbian.
- It should enable you to run interactive console programs (
vim,tmux,irssi,nethack...) and display whatever you want easily with scripts. - Especially with a small font, it is fast enough for interactive use but could be improved to be even faster. Also, it's quite a bit snappier on the Raspberry Pi 3 than the Zero.
- Only the changed region is updated on the display, so typing is faster than full screen scrolling.
- The cursor is also drawn and the image updated as it moves.
- Flicker-free.
- Allows changing the font, font size, orientation and some other parameters.
- Supports TrueType and bitmap fonts (in PIL format).
- Bundled with a
systemdservice unit to start the service early at boot and gracefully stop it.
It isn't perfect and has only been tested with the monochrome 2.13" HAT, but it might work for other models too, and allows you to at least try.
- The PaperTTY code is in the public domain and you run it at your own risk.
- The driver code (in
drivers/) is GPL 3.0 licensed, because it is based on Waveshare's GPL code - you still run it at your own risk.
Screenshots
Collage of running various programs in tmux

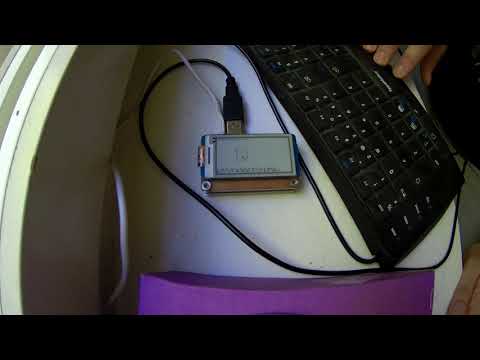
Running Nethack outside in the noon sun, powered directly by a solar panel, connected to a Bluetooth keyboard

Action video - terminal usage (Raspberry Pi Zero W)
Showcasing input feedback.
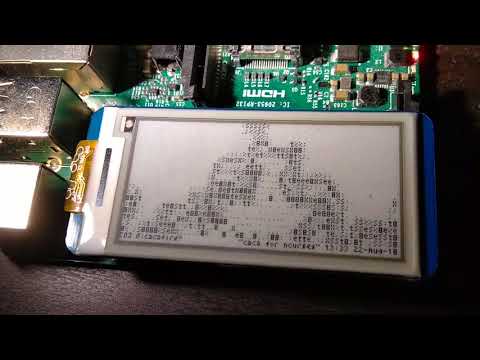
Action video 2 - cacafire (Raspberry Pi 3)
The RPi3 is noticeably faster - cacafire is 3x slower on the Zero. Typical terminal usage works pretty well.
Installation
All of the code was written for Raspbian Stretch and Python 3.5+. These instructions assume you're going to run this on a Raspberry Pi, otherwise you're on your own.
The code includes a reimplementation/refactoring of the Waveshare reference drivers - unlike the rest of the code which is CC0, the drivers have the GPL 3.0 license, because that's what Waveshare used. The drivers for models that aren't in the repo have been acquired from their Wiki's demo code packages.
See the driver page for details and the supported models.
The earlier, initial version of PaperTTY (tag: v0.01) did not have instructions for using virtualenv (though it would work) - you can still run it as before using the system packages and alongside this new version. Using the virtualenv means that PIL and Pillow can also coexist on the same system.
Requirements
- Enable SPI (
sudo raspi-config)Interfacing Options -> SPI -> Yes- Reboot
Steps
- Clone the repo somewhere and enter the directory
git clone https://github.com/joukos/PaperTTY.gitcd PaperTTY
- Install virtualenv and libopenjp2
sudo apt install virtualenvwrapper python3-virtualenv libopenjp2-7
- Source the wrapper to use
mkvirtualenv(you may want to add this to~/.bashrc)source /usr/share/virtualenvwrapper/virtualenvwrapper.sh
- Create the Python 3 virtualenv and install packages in
requirements.txtmkvirtualenv -p /usr/bin/python3 -r requirements.txt papertty- This will create
~/.virtualenvs/paperttywhich contains the required environment
- After creating the virtualenv, it should become active and you should see
(papertty)on your prompt- Note: the software needs to be run with
sudoin the typical case, so you need to explicitly start the interpreter within the virtualenv - otherwise the program attempts to import system packages instead - You should now be able to run
sudo ~/.virtualenvs/papertty/bin/python3 ./papertty.py listto see the available drivers and start using the software
- Note: the software needs to be run with
- Not really needed, but to (de)activate the virtualenv afterwards, run:
~/.virtualenvs/papertty/bin/activate- activate the virtualenv- Or,
workon paperttyif you have sourcedvirtualenvwrapper.sh
- Or,
deactivate- deactivate the virtualenv
Alternative install without virtualenv, using system packages
- If you don't care to use the virtualenv, just install the requirements as system packages:
sudo apt install python3-rpi.gpio python3-spidev python3-pil python3-click- And run the program directly:
sudo ./papertty.py list
Fonts
You can use TrueType fonts or bitmap fonts, but the bitmap fonts need to be in the right format. With bitmap fonts the --size option is ignored.
Included as default is a very small bitmap font called Tom Thumb, it is fairly readable for its tiny size and fits 20 rows with 62 columns on the 2.13". Thanks go to Brian Swetland and Robey Pointer for their work on the font and for releasing it under CC0.
Another included font is the nanofont, which is an extremely tiny (3x4 pixels) font and also released under CC0. Thanks go to the author, Michael Pohoreski. The conversion was done by generating the BMP, then transformed it with Pillow so that everything was on one line, then used Fony to save a BDF and converted that to PIL.
Why would you use such a microscopic font, I hear you ask? One good reason is that some programs refuse to start unless the terminal size is big enough, and using this font will allow you to get things theoretically readable and run those programs even on the smaller displays. One example being Dungeon Crawl Stone Soup which wouldn't otherwise start on the 2.13" display (hooray!):

Playing the game like this would be quite challenging, however...
Unless you're happy with the awesome default font, find a nice monospaced TrueType or bitmap font: Andale Mono (sudo apt install ttf-mscorefonts-installer) is pretty great for very small sizes and on the 2.13" (128x250 pixels) can fit 17 rows and 50 columns
- You can use a proportional font but the terminal will probably look horrible
Pillow includes a utility called pilfont.py, you can use this to convert a BDF/PCF font file into a .pil and a .pbm (I didn't have luck with some fonts - remember to use the pilfont.py version that's on your Pi):
# convert Terminus
gunzip -c /usr/share/fonts/X11/misc/ter-u12b_unicode.pcf.gz > terminus-12.pcf
pilfont.py terminus-12.pcf
# you should get terminus-12.pil that you can pass with the --font option

All font options expect a path to the font file - the system font directories are not searched for them.
Usage
Remember to activate the virtualenv, then run sudo ./papertty.py to get help.
- You'll want to
sudounless you've set it up so that SPI works without and you've given read access to/dev/vcsa*
To do anything, you'll need to tell the script which model you're using - in my case this would be epd2in13. Use the top-level option --driver to set the desired driver.
Append --help with the subcommands to get help with their parameters.
You can just edit papertty.py to your liking - the code is very simple and commented.
Top-level options
| Option | Description | Default |
|---|---|---|
--driver NAME |
Select driver to use - required | no default |
--nopartial |
Disable partial refresh even if the display supported it | disabled |
--encoding NAME |
Select encoding to use | utf-8 |
Note: The encoding settings are a bit questionable right now - encoding/decoding is done explicitly to have ignore on any errors, but I think this needs some more work as it's not an entirely trivial issue. If you feel like there's a big dum-dum in the code regarding these, a PR is very appreciated.
Note 2: To get scandinavian accents to show (ä,ö etc.), try --encoding cp852.
Commands
list - List display drivers
# Example
sudo ./papertty.py list
scrub - Scrub display
This command mostly makes sense with the partial refresh models, although you can run it with full refresh too - it's just going to take a pretty long time to run. I needed this because my own unit can't handle a full refresh so it was the only way to clear the screen properly!
If you're left with "burn-in" or the display doesn't seem to work properly, this usually helps to even it out (may even need to run it twice sometimes if the display is not in a steady state).
This will slowly fill the screen with bands of black, then white.
| Option | Description | Default |
|---|---|---|
--size N |
Chunk width (pixels) to fill with (valid values: 8-32) |
16 |
# Example
sudo ./papertty.py --driver epd2in13 scrub
stdin - Render standard input
Render stdin on the display, simple as that. Leaves the image on the display until something else overwrites it. Very useful for showing script output or just about anything that updates irregularly.
| Option | Description | Default |
|---|---|---|
--font FILENAME |
Path to a TrueType or PIL font to use - strongly recommended to use monospaced | tom-thumb.pil |
--size N |
Font size | 8 |
--width N |
Fit to a particular width (characters) | display width / font width |
--portrait |
Enable portrait mode | disabled |
--nofold |
Disable folding (ie. don't wrap to width) | disabled |
--spacing |
Set line spacing | 0 |
# Example
cowsay "Hello World" | sudo ./papertty.py --driver epd2in13 stdin --nofold
terminal - Render a virtual terminal
The most prominent feature.
This requires read permission to the virtual console device (/dev/vcsa[1-63]) and optionally write permission to the associated terminal device (/dev/tty[1-63]) if you want to set the TTY size via ioctls.
If you're going to use terminal with a display that doesn't support partial refresh, you probably want to set --sleep a bit larger than the default, such as a few seconds, unless you enjoy blinking.
The process handles two signals:
SIGINT- stop and clear the screen (unless--noclearwas given), same as pressing Ctrl-Csudo pkill -INT -f papertty.py- By default, the
systemdservice unit attempts to stop the process using SIGINT
SIGUSR1- apply scrub and keep runningsudo pkill -USR1 -f papertty.py
See details on how all of this works further down this document.
| Option | Description | Default |
|---|---|---|
--vcsa FILENAME |
Virtual console device (/dev/vcsa[1-63]) |
/dev/vcsa1 |
--font FILENAME |
Path to a TrueType or PIL font to use - strongly recommended to use monospaced | tom-thumb.pil |
--size N |
Font size | 8 |
--noclear |
Leave display content on exit | disabled |
--nocursor |
Don't draw cursor | disabled |
--sleep |
Minimum delay between screen updates (seconds) | 0.1 |
--rows |
Set TTY rows (--cols required too) |
no default |
--cols |
Set TTY columns (--rows required too) |
no default |
--portrait |
Enable portrait mode | disabled |
--flipx |
Mirror X axis (experimental / buggy) | disabled |
--flipy |
Mirror Y axis (experimental / buggy) | disabled |
--spacing |
Set line spacing | 0 |
--scrub |
Apply scrub when starting | disabled |
--autofit |
Try to automatically set terminal rows/cols for the font | disabled |
# Examples

# by default the first virtual terminal (/dev/vcsa1 == /dev/tty1) is displayed
sudo ./papertty.py --driver epd2in13 terminal

# set font size to 16, update every 10 seconds, set terminal rows/cols to 10x20
sudo ./papertty.py --driver epd2in13 terminal --size 16 --sleep 10 --rows 10 --cols 20

# auto-fit terminal rows/cols for the font and use a bitmap font
# (fitting may not work for very small fonts in portrait mode because of terminal restrictions)
sudo ./papertty.py --driver epd2in13 terminal --autofit --font myfont.pil
How to use the terminal
Logging in?
After you've gotten the terminal to render, you'll want to run something there.
As the program mirrors the system virtual terminals, you can either attach a keyboard to the Pi and simply log in or use the openvt program to start something there without messing around with cables, if you already have SSH access.
The following commands are run over SSH.
For example, to start htop for user pi on tty1 (via sudo, twice):
# "as a sudoer, start sudo forcibly on VT 1 (tty1) to run 'htop' as the user 'pi'"
sudo openvt -fc 1 -- sudo -u pi htop
After you exit the process, agetty may go haywire though (hogging CPU). Give it a nudge to fix it:
sudo pkill agettyAnd you should have the login prompt there again.
In practice, you'll want to use tmux (or screen, if you prefer) to have the most flexible control over the terminal (these are terminal multiplexers, and if you haven't used one before, now is the time to start):
# start a new tmux session (or just run 'tmux' with a connected keyboard)
sudo openvt -fc 1 -- sudo -u pi tmux
# (see the session starting up on the display)
# now, attach to the session
tmux attach
Lo and behold! You should now be attached to the tiny session visible on the display.
You can kill the papertty.py process at any time - the stuff that runs in the TTY will be unaffected (unless they react badly to console resizing) and you can just restart the terminal to get the display back and play around with the settings.
Start up at boot
A simple systemd service unit file is included with the package, called papertty.service. It calls start.sh so that instead of editing the service file, you can edit the start script (and easily add whatever you need) without needing to run systemctl daemon-reload all the time.
- You can simply put the command in the service file too, it's your choice
- You probably want to set the script to be owned and writable by root only:
sudo chown root:root start.sh; sudo chmod 700 start.sh - Remember: to run the command under the virtualenv, you need to run the
python3command from within the virtualenv'sbindirectory - this will ensure the environment is correct
To have the display turn on at boot, first edit the command you're happy with into start.sh:
# Remember: you probably want to set rows and cols here, because at reboot they're reset.
# Also, when booting up after a power cycle the display may have some artifacts on it, so
# you may want to add --scrub to get a clean display (during boot it's a bit slower than usual)
VENV="/home/pi/.virtualenvs/papertty/bin/python3"
${VENV} papertty.py --driver epd2in13 terminal --autofit
Then make sure you have the right paths set in the service file:
...
### Change the paths below to match yours
WorkingDirectory=/home/pi/code/PaperTTY
ExecStart=/home/pi/code/PaperTTY/start.sh
###
...
Then (read the unit file more carefully and) do the following steps:
sudo cp papertty.service /etc/systemd/system
sudo systemctl daemon-reload
sudo systemctl enable papertty
# To disable the service:
# sudo systemctl disable papertty
# sudo systemctl stop papertty
This will incorporate the service with systemd and enables it. Before rebooting and trying it out, you may want to stop any other instances of the papertty.py and then see if the service works:
sudo systemctl start papertty
# (the service should start and the terminal should appear on the display,
# if you need to edit any settings, run 'systemctl daemon-reload' again after
# saving the service file)
sudo systemctl stop papertty
# (the service should stop and the display should be cleared, unless you used --noclear)
If the service seemed to work, try rebooting and enjoy watching the bootup. If you need to scrub the display while the service is running, you can send the SIGUSR1 signal to the process.
If the service didn't work, check that the paths are correct and that start.sh has the execute bit set.
Why?
Kindles and the like have been around for a long time already, but there have been very few attempts at a general purpose e-ink display. General purpose meaning that I can use the programs I'm used to using and can display them on the e-ink display.
Why would anyone want such a thing, anyway? Here are some reasons:
- First of all, their power consumption is very low, making them suitable for many embedded applications where you just need to display some information periodically
- They are beautiful and easy on the eyes
- They are readable in direct sunlight with no glare to speak of - and could run indefinitely off solar too
- Many of us spend most of their time reading and editing mostly static text, and this is where e-ink should excel
- Sometimes the refresh rate does not matter at all, as long as the eventual feedback is there - you may not want a backlit, power-hungry display for something you need updated just once a day
- You can still read your ebooks - in Vim!
The problem
Aside from digital price tags and similar special markets, there are some viable commercial offerings for mainstream computing on e-ink, such as the Onyx Boox Max2 that not only boasts a proper tablet form factor with an e-ink display, but also an HDMI input for using it as a secondary display (squee!). While it seems really cool, it's quite expensive, rare and more than just a simple display unit (and those cost just as much).
The display modules sold by Waveshare are exceptional in that they are very affordable (~15-90 USD), offer a wide range of sizes (1.54" up to 7.5") and even have "color" models (black/white/red). Earlier such offerings simply weren't there and people used to hack Kindles in very complex ways to get any of the fun.
So now that anyone can buy cheap e-ink, there is but one problem: how to get your content on it?
The display looks really cool and nifty but all you'll get in the package is just that and some code examples to draw something on it - with a program you need to write yourself. After unboxing, how does someone browse the Internet with it? Sadly, they don't.
The solution
I've had a Waveshare 2.13" HAT for the Raspberry Pi for a while now, and from time to time I've tried to find if someone had already implemented something like this since it sounds simple enough, but at the time of writing I don't know of any programs that mirror the terminal onto an e-ink, so I had a go at it.
For my purposes I just need proper terminal program support. The next step might be implementing a VNC client which should naturally translate quite well to e-ink's partial updating, but I don't have the time.
How it works
The principle of operation is deceptively simple:
- Reads the virtual terminal contents via
/dev/vcsa*(seeman vcsa)- For example, content of
/dev/tty1(that you get with Ctrl-Alt-F1) is available at/dev/vcsa1 - This includes the attributes, but they are ignored (if I had a tricolor display, they could be useful)
- Terminal size (character and pixel) is encoded in the first four bytes - this is used to read the rows and columns
- For example, content of
- Optionally sets the desired terminal size with
ioctls (requires write access to the/dev/ttyXdevice) - Adds newlines according to the terminal width (unlike the
screendumputility that reads from/dev/tty*, reading from avcsa*does not include newlines) - Renders the content and the cursor on an
Imageobject - Compares the newly rendered content to the previous content and updates the changed region on the display
- Done in a very simple fashion with just one bounding box
- This results in non-flickering updates and decent speed in typical use cases
Caveats, shortcomings
Some notes:
- Hardly tested, developed for a particular model - other models may not work or may need some code tweaking first
- If it sorta works but crashes or something else goes wrong and your display doesn't seem to work like usual anymore, don't panic, try the
scrubcommand a couple of times first and wait for it to finish - powering off and disconnecting the module completely ought to help as a last resort - Turns out my particular unit is actually flawed and doesn't do full refreshes properly so implementing it for other models has been mostly guesswork and wishful thinking
- The
scrubfeature may be entirely unnecessary for normally functioning units
- The
- If it sorta works but crashes or something else goes wrong and your display doesn't seem to work like usual anymore, don't panic, try the
- The code is surely littered with bugs and could use some refactoring
- You need to figure out the parameters, font and encodings that work for you
- Importantly, Unicode support is lacking because the virtual terminal stores glyph indices in the buffer and the original value is lost in translation - my understanding is that there is currently development being done for the kernel to implement
/dev/vcsu*which would rectify this, but it's not yet in the mainline kernel - option to use a pseudo TTY would be welcome in the mean time
- Importantly, Unicode support is lacking because the virtual terminal stores glyph indices in the buffer and the original value is lost in translation - my understanding is that there is currently development being done for the kernel to implement
- Not much thought given to tricolor displays - you need to modify the part where attributes are skipped and implement it yourself (or donate such a display and I might take a look...)
- Minimal error handling
- You can't set an arbitrary size for the terminals with
ioctls - it would be better to use some pseudo terminal for this but then again, sometimes you specifically wanttty1(imagine server crashing and having the kernel log imprinted on the e-ink) - Cursor placement is a bit obscure - this has to do with how the imaging library handles fonts and their metrics and it's not always very clear to me how they scale with the font... it works well enough though
- The mirroring features were just an afterthought and don't work perfectly (probably simple to fix), also arbitrary rotation is missing (but easy to add)
The code was written for Python 2 - there are some forks and improvements on the Waveshare code around, but I wanted to make this work on the stock offering so didn't bother incorporating that stuff here- The code is now for Python 3
- While testing out some imaging library functions, I noticed that on another computer the library seemed to lack the
spacingkeyword argument for drawing text - this may be a problem in some environments but I didn't think much of it
Conclusion
Even with all the caveats in mind, I still think the program is very useful and fills a niche. I wish I could have tested it with more than one display model, but that's why I'm releasing it as public domain, so anyone can try it out and hopefully turn it into something better.
- Jouko Strömmer


