ROS(1-1)搭建ROS环境
本章主要讲解的是ROS Kinect 版本在Ubuntu __16.04__系统上的安装,后面的内容会在此环境下进行。
#1. 添加ROS的镜像源
sudo sh -c '. /etc/lsb-release && echo "deb http://mirrors.ustc.edu.cn/ros/ubuntu/ $DISTRIB_CODENAME main" > /etc/apt/sources.list.d/ros-latest.list'
添加的镜像源为**科技大学的镜像源。由于ROS的主服务器在国外,国内访问时速度比较慢,因此我们添加国内镜像源。
#2. 配置密钥
sudo apt-key adv --keyserver hkp://ha.pool.sks-keyservers.net:80 --recv-key 421C365BD9FF1F717815A3895523BAEEB01FA116
如果以上服务器在连接过程中存在问题,可以用以下两个备选地址: hkp://pgp.mit.edu:80 hkp://keyserver.ubuntu.com:80
#3. 更新Ubuntu的源
sudo apt-get update
这个步骤如果更新速度比较慢,请回到ubuntu系统配置中,配置ubuntu的源为阿里的源

#4. 安装ROS kinetic
sudo apt-get install ros-kinetic-desktop-full
ros-kinetic-desktop-full内置了很多ROS的开发工具,作为开发阶段而言,我们选择此版本进行安装。
注意细节:在Ubuntu18.04.1系统中配置ROS的时候一直提示E:无法定位软件包,后来发现是ROS的版本不对应导致的,每个不同的ubuntu系统对应着不同的ROS版本,如果装错了就会出现上述问题,在Ubuntu18.04.1环境下可以安装的是melodic版本的,安装教程可以参考官网安装教程,ROS有Melodic、Lunar、Kinetic不同的种类对应着不同的ubuntu版本,
Melodic 主要对应:Ubuntu Artful (17.10), Bionic (18.04 LTS) 以及Debian Stretch
Kinetic 主要对应:Ubuntu Wily (15.10) and Ubuntu Xenial (16.04 LTS),
在安装的过程中要根据自己的ubuntu系统版本选择对应的ROS类型进行安装,具体的ROS类型可以在官网分支类型介绍上查看。
#1. 初始化rosdep
sudo rosdep init
rosdep update
在使用ROS之前,需要初始化rosdep。 rosdep可以轻松地为要编译的代码添加系统依赖项,并且帮助我们运行ROS中核心组件。
#2. 配置全局环境变量
echo "source /opt/ros/kinetic/setup.bash" >> ~/.bashrc
source ~/.bashrc
kinetic安装在/opt/ros/kinetic目录下,我们需要将安装目录下的功能包配置到系统的环境变量中去。这样我们才能使用ROS提供给我们的一些命令工具。
报错解决:

#3. 安装打包工具依赖
sudo apt install python-rosinstall python-rosinstall-generator python-wstool build-essential
E: Failed to fetch http://45.252.224.77/files/2116000007703A52/packages.ros.org/ros/ubuntu/dists/xenial/main/binary-amd64/Packages.gz
E: Failed to fetch http://45.252.224.79/files/111600000609586B/mirrors.ustc.edu.cn/ros/ubuntu/dists/xenial/main/binary-i386/Packages.gz  Hash Sum mismatch
E: Some index files failed to download. They have been ignored, or old ones used instead.
通常在安装过程中会出现 Hash Sum mismatch,这个时候,建议修改Ubuntu操作系统的软件源为http://mirrors.ustc.edu.cn。保证ros的源和ubuntu的源一致,规避掉hash校验的错误。
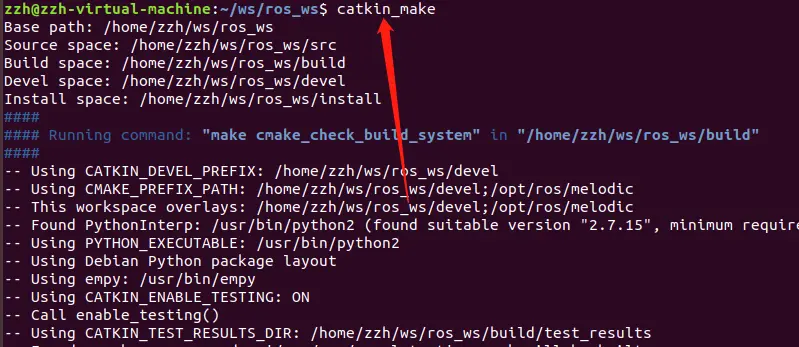
##测试安装 通过命令启动Ros Master
roscore

注意点1:每次新开一个新终端都要在ws/ros_ws下执行catkin_make编译一下,再执行source ./devdl/setup.bash配置下环境变量。
注意点2(如下图,这是python代码,c++也一样):

- 一:终端1:rosrun sample_topic py_publisher.py 终端2:rosrun sample_topic py_subscriber.py
- 二:终端1:rosrun sample_topic py_publisher.py 终端2:rosrun rqt_topic rqt_topic
- 三:终端1:rosrun sample_topic py_subscriber.py一直打开 终端2:rostopic pub /py_topic std_msgs/String "data:'写入数据'"
- 四:终端1:rosrun sample_topic py_subscriber.py一直打开 终端2:rosrun rqt_publisher rqt_publisher
-
- mkdir devtool
-
- cd devtool wget https://download.jetbrains.8686c.com/cpp/CLion-2019.1.4.tar.gz tar -zxvf CLion-2019.1.4.tar.gz
- 3.创建目录 mkdir -p $HOME/ws/ros_ws
- 4.创建src mkdir src
-
- cd ws/ros_ws catkin_make // 编译
-
- cd ws/ros_ws/src catkin_create_pkg sample_hello roscpp rospy rosmsg
-
- cd ws/ros_ws source devel/setup.bash // 配置环境变量
-
- cd wx/ros_ws roscore
-
- 打开另一个终端
cd ~/devtool/clion-2019.1.4/bin
./clion.sh
报错:Gtk-Message: Failed to load module "canberra-gtk-module"解决:apt-get install libcanberra-gtk-module
- 打开另一个终端
cd ~/devtool/clion-2019.1.4/bin
./clion.sh
-
- 打开工程
- 打开工程


- 另外打开一个新终端
如果tab不出来,cd ws/ros_ws目录下,source devel/setup.bash


- 另外打开一个新终端


注意点1:每次新开一个新终端都要在ws/ros_ws下执行catkin_make编译一下,再执行source ./devdl/setup.bash配置下环境变量。
注意点2(如下图,这是python代码,c++也一样):
- 一:终端1:rosrun sample_topic py_publisher.py 终端2:rosrun sample_topic py_subscriber.py
- 二(ui调试):终端1:rosrun sample_topic py_publisher.py 终端2:rosrun rqt_topic rqt_topic
- 三:终端1:rosrun sample_topic py_subscriber.py一直打开 终端2:rostopic pub /py_topic std_msgs/String "data:'写入数据'"
- 四(ui调试):终端1:rosrun sample_topic py_subscriber.py一直打开 终端2:rosrun rqt_publisher rqt_publisher
- 五(模拟调试):终端1:rosrun sample_topic py_publisher.py 终端2:rosrun sample_topic echo /py_topic
注意点:每次新开一个新终端都要在ws/ros_ws下执行catkin_make编译一下,再执行source ./devdl/setup.bash配置下环境变量。
需要先进行编译,如下图步骤2
编译的方式也可以采用这个:cd ws/ros_ws catkin_make

无需提前进行编译


ctrl+c停止不了循环,我们把while循环更改为如下图即可


注意点1:每次新开一个新终端都要在ws/ros_ws下执行catkin_make编译一下,再执行source ./devdl/setup.bash配置下环境变量。
注意点2(如下图,这是python代码,c++也一样):
- 一:终端1:rosrun sample_topic py_publisher.py 终端2:rosrun sample_topic py_subscriber.py
- 二(ui调试):终端1:rosrun sample_topic py_publisher.py 终端2:rosrun rqt_topic rqt_topic
- 三:终端1:rosrun sample_topic py_subscriber.py一直打开 终端2:rostopic pub /py_topic std_msgs/String "data:'写入数据'"
- 四(ui调试):终端1:rosrun sample_topic py_subscriber.py一直打开 终端2:rosrun rqt_publisher rqt_publisher
- 五(模拟调试):终端1:rosrun sample_topic py_publisher.py 终端2:rosrun sample_topic echo /py_topic
这里省略创建工程的具体步骤,具体可参考ROS(2-1)
CMakeLists.txt文件修改


调试方式一:通过subscriber可以实现一个发布,一个接收,步骤3和步骤4


调试方式二:通过rostopic工具进行调试,模拟发布数据,没有publisher,在终端将subscriber一直打开
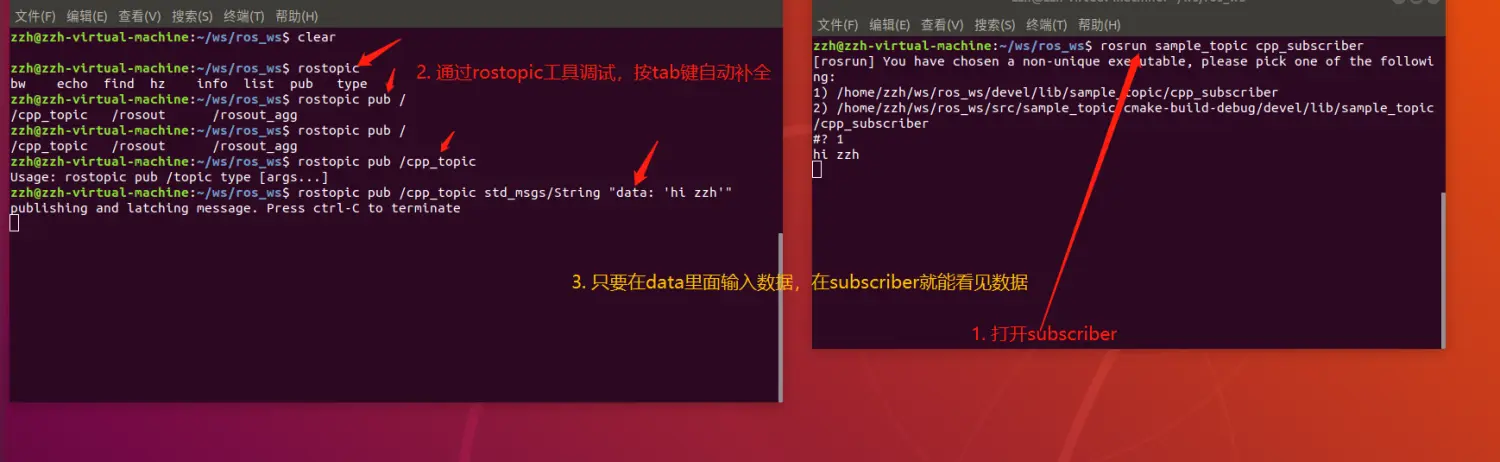
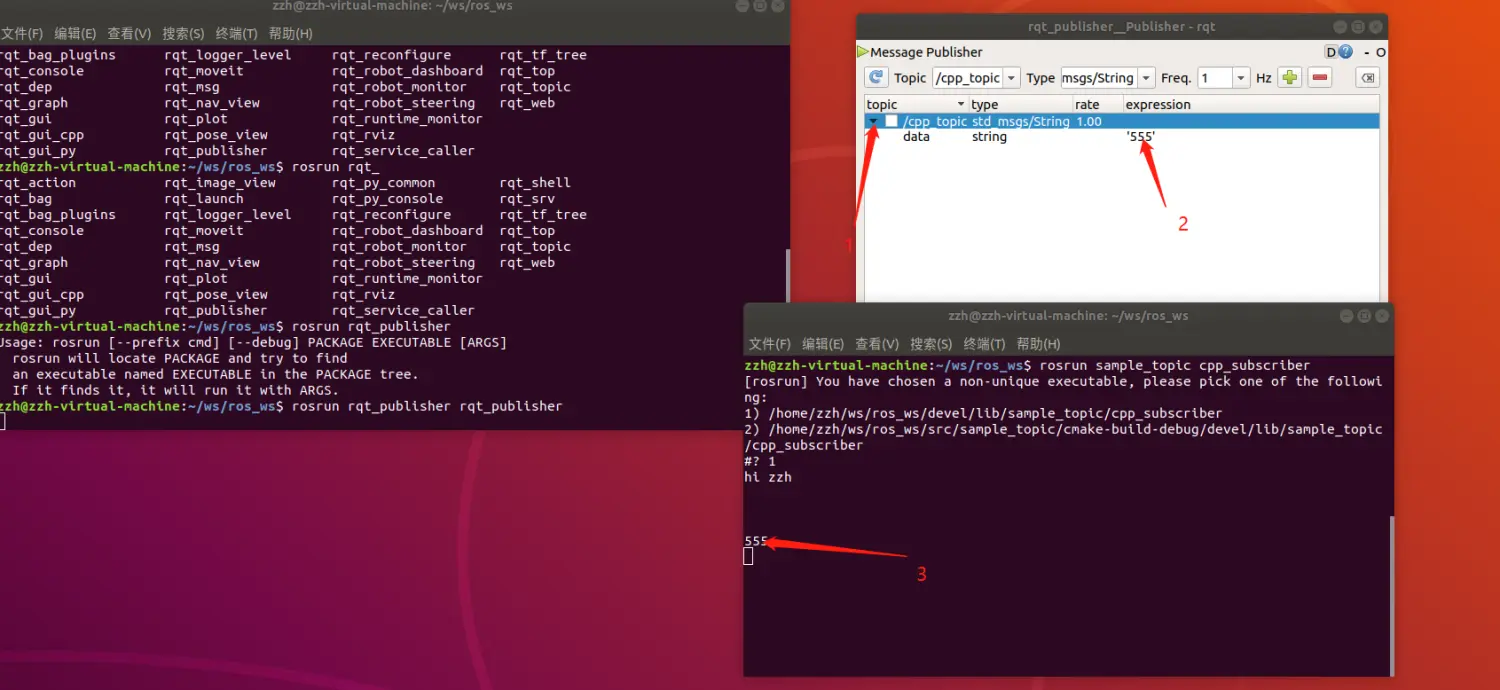
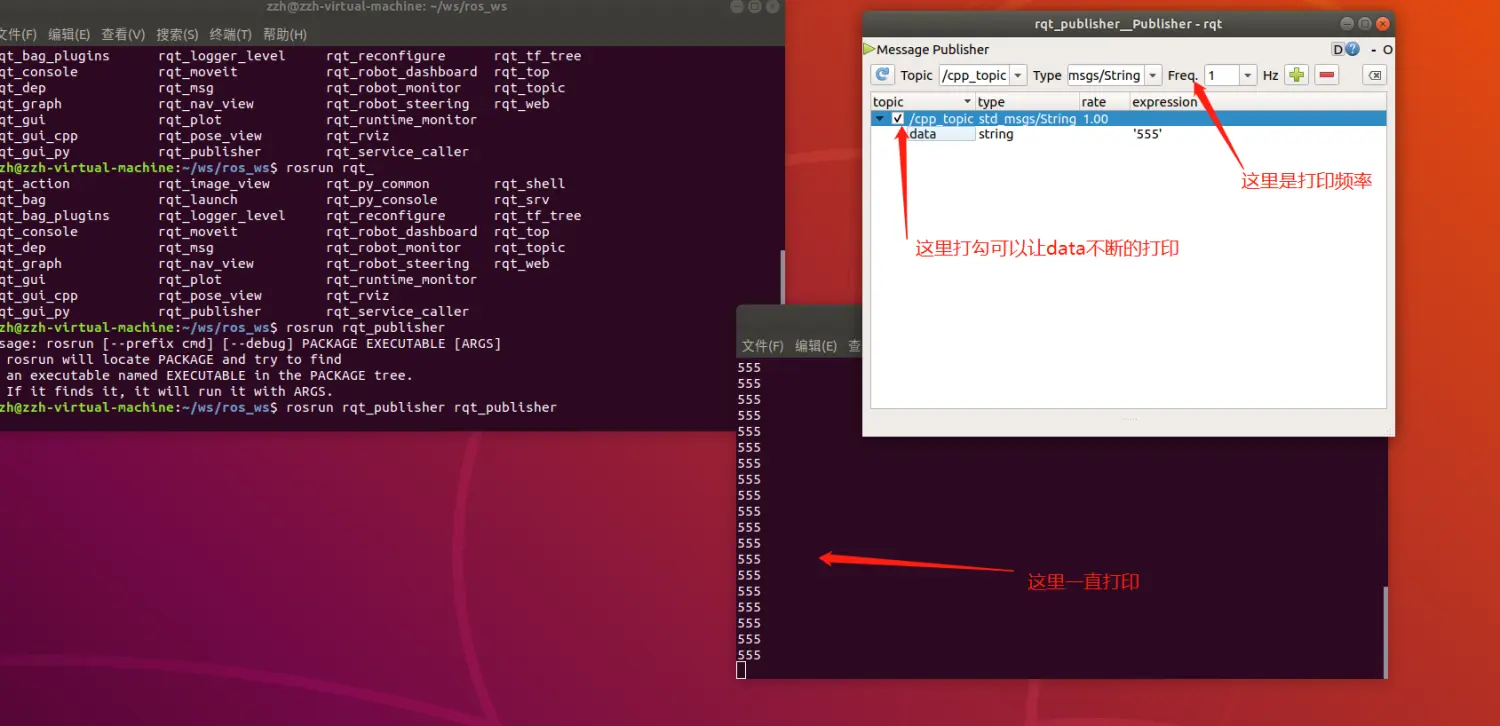
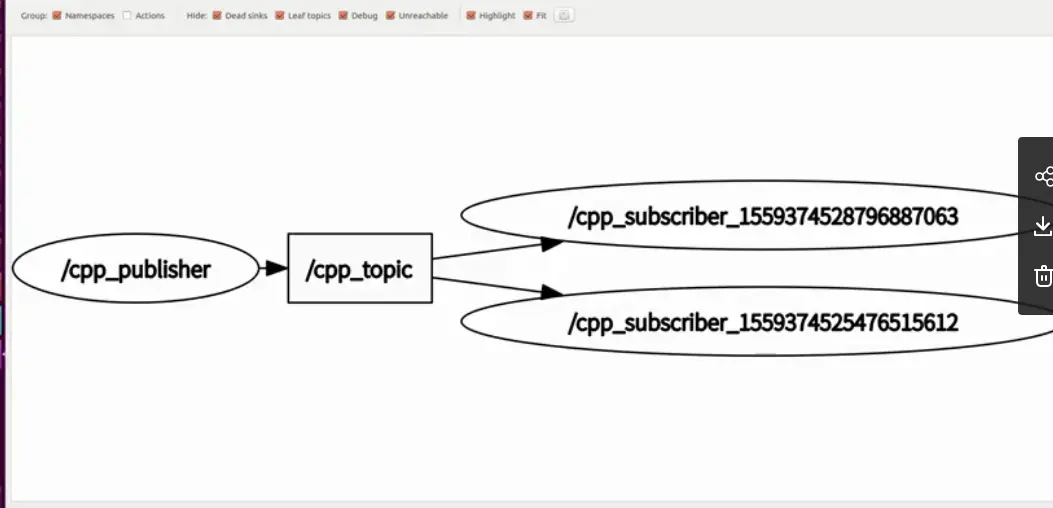
调试方式三:通过rqt_topic的ui的方式调试

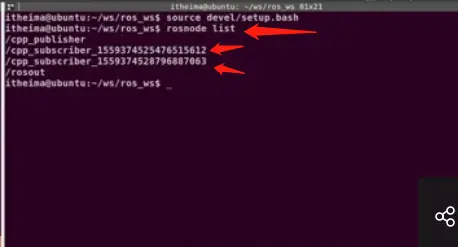
匿名节点的使用,如果不使用匿名节点的话,同时开两个subscriber是不行的。

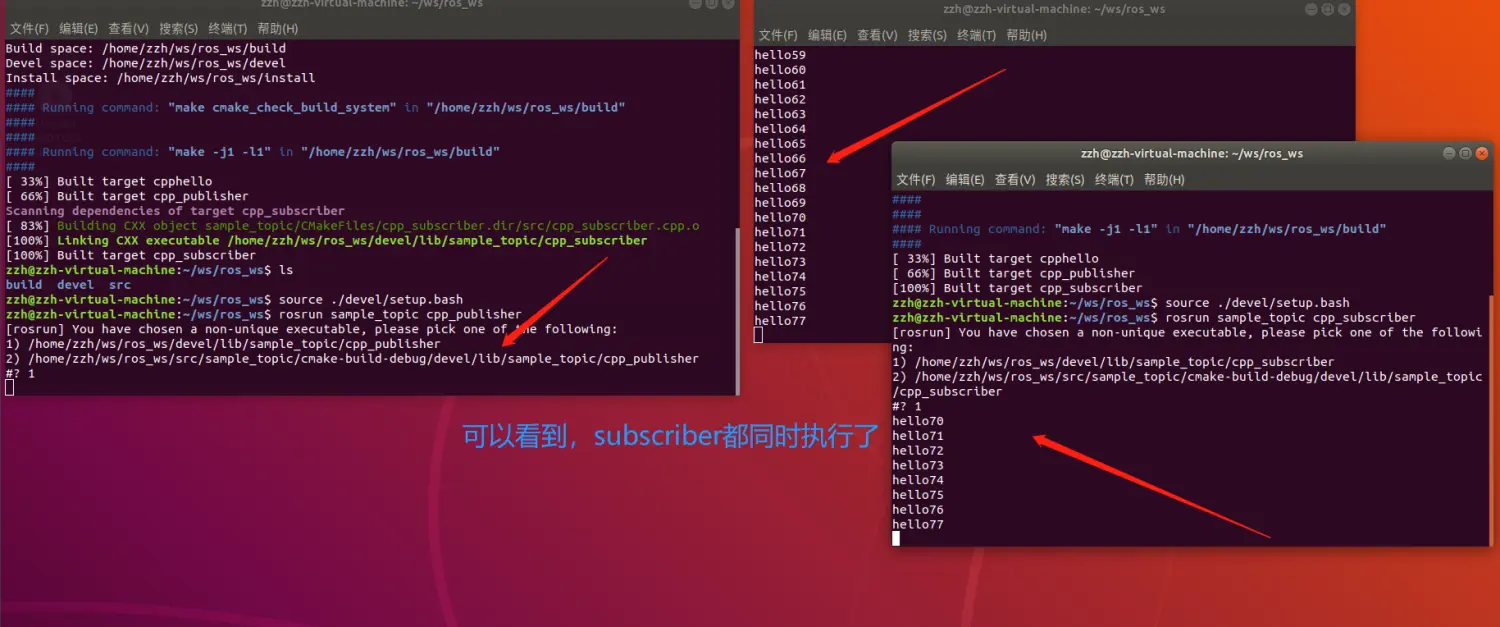


注意点1:每次新开一个新终端都要在ws/ros_ws下执行catkin_make编译一下,再执行source ./devdl/setup.bash配置下环境变量。
注意点2(如下图,这是python代码,c++也一样):
- 一:终端1:rosrun sample_topic py_publisher.py 终端2:rosrun sample_topic py_subscriber.py
- 二(ui调试):终端1:rosrun sample_topic py_publisher.py 终端2:rosrun rqt_topic rqt_topic
- 三:终端1:rosrun sample_topic py_subscriber.py一直打开 终端2:rostopic pub /py_topic std_msgs/String "data:'写入数据'"
- 四(ui调试):终端1:rosrun sample_topic py_subscriber.py一直打开 终端2:rosrun rqt_publisher rqt_publisher
- 五(模拟调试):终端1:rosrun sample_topic py_publisher.py 终端2:rosrun sample_topic echo /py_topic
-
- 创建sample_msgs
- 创建sample_msgs
-
- 项目配置
- 项目配置
-
- 搭建项目
- 搭建项目
-
- 配置package.xml文件
<build_depend>message_generation</build_depend> --> <exec_depend>message_runtime</exec_depend> -->
- 配置package.xml文件
- 5.配置CMakeList文件
请对照截图做修改


find_package(catkin REQUIRED COMPONENTS
        roscpp
        rosmsg
        rospy
        message_generation
        )

add_message_files(
        FILES
        Student.msg
)

generate_messages(
        DEPENDENCIES
        std_msgs  # Or other packages containing msgs
)

catkin_package(
        #  INCLUDE_DIRS include
        #  LIBRARIES sample_msgs
        CATKIN_DEPENDS roscpp rosmsg rospy message_runtime
        #  DEPENDS system_lib
)

include_directories(
        # include
        ${catkin_INCLUDE_DIRS}
)


- 在sample_topic新增一个c++文件,里面的内容跟cpp_publisher.cpp文件一样,有修改的地方见步骤10
- 修改CMakeLists.txt文件
9.
重点,重点,重点!重要的事情说三遍!!!执行完以上步骤1~步骤8后,一定要把终端和CLion编译器全部都关掉重新启动,否则在cpp_msg_publisher.cpp引入包会没有提示。10.编写cpp_msg_publisher.cpp文件 - 使用rosrun rqt_topic rqt_topic调试


注意点1:每次新开一个新终端都要在ws/ros_ws下执行catkin_make编译一下,再执行source ./devdl/setup.bash配置下环境变量。
注意点2(如下图,这是python代码,c++也一样):
- 一:终端1:rosrun sample_topic py_publisher.py 终端2:rosrun sample_topic py_subscriber.py
- 二(ui调试):终端1:rosrun sample_topic py_publisher.py 终端2:rosrun rqt_topic rqt_topic
- 三:终端1:rosrun sample_topic py_subscriber.py一直打开 终端2:rostopic pub /py_topic std_msgs/String "data:'写入数据'"
- 四(ui调试):终端1:rosrun sample_topic py_subscriber.py一直打开 终端2:rosrun rqt_publisher rqt_publisher
- 五(模拟调试):终端1:rosrun sample_topic py_publisher.py 终端2:rosrun sample_topic echo /py_topic
c++代码:


python代码:


注意点1:每次新开一个新终端都要在ws/ros_ws下执行catkin_make编译一下,再执行source ./devdl/setup.bash配置下环境变量。
注意点2(如下图,这是python代码,c++也一样):
- 一:终端1:rosrun sample_topic py_publisher.py 终端2:rosrun sample_topic py_subscriber.py
- 二(ui调试):终端1:rosrun sample_topic py_publisher.py 终端2:rosrun rqt_topic rqt_topic
- 三:终端1:rosrun sample_topic py_subscriber.py一直打开 终端2:rostopic pub /py_topic std_msgs/String "data:'写入数据'"
- 四(ui调试):终端1:rosrun sample_topic py_subscriber.py一直打开 终端2:rosrun rqt_publisher rqt_publisher
- 五(模拟调试):终端1:rosrun sample_topic py_publisher.py 终端2:rosrun sample_topic echo /py_topic
python代码:


c++代码:


注意点1:每次新开一个新终端都要在ws/ros_ws下执行catkin_make编译一下,再执行source ./devdl/setup.bash配置下环境变量。
注意点2(如下图,这是python代码,c++也一样):
- 一:终端1:rosrun sample_topic py_publisher.py 终端2:rosrun sample_topic py_subscriber.py
- 二(ui调试):终端1:rosrun sample_topic py_publisher.py 终端2:rosrun rqt_topic rqt_topic
- 三:终端1:rosrun sample_topic py_subscriber.py一直打开 终端2:rostopic pub /py_topic std_msgs/String "data:'写入数据'"
- 四(ui调试):终端1:rosrun sample_topic py_subscriber.py一直打开 终端2:rosrun rqt_publisher rqt_publisher
- 五(模拟调试):终端1:rosrun sample_topic py_publisher.py 终端2:rosrun sample_topic echo /py_topic

// 打开终端:cd ws/ros_ws // 编译:catkin_make // 配置环境变量:source ./devel/setup.bash // roscd std_msgs // cd /opt/ros/melodic/share // 启动节点:rosrun turtlesim turtlesim_node
// 打开另一终端,cd ws/ros_ws // 编译:catkin_make // 配置环境变量:source ./devel/setup.bash // roscd std_msgs // cd /opt/ros/melodic/share // rosrun turtlesim tutle_teleop_key // 将小乌龟回到原点:rosservice call /reset
// 打开第三个终端,cd ws/ros_ws
// 编译:catkin_make
// 配置环境变量:source ./devel/setup.bash
// 通过命令查看当前的启动的节点:rosnode list
// 通过命令可以查看turtlesim节点的详情:rosnode info turtlesim
turtlesim节点存在一个订阅者,去/turtle1/cmd_vel主题中获取数据


geometry_msgs/Vector3 linear指的是线速度,小乌龟只用到了float64 x,代表着乌龟向前进的线速度。 geometry_msgs/Vector3 angular指的是角速度,小乌龟只用到了float64 z,代表着乌龟旋转的角速度。
-
- 通过命令行模拟数据发送

-
- 通过rqt_publisher工具模拟数据发送

// (1)创建工程:cd ws/ros_ws/src
catkin_create_pkg sample_turtle roscpp rospy rosmsg
// 打开工程,配置setting并删除Cmake-build-debug文件夹


rosrun sample_turtle turtle_control
// (4)实现了一个qt界面

// (1) 编写c++代码
#include "ros/ros.h"
#include<iostream>
#include <QtWidgets>
#include <QApplication>

using namespace std;

// 6. 回调函数
void sendClicked() {
    cout << "clicked" << endl;
}

int main(int argc, char **argv) {

    string nodeName = "turtle_control";

    // 1.创建节点
    ros::init(argc, argv, nodeName);
    ros::NodeHandle node;

    // 2.创建Qt界面-可视框
    QApplication app(argc, argv);
    QWidget window;
    // 2.创建Qt界面-主题和边框
    window.setWindowTitle("小乌龟控制");
    window.resize(400, 0);

    // 3.layout布局
    QFormLayout layout;
    window.setLayout(&layout);

    // 3(1)线速度
    QLineEdit editLinear;
    layout.addRow("线速度", &editLinear);

    // 3 (2) 角速度
    QLineEdit editAngular;
    layout.addRow("角速度", &editAngular);

    // 3 (3) button
    QPushButton btnSend("发送");
    layout.addRow(&btnSend);

    // 3 (4). 点击事件
    btnSend.connect(&btnSend, &QPushButton::clicked, &window, sendClicked);

    // 4. 显示
    window.show();

    // 5. 执行
    return app.exec();
}
// (2) 界面展示

//(1)编写c++代码
#include "ros/ros.h"
#include<iostream>
#include <QtWidgets>
#include <QApplication>
#include "geometry_msgs/Twist.h"
#include <math.h>

using namespace std;

// 8. 回调函数
void sendClicked(ros::Publisher &publisher, QLineEdit &editLinear, QLineEdit &editAngular) {

    double x = editLinear.text().toDouble();
    double z = editAngular.text().toDouble();

    // 5.发送消息
    geometry_msgs::Twist twist;
    twist.linear.x = x;
    twist.angular.z = z * M_PI / 180;
    publisher.publish(twist);

}

int main(int argc, char **argv) {

    string nodeName = "turtle_control";
    string topicName = "turtle1/cmd_vel";

    // 1.创建节点
    ros::init(argc, argv, nodeName);
    ros::NodeHandle node;

    // 4.创建publisher
    ros::Publisher publisher = node.advertise<geometry_msgs::Twist>(topicName, 100);

    // 2.创建Qt界面-可视框
    QApplication app(argc, argv);
    QWidget window;
    // 2.创建Qt界面-主题和边框
    window.setWindowTitle("小乌龟控制");
    window.resize(400, 0);

    // 3.layout布局
    QFormLayout layout;
    window.setLayout(&layout);

    // 3(1)线速度
    QLineEdit editLinear("0.0");
    layout.addRow("线速度", &editLinear);

    // 3 (2) 角速度
    QLineEdit editAngular("0.0");
    layout.addRow("角速度", &editAngular);

    // 3 (3) button
    QPushButton btnSend("发送");
    layout.addRow(&btnSend);

    // 3 (4). 点击事件
    btnSend.connect(&btnSend, &QPushButton::clicked, &window, [&publisher, &editLinear, &editAngular]() {
        sendClicked(publisher, editLinear, editAngular);
    });
    // 6. 显示
    window.show();
    // 7. 执行
    return app.exec();
}
// (2) ui展示

// 创建工程,实现ui界面的代码,配置CMakeList文件
#include "ros/ros.h"
#include<iostream>
#include <QtWidgets>
#include <QApplication>
#include "geometry_msgs/Twist.h"
#include <math.h>

using namespace std;

// 8. 回调函数
void sendClicked(ros::Publisher &publisher, QLineEdit &editLinear, QLineEdit &editAngular) {

    double x = editLinear.text().toDouble();
    double z = editAngular.text().toDouble();

    // 5.发送消息
    geometry_msgs::Twist twist;
    twist.linear.x = x;
    twist.angular.z = z * M_PI / 180;
    publisher.publish(twist);

}

int main(int argc, char **argv) {

    string nodeName = "turtle_control2";
    string topicName = "turtle1/cmd_vel";

    // 1.创建节点
    ros::init(argc, argv, nodeName);
    ros::NodeHandle node;

    // 4.创建publisher
    ros::Publisher publisher = node.advertise<geometry_msgs::Twist>(topicName, 100);

    // 2.创建Qt界面-可视框
    QApplication app(argc, argv);
    QWidget window;
    // 2.创建Qt界面-主题和边框
    window.setWindowTitle("小乌龟控制");
    window.resize(400, 0);

    // 3.layout布局
    QFormLayout layout;
    window.setLayout(&layout);

    // 3(1-1)线速度
    QLineEdit editLinear("0.0");
    layout.addRow("线速度", &editLinear);

    // 3 (2-1) 角速度
    QLineEdit editAngular("0.0");
    layout.addRow("角速度", &editAngular);

    // 3 (2-2) 坐标x
    QLabel lbx;
    layout.addRow("当前X坐标", &lbx);

    // 3 (3-2) 坐标y
    QLabel lby;
    layout.addRow("当前Y坐标", &lby);

    // 3 (4-2) 线速度
    QLabel lbLinearVel;
    layout.addRow("当前线速度", &lbLinearVel);

    // 3 (5-2) 角速度
    QLabel lbAngularVel;
    layout.addRow("当前角速度", &lbAngularVel);

    // 3 (6-2) 当前角度
    QLabel lbTheta;
    layout.addRow("当前角度", &lbTheta);

    // 3 (3) button
    QPushButton btnSend("发送");
    layout.addRow(&btnSend);

    // 3 (4). 点击事件
    btnSend.connect(&btnSend, &QPushButton::clicked, &window, [&publisher, &editLinear, &editAngular]() {
        sendClicked(publisher, editLinear, editAngular);
    });

    // 6. 显示
    window.show();
    // 7. 执行
    return app.exec();
}


// 创建工程,实现ui界面的代码
#include "ros/ros.h"
#include<iostream>
#include <QtWidgets>
#include <QApplication>
#include "geometry_msgs/Twist.h"
#include <math.h>
#include "turtlesim/Pose.h"

using namespace std;

// 8. 回调函数
void sendClicked(ros::Publisher &publisher, QLineEdit &editLinear, QLineEdit &editAngular) {

    double x = editLinear.text().toDouble();
    double z = editAngular.text().toDouble();

    // 5.发送消息
    geometry_msgs::Twist twist;
    twist.linear.x = x;
    twist.angular.z = z * M_PI / 180;
    publisher.publish(twist);

}

// 4. (4-2) 创建subscriber
//void Foo::callback(const std_msgs::Empty::ConstPtr& message) {}
void poseCallback(const turtlesim::Pose::ConstPtr &message) {
    cout << "== == == == == == == == == == ==" << endl;
    cout << message->x << endl;
    cout << message->y << endl;
}

int main(int argc, char **argv) {

    string nodeName = "turtle_control2";
    string veltopicName = "turtle1/cmd_vel";
    string posetopicName = "turtle1/pose";

    // 1.创建节点
    ros::init(argc, argv, nodeName);
    ros::NodeHandle node;

    // 4. (4-3) 开启一个异步轮询器
    ros::AsyncSpinner spinner(1);
    spinner.start();

    // 4.创建publisher
    ros::Publisher publisher = node.advertise<geometry_msgs::Twist>(veltopicName, 100);

    // 4. (4-1) 创建subscriber
    const ros::Subscriber &subscriber = node.subscribe<turtlesim::Pose>(posetopicName, 100, poseCallback);

    // 2.创建Qt界面-可视框
    QApplication app(argc, argv);
    QWidget window;
    // 2.创建Qt界面-主题和边框
    window.setWindowTitle("小乌龟控制");
    window.resize(400, 0);

    // 3.layout布局
    QFormLayout layout;
    window.setLayout(&layout);

    // 3(1-1)线速度
    QLineEdit editLinear("0.0");
    layout.addRow("线速度", &editLinear);

    // 3 (2-1) 角速度
    QLineEdit editAngular("0.0");
    layout.addRow("角速度", &editAngular);

    // 3 (2-2) 坐标x
    QLabel lbx;
    layout.addRow("当前X坐标", &lbx);

    // 3 (3-2) 坐标y
    QLabel lby;
    layout.addRow("当前Y坐标", &lby);

    // 3 (4-2) 线速度
    QLabel lbLinearVel;
    layout.addRow("当前线速度", &lbLinearVel);

    // 3 (5-2) 角速度
    QLabel lbAngularVel;
    layout.addRow("当前角速度", &lbAngularVel);

    // 3 (6-2) 当前角度
    QLabel lbTheta;
    layout.addRow("当前角度", &lbTheta);

    // 3 (3) button
    QPushButton btnSend("发送");
    layout.addRow(&btnSend);

    // 3 (4). 点击事件
    btnSend.connect(&btnSend, &QPushButton::clicked, &window, [&publisher, &editLinear, &editAngular]() {
        sendClicked(publisher, editLinear, editAngular);
    });

    // 6. 显示
    window.show();

    // 7. 执行
    return app.exec();
}

#include "ros/ros.h"
#include<iostream>
#include <QtWidgets>
#include <QApplication>
#include "geometry_msgs/Twist.h"
#include <math.h>
#include "turtlesim/Pose.h"

using namespace std;

QLabel *lbX;
QLabel *lbY;
QLabel *lbLinearVel;
QLabel *lbAngularVel;
QLabel *lbTheta;

// 8. 回调函数
void sendClicked(ros::Publisher &publisher, QLineEdit &editLinear, QLineEdit &editAngular) {

    double x = editLinear.text().toDouble();
    double z = editAngular.text().toDouble();

    // 5.发送消息
    geometry_msgs::Twist twist;
    twist.linear.x = x;
    twist.angular.z = z * M_PI / 180;
    publisher.publish(twist);

}

// 4. (4-2) 创建subscriber
//void Foo::callback(const std_msgs::Empty::ConstPtr& message) {}
void poseCallback(const turtlesim::Pose::ConstPtr &message) {

    lbX->setText(QString::fromStdString(to_string(message->x)));
    lbY->setText(QString::fromStdString(to_string(message->y)));
    lbLinearVel->setText(QString::fromStdString(to_string(message->linear_velocity)));
    lbAngularVel->setText(QString::fromStdString(to_string(message->angular_velocity)));
    lbTheta->setText(QString::fromStdString(to_string(message->theta * 180 / M_PI)));
}

int main(int argc, char **argv) {

    string nodeName = "turtle_control2";
    string veltopicName = "turtle1/cmd_vel";
    string posetopicName = "turtle1/pose";

    // 1.创建节点
    ros::init(argc, argv, nodeName);
    ros::NodeHandle node;

    // 4. (4-3) 开启一个异步轮询器
    ros::AsyncSpinner spinner(1);
    spinner.start();

    // 4.创建publisher
    ros::Publisher publisher = node.advertise<geometry_msgs::Twist>(veltopicName, 100);

    // 4. (4-1) 创建subscriber
    const ros::Subscriber &subscriber = node.subscribe<turtlesim::Pose>(posetopicName, 100, poseCallback);

    // 2.创建Qt界面-可视框
    QApplication app(argc, argv);
    QWidget window;
    // 2.创建Qt界面-主题和边框
    window.setWindowTitle("小乌龟控制");
    window.resize(400, 0);

    // 3.layout布局
    QFormLayout layout;
    window.setLayout(&layout);

    // 3(1-1)线速度
    QLineEdit editLinear("0.0");
    layout.addRow("线速度", &editLinear);

    // 3 (2-1) 角速度
    QLineEdit editAngular("0.0");
    layout.addRow("角速度", &editAngular);

    // 3 (2-2) 坐标x
    lbX = new QLabel();
    layout.addRow("当前X坐标", lbX);

    // 3 (3-2) 坐标
    lbY = new QLabel();
    layout.addRow("当前Y坐标", lbY);

    // 3 (4-2) 线速度
    lbLinearVel = new QLabel();
    layout.addRow("当前线速度", lbLinearVel);

    // 3 (5-2) 角速度
    lbAngularVel = new QLabel();
    layout.addRow("当前角速度", lbAngularVel);

    // 3 (6-2) 当前角度
    lbTheta = new QLabel();
    layout.addRow("当前角度", lbTheta);

    // 3 (3) button
    QPushButton btnSend("发送");
    layout.addRow(&btnSend);

    // 3 (4). 点击事件
    btnSend.connect(&btnSend, &QPushButton::clicked, &window, [&publisher, &editLinear, &editAngular]() {
        sendClicked(publisher, editLinear, editAngular);
    });

    // 6. 显示
    window.show();

    // 7. 执行
    return app.exec();
}

#!/usr/bin/env python
# coding:utf-8

import rospy
from geometry_msgs.msg import Twist

from PyQt5.QtWidgets import *
import sys
import math


def btnClicked(editLinear, editAngluar, publisher):
    linearX = float(editLinear.text())
    angluarZ = float(editAngular.text())

    # 创建消息
    twist = Twist()
    # 填充数据
    twist.linear.x = linearX
    twist.angular.z = angluarZ * math.pi / 180
    # 发送消息
    publisher.publish(twist)


if __name__ == '__main__':
    nodeName = "turle_control";
    topicName = "/turtle1/cmd_vel"

    # 创建ros node
    rospy.init_node(nodeName, anonymous=True)

    # 创建publisher
    publisher = rospy.Publisher(topicName, Twist, queue_size=1000)

    # 创建Qt程序
    app = QApplication(sys.argv)
    # 创建窗体
    window = QWidget()
    window.setWindowTitle("小乌龟控制")
    window.resize(400, 0)

    # 设在布局
    layout = QFormLayout()
    window.setLayout(layout)

    # 添加组件
    editLinear = QLineEdit()
    editLinear.setText("0.0")
    layout.addRow("距离", editLinear)

    editAngular = QLineEdit()
    editAngular.setText("0.0")
    layout.addRow("角度", editAngular)

    btnSend = QPushButton("发送")
    layout.addRow(btnSend)

    # 事件
    btnSend.clicked.connect(lambda: btnClicked(editLinear, editAngular, publisher))

    window.show()

    sys.exit(app.exec_())

- 配置文件
- 编写c++服务端代码

#include "ros/ros.h"
#include<iostream>
#include <QtWidgets>
#include <QApplication>

#include "std_srvs/Empty.h"

using namespace std;

void clickReset(ros::NodeHandle &node) {
    ROS_INFO_STREAM("clicke reset");

    string serviceName = "/reset";

    ros::ServiceClient client = node.serviceClient<std_srvs::Empty>(serviceName);

    std_srvs::Empty msg;
    client.call(msg);

    client.shutdown();

}

int main(int argc, char **argv) {

    string nodeName = "turtle_service_control";

    // 1.创建节点
    ros::init(argc, argv, nodeName);
    ros::NodeHandle node;

    //构建Qt界面
    QApplication app(argc, argv);

    // window
    QWidget window;
    window.resize(400, 0);

    // layout
    QFormLayout layout;
    window.setLayout(&layout);

    QPushButton btnReset("重置");
    layout.addRow(&btnReset);

    QLineEdit editR("0");
    layout.addRow("红色", &editR);

    QLineEdit editG("0");
    layout.addRow("绿色", &editG);

    QLineEdit editB("0");
    layout.addRow("蓝色", &editB);

    QPushButton btnChangeColor("改变画笔颜色");
    layout.addRow(&btnChangeColor);

    QLineEdit editX("0");
    layout.addRow("X坐标", &editX);

    QLineEdit editY("0");
    layout.addRow("Y坐标", &editY);

    QLineEdit editTheta("0");
    layout.addRow("角度", &editTheta);

    QPushButton btnSetXY("设置位置");
    layout.addRow(&btnSetXY);

    // 点击事件
    btnReset.connect(&btnReset, &QPushButton::clicked, &window, bind(clickReset,node));


    window.show();

    return app.exec();
}
- 调试

- c++代码实现
#include "ros/ros.h"
#include<iostream>
#include <QtWidgets>
#include <QApplication>

#include "std_srvs/Empty.h"
#include "turtlesim/SetPen.h"

using namespace std;

void clickReset(ros::NodeHandle &node) {
    ROS_INFO_STREAM("clicke reset");

    string serviceName = "/reset";

    ros::ServiceClient client = node.serviceClient<std_srvs::Empty>(serviceName);

    std_srvs::Empty msg;
    client.call(msg);

    client.shutdown();

}

void clickChangeColor(ros::NodeHandle &node, QLineEdit *editR, QLineEdit *editG, QLineEdit *editB) {

    string serviceName = "/turtle1/set_pen";

    uint r = editR->text().toUInt();
    uint g = editG->text().toUInt();
    uint b = editB->text().toUInt();

    ros::ServiceClient client = node.serviceClient<turtlesim::SetPen>(serviceName);

    turtlesim::SetPen srv;
    srv.request.r = r;
    srv.request.g = g;
    srv.request.b = b;
    srv.request.width = 4;
    client.call(srv);

    client.shutdown();

}

int main(int argc, char **argv) {

    string nodeName = "turtle_service_control";

    // 1.创建节点
    ros::init(argc, argv, nodeName);
    ros::NodeHandle node;

    //构建Qt界面
    QApplication app(argc, argv);

    // window
    QWidget window;
    window.resize(400, 0);

    // layout
    QFormLayout layout;
    window.setLayout(&layout);

    QPushButton btnReset("重置");
    layout.addRow(&btnReset);

    QLineEdit editR("0");
    layout.addRow("红色", &editR);

    QLineEdit editG("0");
    layout.addRow("绿色", &editG);

    QLineEdit editB("0");
    layout.addRow("蓝色", &editB);

    QPushButton btnChangeColor("改变画笔颜色");
    layout.addRow(&btnChangeColor);

    QLineEdit editX("0");
    layout.addRow("X坐标", &editX);

    QLineEdit editY("0");
    layout.addRow("Y坐标", &editY);

    QLineEdit editTheta("0");
    layout.addRow("角度", &editTheta);

    QPushButton btnSetXY("设置位置");
    layout.addRow(&btnSetXY);

    // 事件
    btnReset.connect(&btnReset, &QPushButton::clicked, &window, bind(clickReset, node));

    btnChangeColor.connect(&btnChangeColor, &QPushButton::clicked, &window, bind(clickChangeColor, node,&editR,&editG,&editB));


    window.show();

    return app.exec();
}
- 调试

- c++代码实现
#include "ros/ros.h"
#include<iostream>
#include <QtWidgets>
#include <QApplication>

#include "std_srvs/Empty.h"
#include "turtlesim/SetPen.h"
#include "turtlesim/TeleportAbsolute.h"

using namespace std;

// 设置点击重置的回调函数
void clickReset(ros::NodeHandle &node) {
    ROS_INFO_STREAM("clicke reset");

    string serviceName = "/reset";

    ros::ServiceClient client = node.serviceClient<std_srvs::Empty>(serviceName);

    std_srvs::Empty msg;
    client.call(msg);

    client.shutdown();

}

// 设置点击改变颜色的回调函数
void clickChangeColor(ros::NodeHandle &node, QLineEdit *editR, QLineEdit *editG, QLineEdit *editB) {

    string serviceName = "/turtle1/set_pen";

    uint r = editR->text().toUInt();
    uint g = editG->text().toUInt();
    uint b = editB->text().toUInt();

    ros::ServiceClient client = node.serviceClient<turtlesim::SetPen>(serviceName);

    turtlesim::SetPen srv;
    srv.request.r = r;
    srv.request.g = g;
    srv.request.b = b;
    srv.request.width = 4;
    client.call(srv);

    client.shutdown();

}

// 设置点击改变小乌龟位置的回调函数
void clickSetXY(ros::NodeHandle &node, QLineEdit *editX, QLineEdit *editY, QLineEdit *editTheta) {

    string serviceName = "/turtle1/teleport_absolute";

    float x = editX->text().toFloat();
    float y = editY->text().toFloat();
    float theta = editTheta->text().toFloat() * M_PI / 180;

    ros::ServiceClient client = node.serviceClient<turtlesim::TeleportAbsolute>(serviceName);

    turtlesim::TeleportAbsolute srv;
    srv.request.x = x;
    srv.request.y = y;
    srv.request.theta = theta;
    client.call(srv);

    client.shutdown();

}


int main(int argc, char **argv) {

    string nodeName = "turtle_service_control";

    // 1.创建节点
    ros::init(argc, argv, nodeName);
    ros::NodeHandle node;

    //构建Qt界面
    QApplication app(argc, argv);

    // window
    QWidget window;
    window.resize(400, 0);

    // layout
    QFormLayout layout;
    window.setLayout(&layout);

    QPushButton btnReset("重置");
    layout.addRow(&btnReset);

    QLineEdit editR("0");
    layout.addRow("红色", &editR);

    QLineEdit editG("0");
    layout.addRow("绿色", &editG);

    QLineEdit editB("0");
    layout.addRow("蓝色", &editB);

    QPushButton btnChangeColor("改变画笔颜色");
    layout.addRow(&btnChangeColor);

    QLineEdit editX("0");
    layout.addRow("X坐标", &editX);

    QLineEdit editY("0");
    layout.addRow("Y坐标", &editY);

    QLineEdit editTheta("0");
    layout.addRow("角度", &editTheta);

    QPushButton btnSetXY("设置位置");
    layout.addRow(&btnSetXY);

    // 重置小乌龟事件
    btnReset.connect(&btnReset, &QPushButton::clicked, &window, bind(clickReset, node));

    // 改变颜色事件
    btnChangeColor.connect(&btnChangeColor, &QPushButton::clicked, &window,
                           bind(clickChangeColor, node, &editR, &editG, &editB));

    // 改变小乌龟位置事件
    btnSetXY.connect(&btnSetXY, &QPushButton::clicked, &window,
                     bind(clickSetXY, node, &editX, &editY, &editTheta));


    window.show();

    return app.exec();
}
- 调试


日志级别的划分:
| 级别 | 描述 |
|---|---|
DEBUG |
调试日志,供开发测试使用 |
INFO |
常规日志,用户可见级别的信息 |
WARN |
警告信息。 |
ERROR |
错误信息。程序出错后打印的信息 |
FATAL |
致命错误。出现宕机的日志记录 |
日志可见等级顺序是:
DEBUG > INFO > WARN > ERROR > FATAL
通常程序在运行时,都会设置一个日志等级,默认等级时INFO。
-
假如将当前程序日志等级设置为
DEBUG,可查看到的日志信息包含:DEBUG,INFO,WARN,ERROR,FATAL -
假如将当前程序日志等级设置为
INFO,可查看到的日志信息包含:INFO,WARN,ERROR,FATAL -
假如将当前程序日志等级设置为
WARN,可查看到的日志信息包含:WARN,ERROR,FATAL -
假如将当前程序日志等级设置为
ERROR,可查看到的日志信息包含:ERROR,FATAL -
假如将当前程序日志等级设置为
FATAL,可查看到的日志信息包含:FATAL
#C++日志API
在ROS系统中,提供了常规API供我们使用
基础API格式:
ROS_DEBUG("打印的内容");
ROS_INFO("打印的内容");
ROS_WARN("打印的内容");
ROS_ERROR("打印的内容");
ROS_FATAL("打印的内容");
stream API格式:
ROS_DEBUG_STREAM("打印的内容" << "hello");
ROS_INFO_STREAM("打印的内容" << "hello");
ROS_WARN_STREAM("打印的内容" << "hello");
ROS_ERROR_STREAM("打印的内容" << "hello");
ROS_FATAL_STREAM("打印的内容" << "hello");
#Python日志API
rospy.logdebug("打印的内容")
rospy.loginfo("打印的内容")
rospy.logwarn("打印的内容")
rospy.logerror("打印的内容")
rospy.logfatal("打印的内容")
#日志查看系统
我们可以时使用rqt_console命令来查看过滤日志
rosrun rqt_console rqt_console

#日志级别设置
通过右上角的设置按钮进入进行日志级别的设置:


#日志级别过滤


-
创建工程
-
配置package.xml文件 在package.xml种添加如下配置:

<build_depend>message_generation</build_depend>
<exec_depend>message_runtime</exec_depend>
message_generation是消息生成工具,在打包编译时会用到
message_runtime运行时消息处理工具
- 配置CMakeLists.txt
在
find_package添加message_generation,结果如下:
find_package(catkin REQUIRED COMPONENTS
  roscpp
  rosmsg
  rospy
  message_generation
)
添加add_message_file,结果如下:
add_service_files(
        FILES
        NumOption.srv
)
这里的NumOption.srv要和你创建的srv文件名称一致,且必须时在srv目录下,否则编译会出现问题
添加generation_msg,结果如下:
generate_messages(
        DEPENDENCIES
        std_msgs
)
这个配置的作用是添加生成消息的依赖,默认的时候要添加std_msgs
修改catkin_package,结果如下:
catkin_package(
#  INCLUDE_DIRS include
#  LIBRARIES demo_msg
#  CATKIN_DEPENDS roscpp rosmsg rospy
#  DEPENDS system_lib
        CATKIN_DEPENDS message_runtime
)
- 通过rossrv工具校验
rossrv show demo_srvs/NumOption
- 创建工程
- 配置package.xml文件
- 配置CMakeLists.txt
- 编写c++代码


#include "ros/ros.h"
#include<iostream>
#include "sample_srvs/NumOption.h"

using namespace std;

//bool Foo::callback(std_srvs::Empty& request, std_srvs::Empty& response)
//{
//    return true;
//}

// 3. 回调函数
bool callback(sample_srvs::NumOptionRequest &request, sample_srvs::NumOptionResponse &response) {

    // 4. 运算逻辑
    long a = request.a;
    long b = request.b;
    string option = request.option;

    long result = 0;

    if ("+" == option) {
        result = a + b;
    } else if ("-" == option) {
        result = a - b;

    } else if ("*" == option) {
        result = a * b;

    } else if ("/" == option) {
        result = a / b;

    } else if ("%" == option) {
        result = a % b;

    }

    response.result = result;

    return true;
}


int main(int argc, char **argv) {

    string nodeName = "service_server";
    string service = "/server/add";

    // 1. init node
    ros::init(argc, argv, nodeName);
    ros::NodeHandle node;

    // 2. 创建Server端 std::string& service, bool(T::*srv_func)(MReq &, MRes &), T *obj)
    const ros::ServiceServer &server = node.advertiseService(service, callback);

    // 5. 阻塞
    ros::spin();
    return 0;
}
如果遇到#include"sample_srvs"的包一直没有自动显示,则重新打开工程


-
创建工程
-
配置CMakeList文件
-
编写c++代码


#include "ros/ros.h"
#include<iostream>
#include "sample_srvs/NumOption.h"

using namespace std;

int main(int argc, char **argv) {

    string nodeName = "service_client";
    string service = "/server/option";

    // 1. init node
    ros::init(argc, argv, nodeName);
    ros::NodeHandle node;

    // 2. 通过Node创建Client端
    ros::ServiceClient client = node.serviceClient<sample_srvs::NumOption>(service);

    // 3. 访问服务器
    sample_srvs::NumOption srv;
    srv.request.a = 10;
    srv.request.b = 5;
    srv.request.option = "+";
    // 4. 调用srv
    client.call(srv);

    // 5. 打印结果
    ROS_INFO_STREAM("result:" << srv.response.result);
    return 0;
}
- 调试

- python代码
# /usr/bin env python
# encoding:utf-8

import rospy
from sample_srvs.srv import NumOption, NumOptionRequest, NumOptionResponse


# 3. 逻辑运算
def handler(request):
    a = request.a
    b = request.b
    option = request.option

    result = 0

    if "+" == option:
        result = a + b
    elif "-" == option:
        result = a - b
    elif "*" == option:
        result = a * b
    elif "/" == option:
        result == a / b
    elif "%" == option:
        result == a % b

        return result


if __name__ == '__main__':
    # 1-2. 节点名称
    nodeName = "service_server"

    # 2-2. 服务名称
    serviceName = "/service/option"

    # 1-1. init node
    rospy.init_node(nodeName)

    # 2-1. 创建service
    rospy.Service(serviceName, NumOption, handler)

   # 4. 阻塞
    rospy.spin()
- 调试

- python代码
# /usr/bin env python
# encoding:utf-8

import rospy
from sample_srvs.srv import NumOption, NumOptionRequest, NumOptionResponse

if __name__ == '__main__':
    # 1-2. 节点名称
    nodeName = "service_client"

    # 2-2. 访问地址
    serviceName = "/service/option"

    # 1-1. init node
    rospy.init_node(nodeName)

    # 2-1. 创建service的client端
    client = rospy.ServiceProxy(serviceName, NumOption)
    response = client(a=10, b=2, option="*")
    # 3.
    rospy.loginfo(response)
- 创建GetStuId.srv文件
- 检验是否创建完成
- 编写c++服务端代码


#include "ros/ros.h"
#include<iostream>
#include "sample_srvs/GetStuId.h"
#include "sample_msgs/Student.h"

using namespace std;

//bool Foo::callback(std_srvs::Empty& request, std_srvs::Empty& response)
//{
//    return true;
//}

// 3. 回调函数
bool callback (sample_srvs::GetStuIdRequest &request,sample_srvs::GetStuIdResponse &response){

    // 4. request是客户端给服务端发送的数据
    sample_msgs::Student student = request.student;

    response.stuId = student.name + to_string(student.age);

    return true;
}


int main(int argc, char **argv) {

    // 创建节点名称
    string nodeName = "service_server";

    // 访问地址
    string service = "/server/getstuid";

    // 1. init node
    ros::init(argc, argv, nodeName);
    ros::NodeHandle node;

    // 2. 创建server
    const ros::ServiceServer &server = node.advertiseService(service, callback);

    // 5. 阻塞
    ros::spin();

    return 0;

}
- 配置CMakeList.txt文件
- 调试


- python客户端代码
# /usr/bin env python
# encoding:utf-8

import rospy
from sample_srvs.srv import GetStuId
from sample_msgs.msg import Student

if __name__ == '__main__':
    # 1-2. 节点名称
    nodeName = "service_client"

    # 2-2. 访问地址
    serviceName = "server/getstuid"

    # 1-1. init node
    rospy.init_node(nodeName)

    # 2-1. 创建service的client端
    client = rospy.ServiceProxy(serviceName, GetStuId)
    response = client(student = Student(name = "zhangsan",age = 19))

    # 3.
    rospy.loginfo(response)
- sample_srvs相关配置
- python服务端代码

# /usr/bin env python
# encoding:utf-8

import rospy
from sample_srvs.srv import GetTeam, GetTeamResponse
from sample_msgs.msg import Student
from std_msgs.msg import String


# 3. 逻辑
def handler(request):
    name = request.name

    response = GetTeamResponse()
    response.members = []
    response.members.append(Student(name="zhangsan", age=15))
    response.members.append(Student(name="lisi", age=16))
    response.members.append(Student(name="wangwu", age=17))

    response.leader = Student(name="zhaoliu", age=18)

    response.info = String(data="team information")

    return response


if __name__ == '__main__':
    # 1-2. 节点名称
    nodeName = "service_server"

    # 2-2. 服务名称
    serviceName = "/service/getteam"

    # 1-1. init node
    rospy.init_node(nodeName)

    # 2-1. 创建service
    rospy.Service(serviceName, GetTeam, handler)

    rospy.spin()
- c++客户端代码编写
#include "ros/ros.h"
#include<iostream>
#include <vector>

#include "sample_srvs/GetTeam.h"
#include "sample_msgs/Student.h"
#include "std_msgs/String.h"

using namespace std;

int main(int argc, char **argv) {

    string nodeName = "service_client";
    string service = "/service/getteam";

    // 1. init node
    ros::init(argc, argv, nodeName);
    ros::NodeHandle node;

    // 2. 通过Node创建Client端
    ros::ServiceClient client = node.serviceClient<sample_srvs::GetTeam>(service);

    // 3. 访问服务器
    sample_srvs::GetTeam srv;
    srv.request.name = "wangwu";
    // 4. 调用srv
    client.call(srv);

    sample_srvs::GetTeam::Response &response = srv.response;

    vector<sample_msgs::Student> &members = response.members;

    sample_msgs::Student leader = response.leader;

    std_msgs::String info = response.info;


    return 0;

}
-
创建工程 cd ws/ros_ws/src catkin_create_pkg sample_robot roscpp rospy rosmsg
-
配置CMakeLists文件
cmake_minimum_required(VERSION 2.8.3)
project(sample_robot)

## Compile as C++11, supported in ROS Kinetic and newer
 add_compile_options(-std=c++11)

## Find catkin macros and libraries
## if COMPONENTS list like find_package(catkin REQUIRED COMPONENTS xyz)
## is used, also find other catkin packages
find_package(catkin REQUIRED COMPONENTS
        roscpp
        rosmsg
        rospy
        )

##############################################################################
# Qt Environment
##############################################################################

set(CMAKE_INCLUDE_CURRENT_DIR ON)
set(CMAKE_AUTOMOC ON)

find_package(Qt5 COMPONENTS Core Gui Widgets PrintSupport)
##############################################################################

## System dependencies are found with CMake's conventions
# find_package(Boost REQUIRED COMPONENTS system)


## Uncomment this if the package has a setup.py. This macro ensures
## modules and global scripts declared therein get installed
## See http://ros.org/doc/api/catkin/html/user_guide/setup_dot_py.html
# catkin_python_setup()

################################################
## Declare ROS messages, services and actions ##
################################################

## To declare and build messages, services or actions from within this
## package, follow these steps:
## * Let MSG_DEP_SET be the set of packages whose message types you use in
##   your messages/services/actions (e.g. std_msgs, actionlib_msgs, ...).
## * In the file package.xml:
##   * add a build_depend tag for "message_generation"
##   * add a build_depend and a exec_depend tag for each package in MSG_DEP_SET
##   * If MSG_DEP_SET isn't empty the following dependency has been pulled in
##     but can be declared for certainty nonetheless:
##     * add a exec_depend tag for "message_runtime"
## * In this file (CMakeLists.txt):
##   * add "message_generation" and every package in MSG_DEP_SET to
##     find_package(catkin REQUIRED COMPONENTS ...)
##   * add "message_runtime" and every package in MSG_DEP_SET to
##     catkin_package(CATKIN_DEPENDS ...)
##   * uncomment the add_*_files sections below as needed
##     and list every .msg/.srv/.action file to be processed
##   * uncomment the generate_messages entry below
##   * add every package in MSG_DEP_SET to generate_messages(DEPENDENCIES ...)

## Generate messages in the 'msg' folder
# add_message_files(
#   FILES
#   Message1.msg
#   Message2.msg
# )

## Generate services in the 'srv' folder
# add_service_files(
#   FILES
#   Service1.srv
#   Service2.srv
# )

## Generate actions in the 'action' folder
# add_action_files(
#   FILES
#   Action1.action
#   Action2.action
# )

## Generate added messages and services with any dependencies listed here
# generate_messages(
#   DEPENDENCIES
#   std_msgs  # Or other packages containing msgs
# )

################################################
## Declare ROS dynamic reconfigure parameters ##
################################################

## To declare and build dynamic reconfigure parameters within this
## package, follow these steps:
## * In the file package.xml:
##   * add a build_depend and a exec_depend tag for "dynamic_reconfigure"
## * In this file (CMakeLists.txt):
##   * add "dynamic_reconfigure" to
##     find_package(catkin REQUIRED COMPONENTS ...)
##   * uncomment the "generate_dynamic_reconfigure_options" section below
##     and list every .cfg file to be processed

## Generate dynamic reconfigure parameters in the 'cfg' folder
# generate_dynamic_reconfigure_options(
#   cfg/DynReconf1.cfg
#   cfg/DynReconf2.cfg
# )

###################################
## catkin specific configuration ##
###################################
## The catkin_package macro generates cmake config files for your package
## Declare things to be passed to dependent projects
## INCLUDE_DIRS: uncomment this if your package contains header files
## LIBRARIES: libraries you create in this project that dependent projects also need
## CATKIN_DEPENDS: catkin_packages dependent projects also need
## DEPENDS: system dependencies of this project that dependent projects also need
catkin_package(
        #  INCLUDE_DIRS include
        #  LIBRARIES sample_robot
        #  CATKIN_DEPENDS roscpp rosmsg rospy
        #  DEPENDS system_lib
)

###########
## Build ##
###########

## Specify additional locations of header files
## Your package locations should be listed before other locations
include_directories(
        # include
        ${catkin_INCLUDE_DIRS}
)

## Declare a C++ library
# add_library(${PROJECT_NAME}
#   src/${PROJECT_NAME}/sample_robot.cpp
# )

## Add cmake target dependencies of the library
## as an example, code may need to be generated before libraries
## either from message generation or dynamic reconfigure
# add_dependencies(${PROJECT_NAME} ${${PROJECT_NAME}_EXPORTED_TARGETS} ${catkin_EXPORTED_TARGETS})

## Declare a C++ executable
## With catkin_make all packages are built within a single CMake context
## The recommended prefix ensures that target names across packages don't collide
# add_executable(${PROJECT_NAME}_node src/sample_robot_node.cpp)
add_executable(robot1 src/robot1.cpp)


## Rename C++ executable without prefix
## The above recommended prefix causes long target names, the following renames the
## target back to the shorter version for ease of user use
## e.g. "rosrun someones_pkg node" instead of "rosrun someones_pkg someones_pkg_node"
# set_target_properties(${PROJECT_NAME}_node PROPERTIES OUTPUT_NAME node PREFIX "")

## Add cmake target dependencies of the executable
## same as for the library above
# add_dependencies(${PROJECT_NAME}_node ${${PROJECT_NAME}_EXPORTED_TARGETS} ${catkin_EXPORTED_TARGETS})

## Specify libraries to link a library or executable target against
# target_link_libraries(${PROJECT_NAME}_node
#   ${catkin_LIBRARIES}
# )

target_link_libraries(
        robot1
        ${catkin_LIBRARIES}
        Qt5::Core
        Qt5::Gui
        Qt5::Widgets
        Qt5::PrintSupport
)

#############
## Install ##
#############

# all install targets should use catkin DESTINATION variables
# See http://ros.org/doc/api/catkin/html/adv_user_guide/variables.html

## Mark executable scripts (Python etc.) for installation
## in contrast to setup.py, you can choose the destination
# install(PROGRAMS
#   scripts/my_python_script
#   DESTINATION ${CATKIN_PACKAGE_BIN_DESTINATION}
# )

## Mark executables and/or libraries for installation
# install(TARGETS ${PROJECT_NAME} ${PROJECT_NAME}_node
#   ARCHIVE DESTINATION ${CATKIN_PACKAGE_LIB_DESTINATION}
#   LIBRARY DESTINATION ${CATKIN_PACKAGE_LIB_DESTINATION}
#   RUNTIME DESTINATION ${CATKIN_PACKAGE_BIN_DESTINATION}
# )

## Mark cpp header files for installation
# install(DIRECTORY include/${PROJECT_NAME}/
#   DESTINATION ${CATKIN_PACKAGE_INCLUDE_DESTINATION}
#   FILES_MATCHING PATTERN "*.h"
#   PATTERN ".svn" EXCLUDE
# )

## Mark other files for installation (e.g. launch and bag files, etc.)
# install(FILES
#   # myfile1
#   # myfile2
#   DESTINATION ${CATKIN_PACKAGE_SHARE_DESTINATION}
# )

#############
## Testing ##
#############

## Add gtest based cpp test target and link libraries
# catkin_add_gtest(${PROJECT_NAME}-test test/test_sample_robot.cpp)
# if(TARGET ${PROJECT_NAME}-test)
#   target_link_libraries(${PROJECT_NAME}-test ${PROJECT_NAME})
# endif()

## Add folders to be run by python nosetests
# catkin_add_nosetests(test)
- 编写c++代码
#include <iostream>
#include "ros/ros.h"

#include "QApplication"
#include "QtWidgets"

using namespace std;

void clickDone(QLineEdit *xEdit, QLineEdit *yEdit) {
    double distX = xEdit->text().toDouble();
    double distY = yEdit->text().toDouble();

    ROS_INFO_STREAM("distX: " << distX << "  distY:" << distY);
}

int main(int argc, char **argv) {
    string nodeName = "turtle_control";

    // 创建节点
    ros::init(argc, argv, nodeName, ros::init_options::AnonymousName);
    ros::NodeHandle node;

    // 创建Qt程序
    QApplication app(argc, argv);
    //窗体
    QWidget window;
    window.setWindowTitle("小乌龟控制器");
    window.resize(400, 0);
    //布局
    QFormLayout layout;
    window.setLayout(&layout);

    // 目标x坐标
    QLineEdit xEdit("10.54444");
    layout.addRow("目标x坐标", &xEdit);

    // 目标y坐标
    QLineEdit yEdit("5.54444");
    layout.addRow("目标y坐标", &yEdit);

    //当前姿态坐标信息
    QHBoxLayout poseLayout;
    layout.addRow(&poseLayout);

    QFormLayout xLayout;
    QLabel xLb;
    xLayout.addRow("x坐标", &xLb);
    poseLayout.addLayout(&xLayout);

    QFormLayout yLayout;
    QLabel yLb;
    yLayout.addRow("y坐标", &yLb);
    poseLayout.addLayout(&yLayout);

    QFormLayout thetaLayout;
    QLabel thetaLb;
    thetaLayout.addRow("角度", &thetaLb);
    poseLayout.addLayout(&thetaLayout);

    // 执行按钮
    QPushButton btnDone("执行");
    layout.addRow(&btnDone);

    // 事件设置
    btnDone.connect(&btnDone, &QPushButton::clicked,&window,bind(&clickDone, &xEdit, &yEdit));

    window.show();

    return app.exec();
}
- 调试

- 编写c++代码
#include <iostream>
#include "ros/ros.h"

#include "QApplication"
#include "QtWidgets"

#include "geometry_msgs/Twist.h"
#include "turtlesim/Pose.h"

using namespace std;

void clickDone(QLineEdit *xEdit, QLineEdit *yEdit) {
    double distX = xEdit->text().toDouble();
    double distY = yEdit->text().toDouble();

    ROS_INFO_STREAM("distX: " << distX << "  distY:" << distY);
}

void poseCallback(const turtlesim::Pose::ConstPtr &msg, QLabel *xLb, QLabel *yLb, QLabel *thetaLb) {
//    ROS_INFO_STREAM("x: " << msg->x);
//    ROS_INFO_STREAM("y: " << msg->y);
//    ROS_INFO_STREAM("theta: " << msg->theta);
//    ROS_INFO_STREAM("linear: " << msg->linear_velocity);
//    ROS_INFO_STREAM("angular: " << msg->angular_velocity);
//    ROS_INFO_STREAM("degrees: " << msg->theta * 180 / M_PI);
//    ROS_INFO_STREAM("=========================================");

    xLb->setText(QString::fromStdString(to_string(msg->x)));
    yLb->setText(QString::fromStdString(to_string(msg->y)));
    thetaLb->setText(QString::fromStdString(to_string(msg->theta * 180 / M_PI)));
}

int main(int argc, char **argv) {
    string nodeName = "turtle_control";

    // 创建节点
    ros::init(argc, argv, nodeName, ros::init_options::AnonymousName);
    ros::NodeHandle node;

    // 创建Qt程序
    QApplication app(argc, argv);
    //窗体
    QWidget window;
    window.setWindowTitle("小乌龟控制器");
    window.resize(400, 0);
    //布局
    QFormLayout layout;
    window.setLayout(&layout);

    // 目标x坐标
    QLineEdit xEdit("10.54444");
    layout.addRow("目标x坐标", &xEdit);

    // 目标y坐标
    QLineEdit yEdit("5.54444");
    layout.addRow("目标y坐标", &yEdit);

    //当前姿态坐标信息
    QHBoxLayout poseLayout;
    layout.addRow(&poseLayout);

    QFormLayout xLayout;
    QLabel xLb;
    xLayout.addRow("x坐标", &xLb);
    poseLayout.addLayout(&xLayout);

    QFormLayout yLayout;
    QLabel yLb;
    yLayout.addRow("y坐标", &yLb);
    poseLayout.addLayout(&yLayout);

    QFormLayout thetaLayout;
    QLabel thetaLb;
    thetaLayout.addRow("角度", &thetaLb);
    poseLayout.addLayout(&thetaLayout);

    // 执行按钮
    QPushButton btnDone("执行");
    layout.addRow(&btnDone);

    // 事件设置
    btnDone.connect(&btnDone, &QPushButton::clicked, &window, bind(&clickDone, &xEdit, &yEdit));

    window.show();

    ros::AsyncSpinner spinner(1);
    spinner.start();


//小乌龟控制地址
    string velTopicName = "/turtle1/cmd_vel";
//小乌龟数据获得
    string poseTopicName = "/turtle1/pose";
// 创建小乌龟移动发布者
    ros::Publisher &&publisher = node.advertise<geometry_msgs::Twist>(velTopicName, 1000);
// 创建小乌龟位置的订阅者
    const ros::Subscriber &subscriber = node.subscribe<turtlesim::Pose>(poseTopicName, 1000,
                                                                        bind(poseCallback, _1, &xLb, &yLb, &thetaLb));

    return app.exec();
}
- 调试

- 编写c++代码
#include <iostream>
#include "ros/ros.h"

#include "QApplication"
#include "QtWidgets"

#include "geometry_msgs/Twist.h"
#include "turtlesim/Pose.h"

using namespace std;

turtlesim::Pose::ConstPtr pose;

double calcDistance(double srcX, double srcY, double distX, double distY) {
    return sqrt(pow(srcX - distX, 2) + pow(srcY - distY, 2));
}

void clickDone(QLineEdit *xEdit, QLineEdit *yEdit, ros::Publisher publisher) {
    double distX = xEdit->text().toDouble();
    double distY = yEdit->text().toDouble();

    ROS_INFO_STREAM("distX: " << distX << "  distY:" << distY);

    double srcX = pose->x;
    double srcY = pose->y;


    double linearDistance = calcDistance(srcX, srcY, distX, distY);
    double time = 5;
    double linearVel = linearDistance / time;

/*
 * 、// 方案一:
    ros::Rate rate(1);
    for (int i = 0; i < 5; ++i) {

        geometry_msgs::Twist twist;
        twist.linear.x = linearVel;
        twist.angular.z = 0;
        publisher.publish(twist);

        rate.sleep();
    }
*/

    double hz = 10;
    ros::Rate rate(hz);
    double runDistance = 0;
   double startTime = ros::Time::now().toSec();
    while (runDistance < linearDistance) {
        geometry_msgs::Twist twist;
        twist.linear.x = linearVel;
        twist.angular.z = 0;
        publisher.publish(twist);

        rate.sleep();

        runDistance += linearVel * 1 / hz;
    }
   double endTime = ros::Time::now().toSec();
    ROS_DEBUG_STREAM(" cost: "<<(endTime - startTime)));

    // 停止
    geometry_msgs::Twist twist;
    twist.linear.x = 0;
    twist.angular.z = 0;
    publisher.publish(twist);


}

void poseCallback(const turtlesim::Pose::ConstPtr &msg, QLabel *xLb, QLabel *yLb, QLabel *thetaLb) {
//    ROS_INFO_STREAM("x: " << msg->x);
//    ROS_INFO_STREAM("y: " << msg->y);
//    ROS_INFO_STREAM("theta: " << msg->theta);
//    ROS_INFO_STREAM("linear: " << msg->linear_velocity);
//    ROS_INFO_STREAM("angular: " << msg->angular_velocity);
//    ROS_INFO_STREAM("degrees: " << msg->theta * 180 / M_PI);
//    ROS_INFO_STREAM("=========================================");

    pose = msg;

    xLb->setText(QString::fromStdString(to_string(msg->x)));
    yLb->setText(QString::fromStdString(to_string(msg->y)));
    thetaLb->setText(QString::fromStdString(to_string(msg->theta * 180 / M_PI)));
}

int main(int argc, char **argv) {
    string nodeName = "turtle_control";

    // 创建节点
    ros::init(argc, argv, nodeName, ros::init_options::AnonymousName);
    ros::NodeHandle node;

    // 创建Qt程序
    QApplication app(argc, argv);
    //窗体
    QWidget window;
    window.setWindowTitle("小乌龟控制器");
    window.resize(400, 0);
    //布局
    QFormLayout layout;
    window.setLayout(&layout);

    // 目标x坐标
    QLineEdit xEdit("10.54444");
    layout.addRow("目标x坐标", &xEdit);

    // 目标y坐标
    QLineEdit yEdit("5.54444");
    layout.addRow("目标y坐标", &yEdit);

    //当前姿态坐标信息
    QHBoxLayout poseLayout;
    layout.addRow(&poseLayout);

    QFormLayout xLayout;
    QLabel xLb;
    xLayout.addRow("x坐标", &xLb);
    poseLayout.addLayout(&xLayout);

    QFormLayout yLayout;
    QLabel yLb;
    yLayout.addRow("y坐标", &yLb);
    poseLayout.addLayout(&yLayout);

    QFormLayout thetaLayout;
    QLabel thetaLb;
    thetaLayout.addRow("角度", &thetaLb);
    poseLayout.addLayout(&thetaLayout);

    // 执行按钮
    QPushButton btnDone("执行");
    layout.addRow(&btnDone);

    window.show();

    ros::AsyncSpinner spinner(1);
    spinner.start();


//小乌龟控制地址
    string velTopicName = "/turtle1/cmd_vel";
//小乌龟数据获得
    string poseTopicName = "/turtle1/pose";
// 创建小乌龟移动发布者
    ros::Publisher &&publisher = node.advertise<geometry_msgs::Twist>(velTopicName, 1000);
// 创建小乌龟位置的订阅者
    const ros::Subscriber &subscriber = node.subscribe<turtlesim::Pose>(poseTopicName, 1000,
                                                                        bind(poseCallback, _1, &xLb, &yLb, &thetaLb));

    // 事件设置
    btnDone.connect(&btnDone, &QPushButton::clicked, &window, bind(&clickDone, &xEdit, &yEdit, publisher));


    return app.exec();
}
- 调试

- 配置sample_action_msgs/action/CountNumber.action
- 编写服务端c++代码

#include "ros/ros.h"
#include <iostream>
#include "actionlib/client/simple_action_client.h"
#include "actionlib/client/simple_client_goal_state.h"
#include "sample_action_msgs/CountNumberAction.h"
#include "actionlib/client/simple_action_client.h"

using namespace std;

void done_cb(const actionlib::SimpleClientGoalState &state,
             const sample_action_msgs::CountNumberResult::ConstPtr &result,
             const actionlib::SimpleActionClient<sample_action_msgs::CountNumberAction> * client) {
    if (state == state.ABORTED) {
        ROS_INFO("server working error, don't finish my job.");
    } else if (state == state.PREEMPTED) {
        ROS_INFO("client cancel job.");
    } else if (state == state.SUCCEEDED) {
        ROS_INFO("server finish job.");
        ROS_INFO_STREAM("result: " << result->count);
    }
}

void active_cb() {
    ROS_INFO_STREAM("active callback");
}

void feedback_cb(const sample_action_msgs::CountNumberFeedback::ConstPtr &feedback) {
    ROS_INFO_STREAM("percent: " << feedback->percent);
}

int main(int argc, char **argv) {

    // 定义
    string nodeName = "simple_action_client";
    string actionName = "/CountNumber";

    // 初始化
    ros::init(argc, argv, nodeName, ros::init_options::AnonymousName);
    ros::NodeHandle node;

    // 创建SimpleActionClient
    actionlib::SimpleActionClient<sample_action_msgs::CountNumberAction> &&client =
            actionlib::SimpleActionClient<sample_action_msgs::CountNumberAction>(node, actionName);
    // 等待服务器启动
    client.waitForServer();


    // 发送Goal
    sample_action_msgs::CountNumberGoal goal;
    goal.max = 100;
    goal.duration = 1;
    client.sendGoal(goal,
                    boost::bind(done_cb, _1, _2, &client),
                    boost::bind(active_cb),
                    boost::bind(feedback_cb, _1));

    ros::spin();


    return 0;
}
- 调试


