This example demonstrates how to perform remote device control over MQTT protocol. Build & flash a firmware and configure WiFi (see quick start guide), and configure MQTT server:
miot build
miot flash
miot config-set wifi............
miot console
The device automatically assigns MQTT publish and subscribe topics.
Use miot config-get mqtt to see the values.
Then use an MQTT client to send messages, for example web-based client at http://www.hivemq.com/demos/websocket-client/. Click on "Connect", then "Add new topic subscription", choose topic set mqtt.sub, then publish a message. In the "Topic" field, specify mqtt.pub topic, and in the "Message" field, one of the following:
{"method": "gpio_write", "args": {"pin": 2, "state": 0}}- sets GPIO pin X into state Y{"method": "gpio_read", "args": {"pin": 2}}- read GPIO pin X{"method": "handle_button", "args": {"pin": 0}}- start listening on button presses on GPIO pin X. When button is pressed, a message "click" is sent to the/responsetopic{"method": "i2c_read", "args": {"addr": 143, "len": 10}}- read data from the I2C bus.{"method": "i2c_write", "args": {"addr": 143, "data": "af404c"}}- write byte stream to the I2C bus. In this example, there are 3 bytes0xaf 0x40 0x4c. Status code 0 in response means success, all other codes mean failure.
You can attach a string tag to any command, it'll be returned in the response:
{"method": "gpio_read", "tag": "foo", "args": {"pin": 2}} -> {"result": "gpio_read", "pin": 2, "state": 1, "tag": "foo"}

By default, this firmware connects to the broker.mqttdashboard.com:1883
MQTT server.
You can change this default setting by editing src/conf_schema.yaml file
and rebuilding/reflashing the firmware. Alternatively, you can change
any setting on the fly, for example to choose a different MQTT server:
miot config-set mqtt.server=my_server:my_port
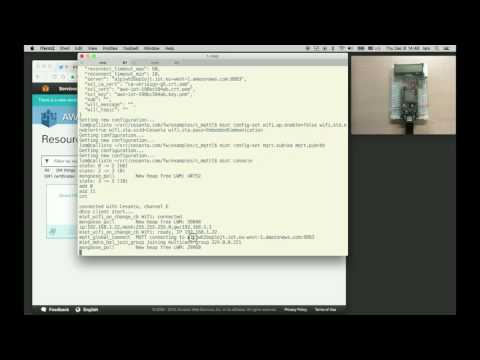
First, download the Amazon's aws utility and run aws configure.
Then you're ready to onboard
... build, flash, configure wifi
miot aws-iot-setup --aws-iot-policy YOUR_POLICY
miot console
Login to AWS IoT console, use web-based MQTT client to send messages. See https://mongoose-iot.com/blog/esp8266-remote-control-via-aws-iot/ for the step-by-step instructions.