Portions of the guide below have been copied from here. All credit and many thanks to Dave Johnson (@thisDaveJ).
I recommend a Raspberry Pi 3 B+ kit that includes power adapter, case, and micro SD card with NOOBS pre-installed. You can always use any old micro SD card, but search online for the proper way to format it and copy NOOBS.
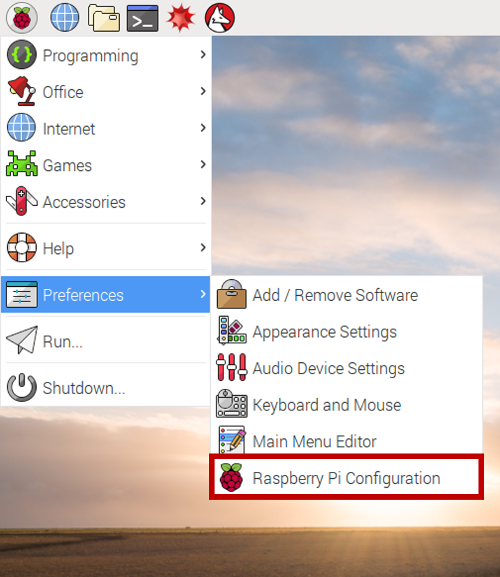
We first need to make a few changes to the RasPi to for the purpose of optimization and personalizing it for our use. To get started, launch Raspberry Pi Configuration which is located in the Menu under Preferences.
This will launch the Raspberry Pi Configuration utility, a handy graphical version of the console-based raspi-config program that was used for many years to configure the RasPi (and is actually still used behind the scenes by this graphical version). This will launch the following window:
Let’s start configuring!

- Expand Filesystem – click this button to expand the filesystem. This ensures that all of the SD card storage is available to Raspbian.
- (Optional) Change Password – from a security perspective, it’s a good idea to change the default password for the “pi” user. Just make sure you don’t forget it. 😉
- Hostname – if you prefer less typing when connecting remotely (explained later), you can change the host name from “raspberrypi” to something shorter such as “raspi”.
The Raspberry Pi is the brilliant brainchild from our friends in the UK. If you are not from the UK, you will need to change some of the localization settings. For example, some of the keys on your keyboard may not work as expected. Here are the changes I made to make my RasPi feel at home in San Diego:
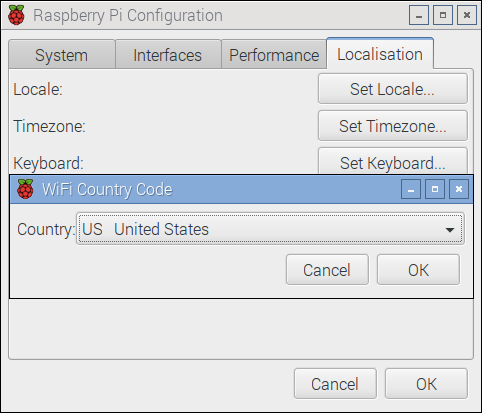
First, click on the Localisation tab:
Click the Set Locale button to change your locale as appropriate and then click OK. Mine looks like this after making the changes:
Click the Set Timezone button to set your timezone and then click OK.
Click the Set Keyboard button to set your keyboard as appropriate and then click OK. Here’s mine:
Finally, click the Set WiFi Country button and change as needed. This dialog box presents a large list of countries. Use the arrow keys on your keyboard to scroll through the list to find your country and then click OK.
After completing these configuration steps, click OK to exit the Raspberry Pi Configuration program. The RasPi will then let you know that it needs to reboot to activate the changes you just made. Reboot it now.


After the RasPi reboots, we are ready to get Wi-Fi up and running to get on the network.
- Click on the network icon in the top right of the screen as shown in the screenshot. The network icon will look different than the icon in the screenshot before Wi-Fi is configured; however, it will should be located between the Bluetooth icon and the speaker (volume control) icon.
- After clicking the network icon, select your network SSID (Wi-Fi network). If you don’t see your Wi-Fi network, be patient. You may see a “Scanning APs” message in the menu; however, your Wi-Fi network SSID should eventually appear in the menu after it is located. When your network SSID appears, click on it.
- You will be prompted for your pre shared key (Wi-Fi) network password. Enter it and select OK.
- Wait for the icon to transform from a network icon to the Wi-Fi icon shown in the screenshot above. From this point, you should be connected to your Wi-Fi network.
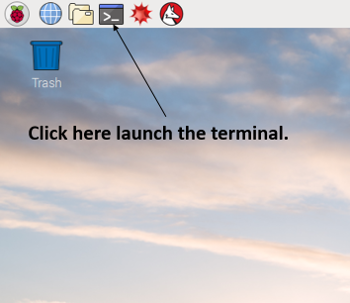
- Test your Wi-Fi network connection by launching the terminal.
- From the terminal, issue a ping command to verify your network connection is working:
$ ping google.com
We’re now ready to move on and ensure our system is up to date with security patches.
Unless you plan on using Wolfram or LibreOffice:
$ sudo apt-get purge -y wolfram-engine && sudo apt-get -y clean && sudo apt-get -y autoremove
$ sudo apt-get remove --purge -y libreoffice* && sudo apt-get -y clean && sudo apt-get -y autoremove
We will first run the apt “update” command. This command will not actually update any software on the system, but will download the latest package lists from the software repositories so that Raspbian will be aware of all new software available along with dependencies. Issue the following command at the “$” prompt:
$ sudo apt update && sudo apt full-upgrade
This is important to keep your RasPi system synchronized with security updates, etc. These two commands should be issued together and run periodically.
We want to run our RasPi remotely without requiring a dedicated HDMI monitor and USB keyboard/mouse. This is known as headless mode. We will be using the xrdp package to accomplish this goal. Newer versions of Raspbian (starting with versions that ship with the PIXEL desktop environment) ship with RealVNC for remote connections. Unfortunately, RealVNC does not work well in headless mode since it degrades to a very low resolution, and there is quite a bit of ceremony required to change the resolution. The xrdp solution automatically scales our desktop resolution and makes our life much easier. Let’s do it:
- Before we can install xrdp, we must first install the tightvncserver package. The tightvncserver installation will also remove the RealVNC server software that ships with newer versions of Raspbian since tightvncserver (xrdp) will not work if RealVNC is installed. (Thanks to Ryan Hanley for this tip!) Enter the following command in the terminal:
$ sudo apt install -y tightvncserver
The “-y” option will automatically answer yes to the default questions which is what we want in this context. - Next, invoke the following command to install xrdp:
$ sudo apt install -y xrdp - Finally, we need to install the samba package so we will be able to access the RasPi by its host name from Windows machines on the network rather than by its IP address which can change since the RasPi receives its IP address via DHCP. (For OS X users, you can install Bonjour and then access your Raspberry Pi by host name. For example, if your host name is “raspi”, you can access it on OS X as “raspi.local”.) OK, let’s install Samba:
$ sudo apt install -y samba - After this installation completes, you should be able to ping the RasPi Hostname (configured in Raspberry Pi Configuration program above) from a Windows machine:
C:\> ping raspi - You are now ready to launch a remote desktop connection!
- From your Windows machine, hit the Windows key, and type “Remote Desktop Connection” to bring up the Remote Desktop program. Click it in to invoke it. (OS X users can use Microsoft Remote Desktop which is available for free in the Mac App Store.)
- Type the host name of your RasPi (“raspi” in my case) in the Computer textbox.
- Next, click the Display tab. Move the Display configuration slider all the way to the right to “Full Screen” to ensure our remote desktop connection will fill our screen. It may already be set to “Full Screen”.
- Click the Connect button near the bottom of the dialog box.
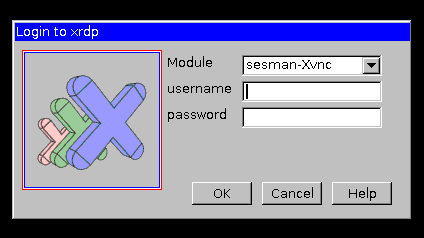
- You will then be prompted with the xrdp login screen:
or it might look like this: - Enter your credentials and log into the RasPi.
- username: pi
- password: raspberry (unless you changed it in the Raspberry Pi Configuration program earlier in the tutorial.)


[My injection: During the startup log shown after connecting to xrdp, note the port connected to (127.0.0.1 SOME_PORT), then revise /etc/xrdp/xrdp.ini (probably under [xrdp1]) port to SOME_PORT (usually 5910) in lieu of -1. Now all remote connections will join the same session.]
Amazing! We are connected remotely to the RasPi and we no longer need the dedicated HDMI monitor and USB keyboard/mouse. Let’s go ahead and shut down the RasPi for a minute so we can free up our monitor and keyboard/mouse:
- Launch a terminal session and enter the following command to cleanly shut down your system:
$ sudo poweroff - Wait a minute for the RasPi to fully power down.
- Unplug the power cable, HDMI cable, and the USB keyboard and mouse.
- Plug the power cable back in and the RasPi should be on its way back up without all of those extra cables!
- After giving the RasPi a minute or so to boot, connect to it once again using the Windows Remote Desktop program.
Many thanks to dodgepong at obsproject.com for the following:
- Install dependencies:
sudo apt-get install build-essential libpcre3 libpcre3-dev libssl-dev - Download nginx code:
wget http://nginx.org/download/nginx-1.16.0.tar.gz(Protip: Check here for the current nginx version. - Get RTMP module code from git:
wget https://github.com/arut/nginx-rtmp-module/archive/master.zip
Note: The OBS website guide changed their RTMP module source tohttps://github.com/sergey-dryabzhinsky/nginx-rtmp-module/archive/dev.zip, a fork of arut's project. Not sure why yet. - Unpack, unzip, and enter the directory:
tar -zxvf nginx-1.16.0.tar.gz
unzip master.zip
cd nginx-1.16.0 - Build nginx:
./configure --with-http_ssl_module --add-module=../nginx-rtmp-module-master
make
sudo make install
Setup nginx to start when the Raspberry Pi does: - Enter rc.local:
sudo nano /etc/rc.local - Before the last (exit) line, add:
sudo /usr/local/nginx/sbin/nginx &
(& symbol allows this to run only once) Configure nginx: - Enter nginx.conf:
sudo nano /usr/local/nginx/conf/nginx.conf - Append with (at the very end... AFTER the last curly bracket, not before):
rtmp {
        server {
                listen 1935;
                chunk_size 4096;

                application live {
                        live on;
                        record off;
                }
        }
}
Customize nginx's index.html:
- Just in case someone stumbles upon it:
sudo nano /usr/local/nginx/html/index.html - Copy and past from another source as needed. I usually do something like:
<html>
	<head>
	<title>raspi-abc</title>

<style>
	body {
		width: 35em;
		margin: 0 auto;
		font-family: Tahoma, Verdana, Arial, sans-serif;
	}
</style>

</head>

<body>

	</br>

	<h3 style="text-align: center;">This is Project ABC's drone streaming server (raspi-abc).</h3>
	<p>It's used by ABC associates as part of the Drone Services Program. If you have any questions, please contact Rod Johnson at 555-555-5555.</p>
	<p><a href="https://a.box.link" target="_blank" rel="noopener">Click here</a> for directions on how to use this hardware with your drone.</p>
	<p><a href="https://another.box.link" target="_blank" rel="noopener">Click here</a> for more information about ABC's Drone Services Program.</p>
	<p><img style="border-width: 0px;" src="/a-picture.jpg" alt="Trent Reznor flies at Project Peanut" width="600" height="400" /></p>

</body>

</html>
DONE! Now, some commands:
- Start server:
sudo /usr/local/nginx/sbin/nginx - Stop server:
sudo /usr/local/nginx/sbin/nginx -s stop
- Create a notification script:
sudo nano /bin/nginx-notify.sh - Paste:
#!/bin/bash
sleep 30
curl -X POST -H "Content-Type: application/json" -d '{"body":"Phx RTMP server has been reset."}' http://blynk-cloud.com/BLYNK_TOKEN/notify
- Change persmissions:
sudo chmod u+x /bin/nginx-notify.sh - Open rc.local:
sudo nano /etc/rc.local - Add:
sudo /bin/nginx-notify.sh &
Long live Pete Scargill. Long live The Script:
- Go to root directory, then:
wget --no-check-certificate https://bitbucket.org/api/2.0/snippets/scargill/ekon6o/master/files/script.sh sudo bash script.sh
WARNING: The above script and its installation may require some internet searchery and meddling.
Just some notes of things I'm installing or messing around with:
- Install bmon for simple network activity monitoring:
sudo apt-get install bmon - Use this command to keep an eye on temps:
watch -n 2 /opt/vc/bin/vcgencmd measure_temp - Install TeamViewer: https://www.techrrival.com/install-teamviewer-raspberry-pi/
- Download ffplay.exe from here (part of the ffmpeg package).
- Create a folder containing ffplay.exe and create a .bat file with the following:
ffplay.exe -fflags nobuffer rtmp://ip_address/live/drone1 -loglevel verbose
- To remove audio add
-anafternobuffer
ffplay.exe -fflags nobuffer -an rtmp://ip_address/live/drone1 -loglevel verbose
Open the .bat file to watch the stream!
- Download the ffmpeg package from here.
- Create a new folder containing a projectname-drone1-stream.bat file:
start "Drone Streamer" cmd /c "Support Files/drone1-stream.bat"

"Support Files/ffmpeg.exe" -fflags "+genpts" -avoid_negative_ts "make_zero" -i rtmp://ip_address/live/drone1 -i "Support Files/720p-Holder-logo-overlay.png" -filter_complex "overlay=0:0" -q:v 2 -f flv rtmp://ip_address/live/watch

pause
- In the newly created folder, create another folder called Support Files.
- Copy in ffmpeg.exe, ffplay.exe, and the overlay file (transparent png).
- Create drone1-stream.bat:
"Support Files/ffplay.exe" -fflags nobuffer -an rtmp://ip_address/live/watch -loglevel verbose

pause
Open the projectname-drone1-stream bat file to watch the stream!


