Before running the project, you have to install the dependencies wit
npm installand run the development server with
npm run devBefore even adding authentication with JWT, we need to setup signup. In order to do this, we need 3 things:
- A User Model
- An
/api/signuproute - Saving the user to the database
This time we're going to use passport-local-mongoose to make user registration and login easier.
Let's add the packages first:
npm install --save mongoose passport-local-mongooseNote: It's more than a passport strategy and we're actually going to use it for that. We're not going to use it's built-in strategy.
Let's create the User model, models/user.js:
const mongoose = require('mongoose');
const passportLocalMongoose = require('passport-local-mongoose');
const { Schema } = mongoose;

const userSchema = new Schema({
  // the username and password are added by passportLocalMongoose
  // we can add any extra information like facebooktokens (or
  // others) as well as a picture, etc
  name: String
});

userSchema.plugin(passportLocalMongoose);

module.exports = mongoose.model('User', userSchema);
Don't forget to connect to Mongo, otherwise your app.js:
const mongoose = require('mongoose');
mongoose.connect("mongodb://localhost/blog-lab", { useMongoClient: true });Now we can use the User model to signup users. As always, let's create the routes/auth.js:
const express = require('express');
const router = express.Router();
const User = require('../models/user');

router.post('/signup', (req, res, next) => {
  // extract the info we need from the body
  // of the request
  const {
    username,
    name,
    password
  } = req.body;

  // create the new user
  // notice how we don't pass the password because
  // we're letting User.register add the hashed version
  // for us
  const user = new User({
    username,
    name
  });

  User.register(user, password, (err) => {
    if (err) {
      return next(err)
    }
    res.json({ success: true })
  })
});

module.exports = router;
Don't forget to add the authRoutes to the app in app.js:
const index = require('./routes/index');
const authRoutes = require("./routes/auth");

app.use('/', index);
app.use('/api', authRoutes);- Try creating a user with Postman
- What happens if you don't provide a username?
- Are you able to create the same user multiple times?
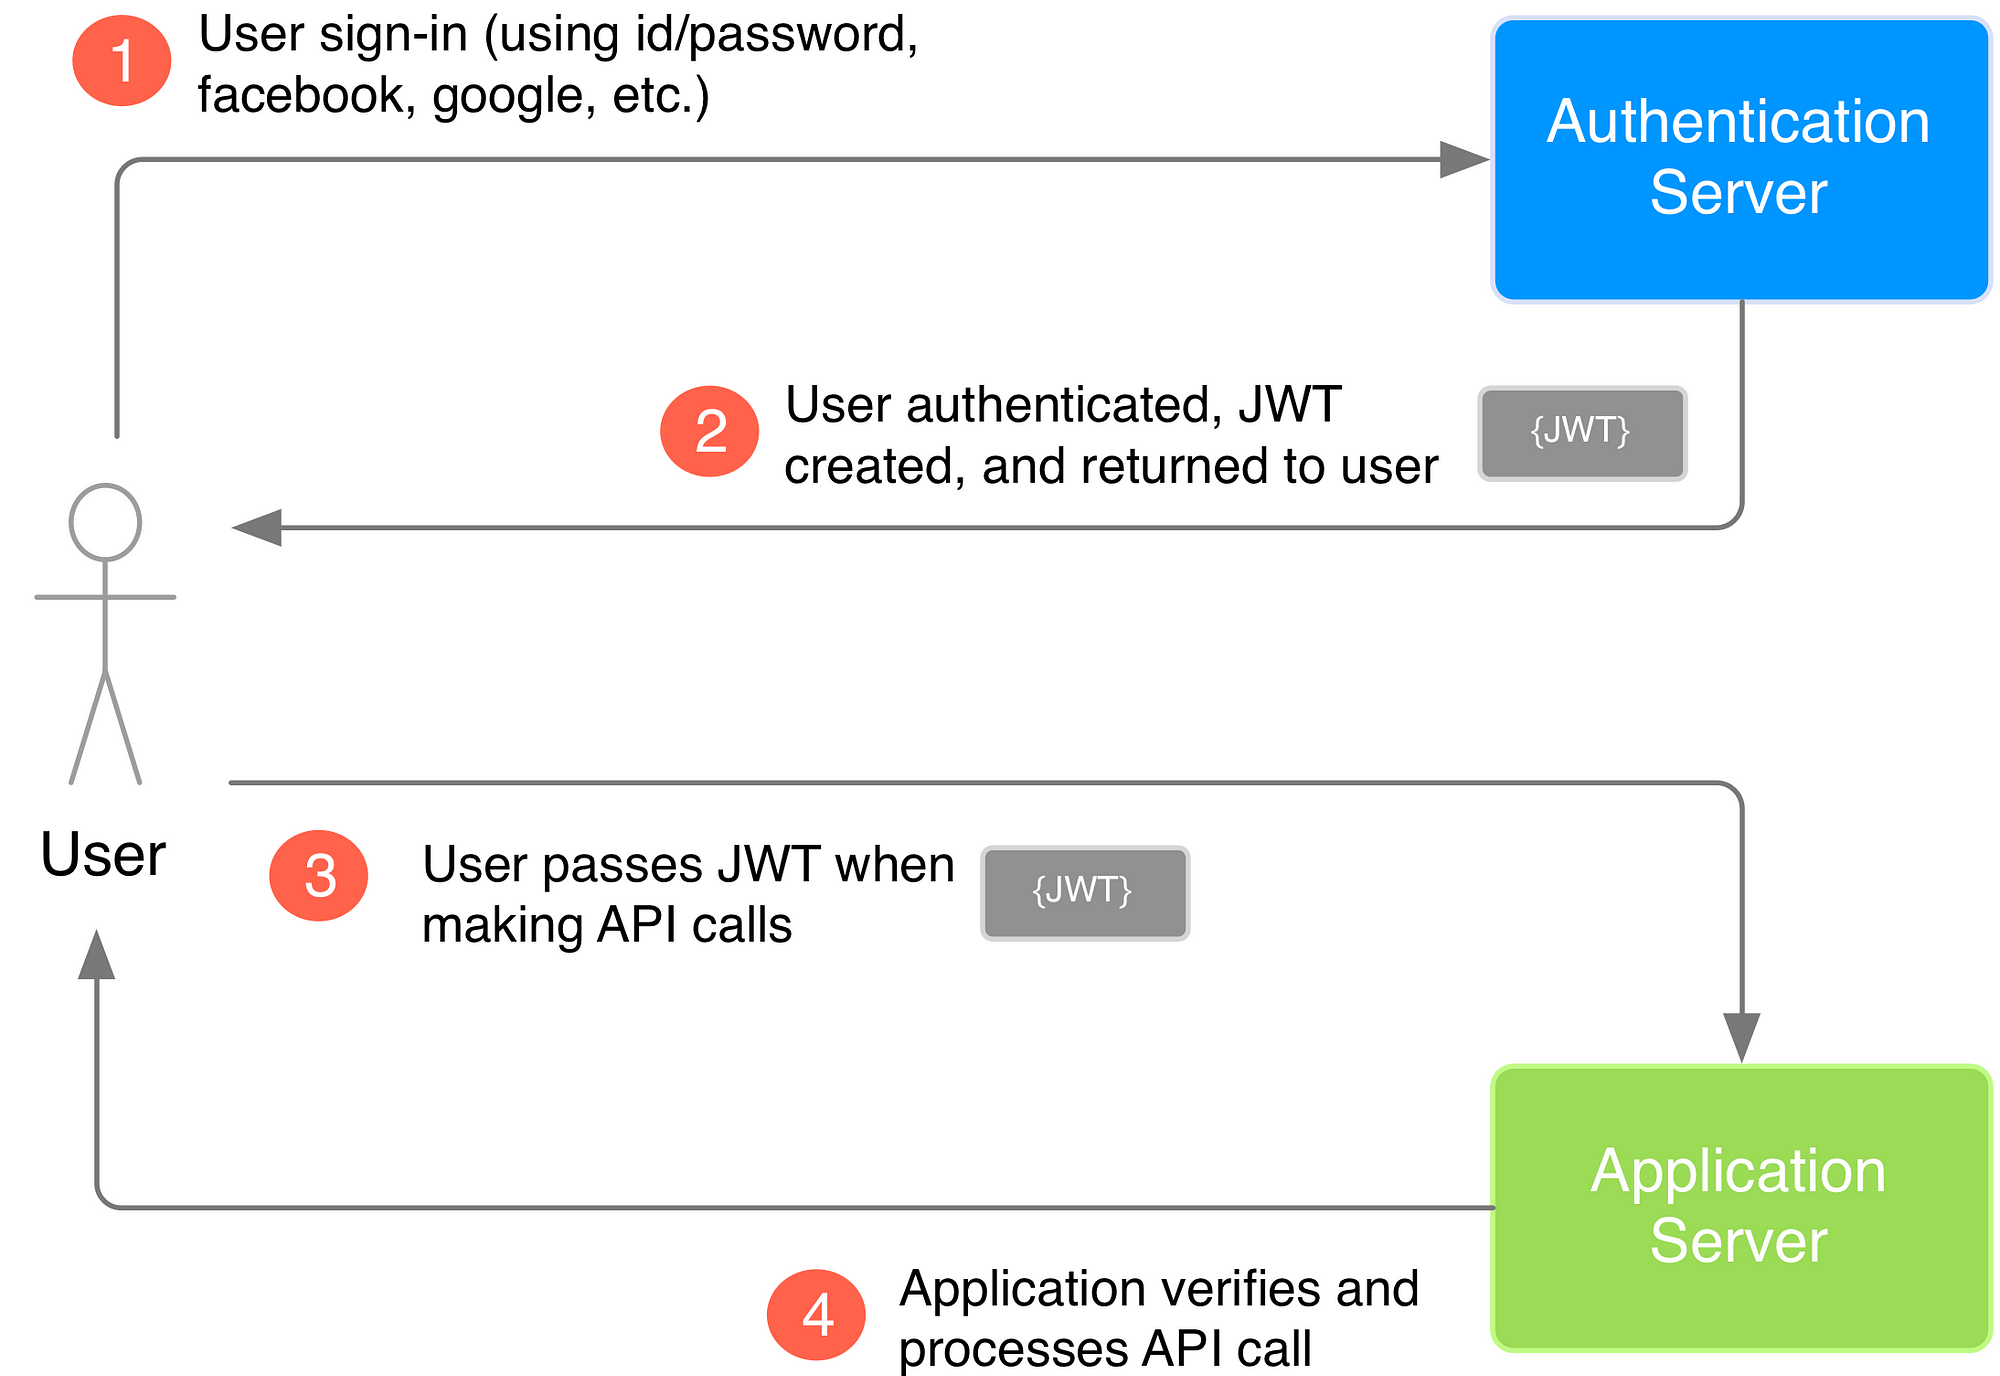
To authenticate the user we're no longer going to use cookies. We are going to use JSON Web Tokens (JWT for short). This is simply a string generated by the server (that's what we call a token) that is sent to the user after we verify his credentials. The user must save it somewhere and send it everytime he makes a new request. The server will be able to verify the token and even decrypt it to get who sent it.
We're going to start by installing some packages:
npm install --save jwt-simple passport passport-jwtLet's create a config.js file where we're going to put some configuration for JWT:
module.exports = {
  // This secret should be in an environment variable instead
  jwtSecret: process.env.JWT_SECRET || "MyS3cr3tK3Y",
  jwtSession: {
    session: false
  }
};
We're going to require this file at multiple places.
Let's setup passport with a new strategy using the JWT. Require these packages at the top of your app.js file:
const passport = require("passport");
const User = require("./models/user");
const config = require("./config");
const { Strategy, ExtractJwt } = require("passport-jwt");
Then, just after adding the bodyParser middleware and before adding our authRoutes, initialise passport and add the strategy:
passport.initialize();
// Create the strategy for JWT
const strategy = new Strategy(
  {
    // this is a config we pass to the strategy
    // it needs to secret to decrypt the payload of the
    // token.
    secretOrKey: config.jwtSecret,
    // This options tells the strategy to extract the token
    // from the header of the request
    jwtFromRequest: ExtractJwt.fromAuthHeaderAsBearerToken()
  },
  (payload, done) => {
    // payload is the object we encrypted at the route /api/token
    // We get the user id, make sure the user exist by looking it up
    User.findById(payload.id).then(user => {
      if (user) {
        // make the user accessible in req.user
        done(null, user);
      } else {
        done(new Error("User not found"));
      }
    });
  }
);
// tell pasport to use it
passport.use(strategy);
Finally we need to add the /api/login route in routes/auth.js, but first let's require some packages at the top of the file:
const jwt = require("jwt-simple");
const passport = require("passport");
const config = require("../config");
Now we can add a new login POST route:
// User.authenticate() returns a function
const authenticate = User.authenticate();
router.post("/login", (req, res, next) => {
  const { username, password } = req.body;
  // check if we have a username and password
  if (username && password) {
    // test if the credentials are valid
    authenticate(username, password, (err, user, failed) => {
      if (err) {
        // an unexpected error from the database
        return next(err);
      }
      if (failed) {
        // failed logging (bad password, too many attempts, etc)
        return res.status(401).json({
          error: failed.message
        });
      }
      if (user) {
        // success!! Save the user id
        // NEVER save the password here
        // the id is usually enough because we can get back
        // the actual user by fetching the database later
        const payload = {
          id: user.id
        };
        // generate a token and send it
        // this token will contain the user.id encrypted
        // only the server is able to decrypt it
        // for the client, this is just a token, he knows that
        // he has to send it
        const token = jwt.encode(payload, config.jwtSecret);
        res.json({ token });
      }
    });
  } else {
    // unauthorized error
    res.sendStatus(401);
  }
});- Try to login using the previously created users
- Try using a bad password
- Compare tokens when login in with different users
Now that we are able to send the user a token, we can protect routes from anonymous users and identify the users that are doing some requests.
It's now super easy thanks to passport. We only need to use passport.authenticate('jwt') as a middleware to protect a route and ensure that we have access to req.user. Add this route after adding the authRoutes in app.js:
// This is an example of protected route
app.get(
  "/api/secret",
  // this is protecting the route and giving us access to
  // req.user
  passport.authenticate("jwt", config.jwtSession),
  (req, res) => {
    // send the user his own information
    res.json(req.user);
  }
);
But... how do we pass the token we got earlier when doing a request?
We have to pass it in the headers of all the requests we make. When using Postman, head over to the Headers tab and add a new entry with Authorization as the key and Bearer <replace this with the jwt> as the value.
When building a front end application you'll probably use something like axios. In that case you need to set the token like this:
axios.defaults.headers.common['Authorization'] = 'Bearer ' + <replace this with the jwt>;This will make any request send the token in the headers of such request.
What about logout? Well, there's actually no such thing as a logout with JWT, you just stop sending the token. With axios that would be deleting the previously added token:
delete axios.defaults.headers.common['Authorization']


