Giter Site home page Giter Site logo

vtcaregorodtcev / 2minsdevsnotes Goto Github PK

View Code? Open in Web Editor NEW
2.0 2.0 0.0 2.03 MB

Github-based fast-to-read blog about dev's daily routine challenges

Home Page: https://vtcaregorodtcev.github.io/2minsDevsNotes/

License: MIT License

JavaScript 8.64% Astro 58.77% TypeScript 24.11% CSS 8.49%
angular architecture automation backend blog chatgpt clouds d3 ember frameworks frontend management nextjs react reactjs remix serverless

2minsdevsnotes's Introduction

Vadim Tsaregorodtsev (@hadoocken)

a javascript enthusiast trying to prove that any JS dev is not just a pixel-mover. And when I say javascript I mean frontend, backend, testing, clouds, ML, bots etc.

I contribute to open-source and make my own:

I speak public:

I collect tech articles in Telegram: "Thanks, I like IT" [RU]

Connect with me:

v_hadoocken | Twitter vadim-tcaregorodtcev | LinkedIn

2minsdevsnotes's People

Contributors

vtcaregorodtcev avatar

Stargazers

 avatar  avatar

Watchers

 avatar  avatar  avatar  avatar

2minsdevsnotes's Issues

Making config server serverless with AWS API Gateway and DynamoDB

Clouds are everywhere. Perhaps it is worth starting with this phrase. As soon as the user opens the browser, they already begin to use cloud technologies. The browser requests its servers, pulls up the necessary data, and the user experiences the same flow, despite the fact that they have already changed their device 10 times, whether it's a computer, smartphone, smart TV or refrigerator. The browser has recognized the user and the user sees the familiar interface.

Clouds are increasingly penetrating into the everyday life of the user. Therefore more and more developers are taking the clouds into their arsenal of tools, equipping the life of the user.

The problem

One of the popular tasks that developers have to solve is the dynamic configuration of what the user should see at one time or another. Sometimes you need to change the content of a site or web application without physically changing the code itself. And to be able to do this, the code must initially support the ability to dynamically load different content.

The most common case in which it is necessary to dynamically change content is AB testing. The condition is entered into the code that if a certain flag (called a feature flag) is set to true, then the user sees one scenario, otherwise another.

Moreover, one of the scenarios may not be completely working, and then you need to quickly prohibit seeing it, and therefore it can be dangerous since users can see non-working code for a long time, because you need to build the project again, and deliver the build to the production stand each time something broken.

Switching the feature flag remotely solves this problem.

Making config server

What would a naive implementation of this pattern look like?

You probably need to have a database to store dynamic configs, so you need a backend server that will help you manipulate these configs + UI service for convenient work.

In addition to the three services, you also need to think about authorization, since you can’t change configs just like that, as well as about load management, since requests to the config server practically duplicate requests to the application itself.

The result is a lot of work.

Better approach

Let's try to use the clouds from the introduction to find a better implementation.

As a result, we have - DB and server replaced by two lambda functions. Write and read config. The rest of the work falls on the shoulders of AWS.

The UI part moves, for example, to github or any other version control system. Moreover, in this case, we also delegate authorization and access management to github and remove a large layer of work from ourselves.

Let's take a closer look at this approach.

config-server

Let's start by deploying the API Gateway. You can use the template that I prepared for such purposes. The template is written on the serverless framework and allows you to deploy a simple API Gateway + DynamoDB in one command.

Next, we need to modify it a bit. Since our gateway will work in both directions (write and read), we need to correctly configure permissions so that the end application using the config can only read it, but cannot overwrite it in any way. For these purposes, we will use two different API keys. In general, it is a very good practice to use your own API key for each operation in order to track who and when accesses your service.

apiGateway:
    apiKeys:
      - ${self:custom.env.repoApiKey}
      - ${self:custom.env.appApiKey}

In the params of our handler, we write that the read config function is private and now AWS, when we are invoking this lambda, will expect the x-api-key header, the value for which we can find in AWS SSM, if, of course, we used the above template. The template contains instructions for creating such api key and storing it in SSM under the name /cfg-srv-exmpl/dev/apis/rest-api/app-api-key.

getConfig:
  handler: src/handlers/get-config.handler
  events:
    - http:
        method: get
        path: config
        cors: true
        private: true

The lambda itself is dead simple. We get the id of our config from query params and just read the config with this id from the database. At the same time, authorization took place in the background. If the function was invoked, it means AWS checked the request headers and everything is OK.

export const handler: APIGatewayProxyHandler = async (event) => {
    const id = event.queryStringParameters.id;
    const json = (await getConfigs()).find((i) => i.id == id);

    return HttpResponse.success(json);
}

Now let's move on to the "write" part.

  • We create a repository on github where our config will be stored.
  • We go into the settings and go to the Webhooks tab.

Screenshot 2022-08-15 at 15 23 24

  • In the "Payload URL" we insert the URL from the SSM store under the name /cfg-srv-exmpl/dev/apis/rest-api/api-url, again, if you used the template, then under this name, there will be the address of the API gateway itself.
  • Do not forget to specify "application/json" for content type and also the secret. Secret is our second generated API key.

Screenshot 2022-08-15 at 15 25 24

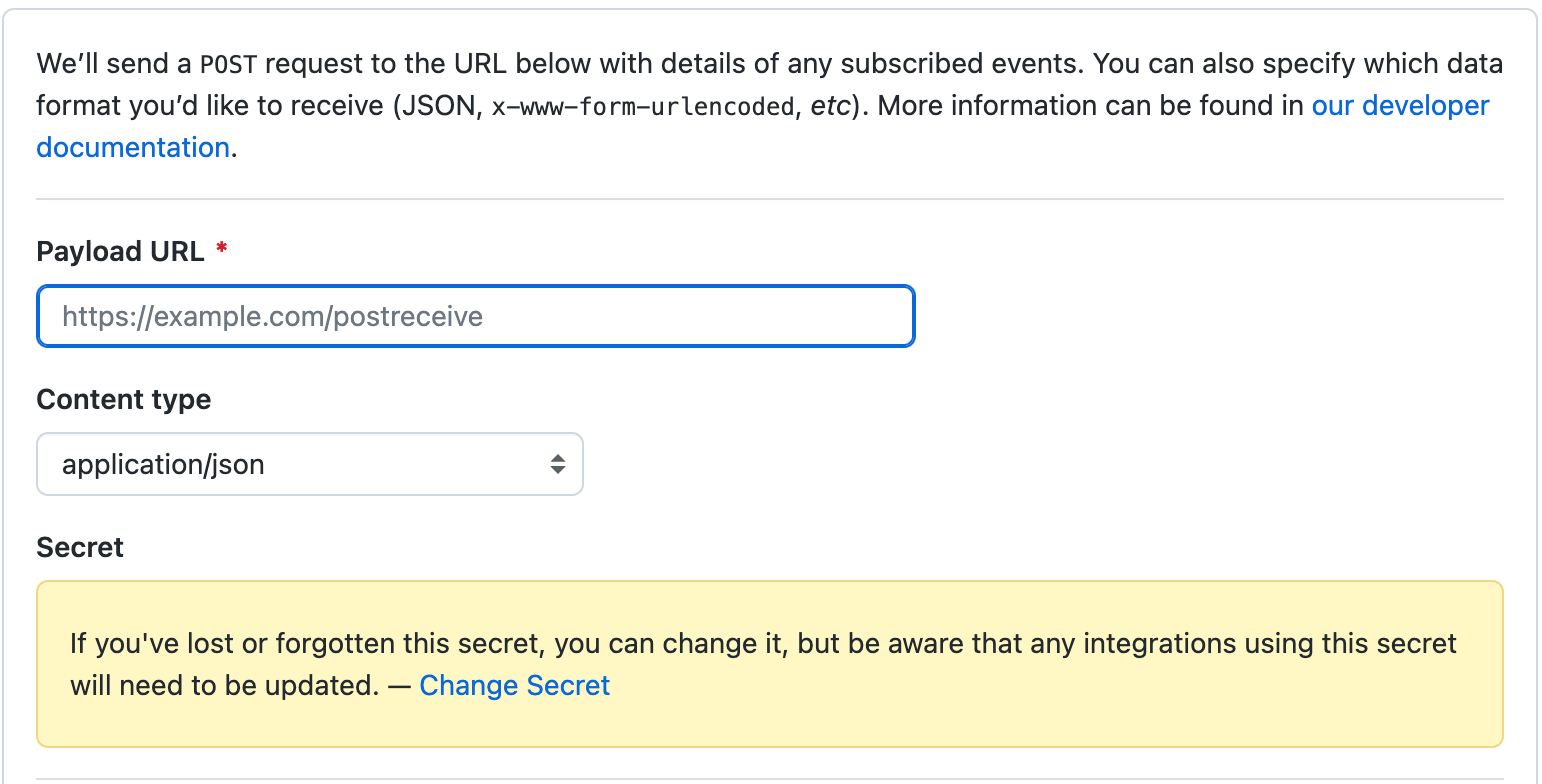
Github will use this secret to get the sha256 hash. Further, as soon as something is updated in the config repository, the github will make a POST request to the address we specified in Payload URL, it will generate a hash and put it in the X-hub-signature-256 header and since only we know this secret, no one else can make the same request.

Then in our function we receive this request, and we can understand that it was made by github with our secret (credits), we make an additional request via github API to get the config and write it to the database, so after each change in the config in github, it will be synchronized with the database, and the application will use the current version.

...
    await checkSignature(event.headers)

    const { encoding, content } = await fetch(
      JSON.parse(event.body!).repository.contents_url.replace("{+path}", "config.json")
    ).then((res) => res.json());

    const json = JSON.parse(Buffer.from(content, encoding).toString());

    await syncConfig(json);
...

Let's go through the steps again.

  1. We deploy an API gateway with two functions (private and public) with a connection to the database
  2. Check that two API keys are being created
  3. We use one key for reading in a private function
  4. We make a webhook for the repository with the config, and sign each request with the second API key
  5. When changing the config, a request is made to the webhook, the function checks the signature and if everything is OK, then the config is updated in the database
  6. Any application that knows the API key for reading can read the config file and inject it into its code.

Pros:

  • minimum effort, almost everything unfolds in one line
  • auth system for reading config out of the box
  • version control system for config out of the box
  • authorized config changes out of the box
  • load management out of the box

The example config-server is under the link.

Automatization for github-based blog

The need to share knowledge is truly an amazing human trait. He can sit for years and rewrite the same book by hand, only to create as many copies as possible, which can then be given to other hands who will do the same.

Fortunately, today, information sharing processes have evolved a lot and every second yet another developer is already thinking about blogging and sharing his experience with other colleagues. I also consider myself one of those developers.

On the other hand, most developers are very lazy, but this is exactly what makes them more productive. No one lazy person wants to do the same job more than once, which is a common occurrence in a developer's routine. All of the above smoothly brings us to the topic of this note.

Choose tools for your task not task for your tools

If you are reading this article, then most likely you have already noticed that I chose github as the platform for my blog. I find this solution extremely convenient and here's why.

Like I said, I'm one of those lazy developers who try to optimize their routine. And why look for a new platform if I spend the whole day on github, working with code. And the key feature here, I think, is the ability to write issues in markdown format. The ability to write technical stories with code inserts makes github almost the best platform, especially when you can mention related technologies and the people who make them.

Also, another important feature of the github, available out of the box, is SEO and optimization in search engines. This means that a developer writing a blog saves a huge amount of time and money on promotion. Well, the last thing that can be said, but not least - you don't need to work on design and styles what allows you to focus only on the content itself.

With the huge pluses listed above, we also inherit some minor inconveniences. But, which we can solve, again, by the abilities of the github itself. What I mean?

First, due to the fact that the repository is public, anyone can come and open their own issue, which is of course not a desirable scenario. It is possible, of course, to completely disable issues, but then we ourselves will not be able to write them. Here another github feature comes to the rescue. Github actions.

We need an automatic mechanism that, when another issue opened, will check who did it. If this is the author of the repository himself, then everything is OK, otherwise it will delete opened issue.

And the first thing we need to do for this is to fork the repository with the base action template on typescript. Further, having cleared the template of garbage (unnecessary tests and actions), you can start writing your action.

Any github action repo should contain an action.yml file in root that describes all input and output parameters.

# action.yml
inputs:
  github_token:
    description: 'Personal access token with admin rights granted.'
    required: true
  issue_node_id:
    description: 'Issue NodeId to delete'
    required: true
runs:
  using: 'node16'
  main: 'dist/index.js'

Further, referring to the documentation, we can see that in order to delete an issue, we need admin write permissions and a standard authorization token that github generates itself and puts in secrets.GITHUB_TOKEN will not work. Therefore, we need to generate our own personal token for this action. [Instruction]

Next, we are going to look among the API documentation for how we can delete the issue, and what parameters are needed for this.

We find out that the github has a graphql endpoint that allows us to delete the issue. Unfortunately, there is no such endpoint for the REST protocol, but this is not a problem. Github supports the npm package, which allows us to create an authorized client and make a request in the form of a mutation on the graphql.

import * as core from '@actions/core'
import * as github from '@actions/github'

...

const token: string = core.getInput('github_token')
const issueNodeId: string = core.getInput('issue_node_id')

const octokit = github.getOctokit(token)

await octokit.graphql(`mutation {
    deleteIssue(input: { issueId: "${issueNodeId}" }) { ... }
}`)

The global id of the issue, which is called node_id, must be passed as the parameter for this mutation. We can get it by subscribing to the issue opening event in the workflow config file.

# .github/workflows/your-delete-issue-workflow.yml
on:
  issues:
    types: [opened]
jobs:
  delete-issue:
    ...
    steps:
      - uses: vtcaregorodtcev/delete-issue@main
        with:
          github_token: ${{ secrets.PERSONAL_TOKEN }}
          issue_node_id: ${{ github.event.issue.node_id }}

You can see the final version of github action in a separate repo and even use it in your projects. Also the way this action used in this blog also presented here.

Further, in the blog's repository, we set in the config that it is necessary to delete an opened issue only when the creator is not the owner of the repository. Now this is only our platform and an outsider will not be able to open an issue that is not related to our blog.

# .github/workflows/your-delete-issue-workflow.yml
...
jobs:
  delete-issue:
    if: github.event.issue.user.login != 'vtcaregorodtcev'
    ...

The full list of available properties on issue object you can find here.

And finally, there is one more small automation. It would be very nice, when adding a new issue, to update the entire list of open issues in the README file. But fortunately, @geraldiner has already dealt with this problem and prepared a solution, which can be found at the link.

Your team lead left a company, and you as the last most mature engineer should start a new project?

Intro

Sometimes, in small companies, it happens that the team leader gets a better offer and leaves the company, leaving their subordinates at the start of a new project. And often, this can put developers in a difficult situation since developers may not have the management experience to organize themselves and confidently start a new project.

The question arises, what to do in this case? What to do when you are the only possible candidate for the team leader position? And you don't mind taking it, of course 😄

Improvise. Adapt. Overcome.

Jk. The very first thing to do is to decide on your role. It is worth mentioning that the position of the developer in the company and their role in the project can be quite different.

For example, a developer is hired as a senior engineer. But on a specific project, they perform the role of a project manager. They often communicate with stakeholders, discuss tasks with the team, plan sprints, and distribute tasks among team members. Or another example, a QA engineer can often play the role of a business analyst, clarifying all project requirements and maintaining documentation.

So this is an important moment when starting a new project. The basic set of roles depends on the project, but most often, at the start, there is always a business analyst, architect, project manager, and designer. These are the roles/people that allow you to determine what exactly needs to be done for the customer.

If at the start of the project it is clear that there are more roles required than people are, then most likely, someone will play more than one role. Accordingly, it is necessary to familiarize yourself with what each role implies.

What's next?

After people have taken their roles, the question arises. According to what scenario will these roles be played? This refers to the principle which will be used in building the processes in the team. I'm sure everyone has heard about waterfall and agile.

More often, preference is given to agile methodologies, such as scrum or kanban, since it is considered that the waterfall is already outdated and often the customer himself may not know what he wants, so a flexible approach with constant feedback is required.

Just in such cases, the business analyst and/or architect at the initial stage may not be able to gather all the requirements for the project. But the base set must still be prepared and then we can say that we have collected the requirements for the MVP, the minimum valuable product, the minimum version of the product that can still demonstrate the basic capabilities.

Typically, such a set of requirements is written in the form of stories, because the human brain perceives stories more easily than diagrams. The story might look like this: "As a user, I want to add products to the cart." The story should include a person and a description of what that person can do.

After the list of such stories is sorted depending on their importance, you can begin to implement them.

Usually, by this point, it is already obvious which technology stack is suitable for the implementation of the project. Therefore, stories are cut into tasks, and tasks are taken by developers to work.

And as you can see, the coding itself comes last, because it is more important to be able to choose a tool for a task than a task for a tool.

Conclusion

The whole text above we can squash into the following steps:

  1. determine your role
  2. determine what you should do in this role
  3. learn a new framework while waiting for the basic requirements gathered
  4. participate in compiling, estimating, and planning user stories
  5. help divide stories into tasks
  6. get to work

Basic D3.js components tree visualization feat. chatGPT

Before starting this small project, I had heard of D3.js but had never worked with it before. I had not even opened the documentation. Therefore, I decided to experiment with ChatGPT to see how well the neural network could understand what I wanted, even when I was not in the context of what I was asking for.

Now that I am writing this note, I already have a basic understanding of how D3.js works and can probably do similar tasks on my own.

So, the first thing I did was to try to ask for the final result right away, without looking at any examples or documentation. Even though the response from the neural network could not fit within the character limit for the response and had some syntactical errors, the code did not run. Here comes the first insight: D3.js has several versions with breaking changes, and the neural network combined examples from different versions, which led to the code breaking.

To avoid this issue, we can use one of the latest versions that were released before the neural network's dataset was closed in 2021:

<script src="https://d3js.org/d3.v6.min.js"></script>

Next, even in that broken version, the silhouette of our application's code is outlined.

const svg = d3
    .select("body")
    .append("svg")
    .attr("width", width)
    .attr("height", height)
    .append("g");

D3 works with SVG and performs all manipulations with this format. To start working, we need to create a workspace (SVG), set its attributes, and add a "g" element to group other elements that we will add later.

What are these elements?

As we are going to visualize a component tree, the neural network suggests that we need two types of elements: nodes and links that connect these nodes.

In D3, it looks like this.

nodes = svg
    .selectAll("foreignObject")
    .data(data.nodes)
    .join("foreignObject")
    .attr("width", 100)
    .attr("height", 50)
    .html(function (d) {
      return d.content;
    });

links = svg
    .selectAll("line")
    .data(data.links)
    .join("line")

Nodes are created using foreignObject. This tag allows using SVG from a different namespace and is often used for custom HTML content.

The syntax .selectAll.data.join means that we are selecting all the current elements of a particular type (just like "document.querySelector"), then we match each element on the SVG with a real object in the code, and finally call join for those data.something elements that do not have a corresponding element on the SVG canvas.

For example, in the code snippet above, we select all foreignObject elements and bind them with data.nodes, then set their width and height attributes to 100 and 50 respectively, and add HTML content to each of them using the "d.content" function. Similarly, we select all line elements and bind them with data.links using the same syntax.

Accordingly, after calling this code, all corresponding elements for data.nodes and data.links will be drawn on the svg.

To get the full picture, let's look at an example node and link:

// node
{
    id: 1,
    depth: 0,
    name: "name a",
    content: '<div class="node">ROOT</div>',
},

// link
{
    source: 1,
    target: 2,
}

For nodes, we specify the id, and links show how nodes are connected to each other through source and target.

In principle, the basic example is finished. We load data about nodes, create links, and feed them to D3.js. However, if there are too many elements, the nodes will overlap each other, which doesn't look very good. Let's seek help from the neural network.

And then it immediately recommends using forceSimulation, a set of functions for simulating physical bodies, to, for example, prevent nodes from visually overlapping on an SVG element.

simulation = d3
    .forceSimulation(data.nodes) // Force algorithm is applied to data.nodes
    .force(
      "link",
      d3
        .forceLink() // This force provides links between nodes
        .distance(200) // how long links should be 
        .id(function (d) {
          return d.id;
        }) // This provides the id of a node
        .links(data.links) // and this the list of links
    )
    .force("charge", d3.forceManyBody().strength(-400)) // This adds repulsion between nodes. Play with the -400 for the repulsion strength
    .force("center", d3.forceCenter(width / 2, height / 2)) // This force attracts nodes to the centre of the SVG area
    .force("collide", d3.forceCollide().radius(75))
    .force(
      "y",
      d3
        .forceY() // on which level each node is supposed to be 
        .strength(1)
        .y((d) => d.depth * 250)
    )
    .on("tick", ticked); // callback for each time tick

After applying forceSimulation, we get a nearly perfect implementation of the visualization.

You can see an example at the following link: https://jsfiddle.net/tn6mukq9/2/


How and why to set up a hybrid fake server?

Very often, when a new web project is about to start, all developers start to code at the same time, which means that there is no ready-made API for the frontend. In this case, developers get out of this situation by creating their fake API so as not to be idle.

And of course, for these needs, there are a huge number of tools. One of the most convenient is json-server.

The main concept of this package is very simple. We should create a JSON file with a structure of all the entities that are needed in our application. Then we just run the following and we get the REST API in one line of code.

// db.json
{
    "products": [{ "id": 1, "name": "name", ... }, ...]
}
json-server --watch db.json 

We can fetch data using GET requests (or see them just in the browser) and write new items directly to JSON using POST requests.

But there is one caveat. If more than one developer works on a project, then most likely everyone will want to use such JSON in their way. Therefore, the content of such JSON will be constantly changing, which will lead to constant conflicts, which in turn will take time. Nobody wants to fix conflicts in files that won't be needed at all later. Therefore, it makes sense to add such a file to the .gitignore. So that each developer works with his version of the database.

Getting rid of one problem, we stumble upon another. What to do now if a new developer comes?

  • they need to refill the database themselves;
  • they need to know the set of fields for each entity so that the application can adequately process them.

All this again leads to wasting time on communication and sending files in messengers. Therefore, we need a mediator who will do all this for us.

Some analogue of faker.js immediately comes to mind. We will write a script once that will create a database for us and then each developer will be able to use it.

const createProduct = () => ({
    price: faker.commerce.price(100, 200),
    description: faker.commerce.productDescription()
    ...
})

This way will work, but it's another item to maintain. We will need to keep it up to date. And if custom fields are not required or the backend part is almost ready, then you can delegate the creation of this database to another service. For example FakeStoreAPI.

I find this approach very convenient:

  • developers do not waste time creating and maintaining their database;
  • developers still can modify and add new entities through a fake API;
  • none of these changes affect other developers, no need to resolve conflicts.

But then you will ask "how to modify data on a remote server without write permissions?". It's simple, we don't need to. We still have our local JSON server running, which allows us to write entities to our local JSON file. We just need to rewrite the read requests. To do this, there is a middleware mechanism from the JSON server documentation.

We can use the http-proxy-middleware package for such purposes and then just create a proxy.js file.

const { createProxyMiddleware } = require('http-proxy-middleware');

module.exports = createProxyMiddleware('/products', {
    target: 'https://fakestoreapi.com',
    secure: false, 
    changeOrigin: true
});

Restart the server with the following arguments:

json-server --watch db.json --middlewares ./proxy.js

Et voilà. The remote database is immediately available to us, and if we need to create a new entity, then it will be created locally. For example, we can fetch products from a remote database but we also can create a cart or order locally.

curl -X POST http://localhost:3004/orders
   -H 'Content-Type: application/json'
   -d '{"userId": 1, "products": "1,2,5"}'

Remix is like ember but only it's react and SSR as well

I bet this is not the first time you might see such comparison in terms of learning a remix.run. And this is not surprising. As the authors say, they were inspired by the technologies that we have been using almost since the dawn of the web. Perhaps the most interesting comparison was made by one of the authors of remix in Reactathon, comparing it with PHP.

And they are indeed connected. Remix follows the MVC pattern that was popular with early web frameworks. Remix keeps control of the view and controllers, and leaves the model layer to the responsibility of a developer. And to figure this out, we need to go back to Ember.

Ember is one of the first MVC frameworks that appeared more than 10 years ago. And, when the ideas for its creation were gaining strength, the key one was the idea that the browser address bar or URL is the key place of the entire application. The entire state of the application can be described in the URL, using a large number of possibilities for this like paths, query parameters, hashes. That is why applications on Ember are also called purely browser-based.

How does this bring us closer to the remix? If we open the documentation, we will see such a line that the remix is a compiler for react-router. And it is not difficult to see that the authors of the react-router itself tried to repeat the success of the router implemented in Ember. From here we can conclude that the remix is a descendant of Ember, but which has the features inherent in the react ecosystem.

The documentation itself, of course, says that the remix is not only about React, and that the Remix is just a handler that can process any framework, but still gives a postscript that it will work best with React.

Let's look at it closer.

What is the unique experience of working with a remix, about which the creators say "mind-shift". Most likely, this is a truly unidirectional data flow.

We have already figured out that the remix inherits the react-router technique, only now it is not necessary to declare all the routes in one place. The router becomes file based. And each separate route is described in its own file. Now, if we return a function called loader from the route file, we can load the data before it is rendered and immediately transfer the fulfiled html to the client.

But we have already seen a similar technique in nextjs. Nothing special here. Another feature is that by returning a function named action, we close the unidirectional data flow cycle, because action also works on the server side and any processing in action causes the loader to be reloaded, which allows us to have up-to-date data on the client.

To implement this on the nextjs, we would need a separate data layer with react-query or other similar tools. But this is a topic for a separate note.

And if we touched comparisons with nextjs, it makes sense to also highlight some negative points regarding dx. Because dx is one of the key benefits of nextjs.

  • although the examples are presented in the repository, there is no clear command on how to use such an example. I would love to run an example in one line. Fortunately, degit allows you to solve this;
  • also in the examples there are deprecated dependencies;
  • there is no built-in ability to infer data types from the loader, you need to do it manually;
  • styles for components can only be described in css format, unless you do not want to compile styles from other preprocessors before starting the application. Because of this, there is no clear vision on how to organize isolated styles.

As you can see, the remix is not without childish problems that are solved in other tools, but it is worth making allowances for the fact that the remix is very young and the architecture still has the flexibility to accommodate such wishes.

Recommend Projects

  • React photo React

    A declarative, efficient, and flexible JavaScript library for building user interfaces.

  • Vue.js photo Vue.js

    🖖 Vue.js is a progressive, incrementally-adoptable JavaScript framework for building UI on the web.

  • Typescript photo Typescript

    TypeScript is a superset of JavaScript that compiles to clean JavaScript output.

  • TensorFlow photo TensorFlow

    An Open Source Machine Learning Framework for Everyone

  • Django photo Django

    The Web framework for perfectionists with deadlines.

  • D3 photo D3

    Bring data to life with SVG, Canvas and HTML. 📊📈🎉

Recommend Topics

  • javascript

    JavaScript (JS) is a lightweight interpreted programming language with first-class functions.

  • web

    Some thing interesting about web. New door for the world.

  • server

    A server is a program made to process requests and deliver data to clients.

  • Machine learning

    Machine learning is a way of modeling and interpreting data that allows a piece of software to respond intelligently.

  • Game

    Some thing interesting about game, make everyone happy.

Recommend Org

  • Facebook photo Facebook

    We are working to build community through open source technology. NB: members must have two-factor auth.

  • Microsoft photo Microsoft

    Open source projects and samples from Microsoft.

  • Google photo Google

    Google ❤️ Open Source for everyone.

  • D3 photo D3

    Data-Driven Documents codes.