Hello! I'm Manu (@mrcatacroquer), the guy who created the first Yayagram, A machine that helps our beloved elders to keep communicating with their grandchildren. Here I share with you the steps to build yours!
If you want to support my work and allow me to keep building crazy contraptions please consider buying me a pizza.


I'm not an expert, I'm just an average guy that likes building contraptions. So, if you see something that can be improved, fork it and change it, you are also very welcome to comment on anything or ask me anything. I'll be happy to keep learning and help you.
I built this device to help my Yaya to improve communication with her grandchildren. She has hearing issues and phone/video calls are not optimal for her. She relies on my parents to receive calls and the Yayagram empowers her to send and receive fast messages. This is not a device for everyone, it's specific for my Yaya but it's true it might be useful for more people.
Please review more details at the Twitter thread.
To build the original Yayagram you will need the following items but you can change them to match your necessities. At the bottom of this guide, I'll enumerate a few variations.
| Item | Description | Average price | Where to buy |
|---|---|---|---|
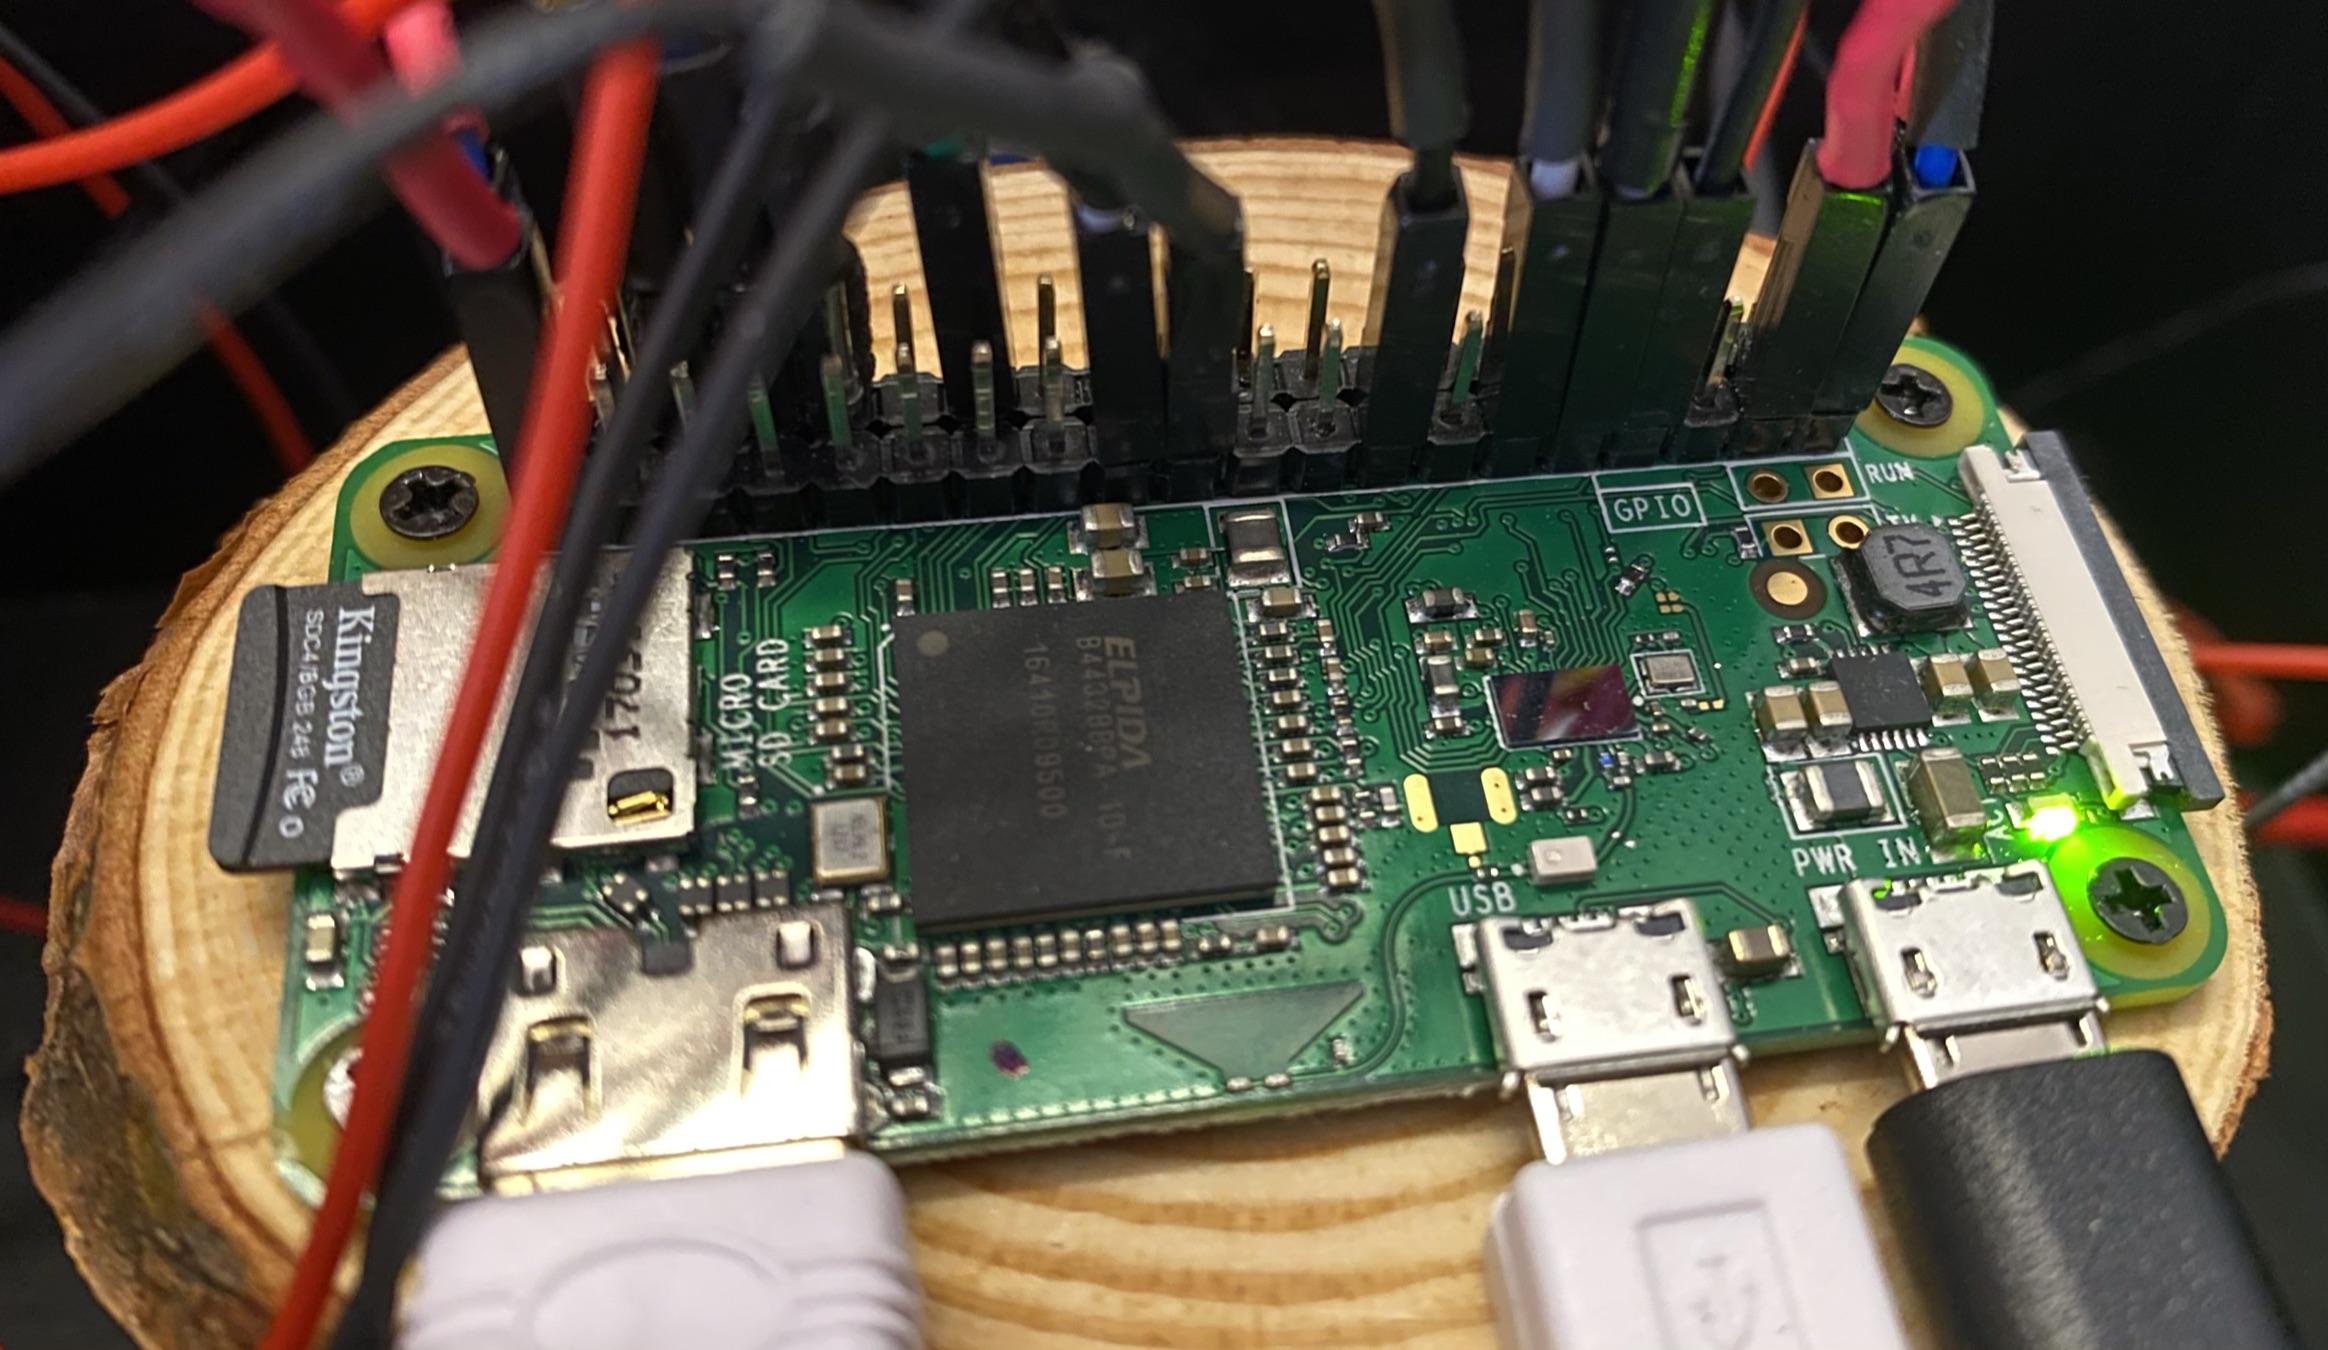
| Raspberry Pi Zero W | The brain of the project | 11€ | Kubii Link |
| Jack connectors and sockets | To be used as the address for the Yaya and the grandchildren | 20€ | Local shop |
| Microphone cable | To connect the Yaya with the grandchildren | 3€ | Local shop |
| 8Gb Micro SD Card | To store the Raspberry Pi OS | 5€ | Kubii link |
| Arcade button | To start recording the message | 1€ | Kubii Link |
| USB Microphone | To record the message | 4€ | Kubii link |
| Thermal printer. | To print the messages | 40€ | Adafruit link |
| Powerful power supply 5V | Juice for the Pi and printer | 10€ | Kubii Link |
| Cables. | For the electronic connections | 3€ | Kubii link |
| A box. | To frame the project | 10€ | Local shop |
| LEDs | To give visual feedback | 2€ | Kubii link |
| GPIO Pin adapter | To connect all the hardware | 2€ | Kubii Link |
| Micro USB to USB adapter | To connect the microphone | 4€ | Kubii link |
| HDMI Cable | To connect the Pi to a screen | 3€ | Kubii link |
I assume that you already have basic items like a soldering iron, a screen, a keyboard, and a mouse. So the total cost without those items is around 100€.
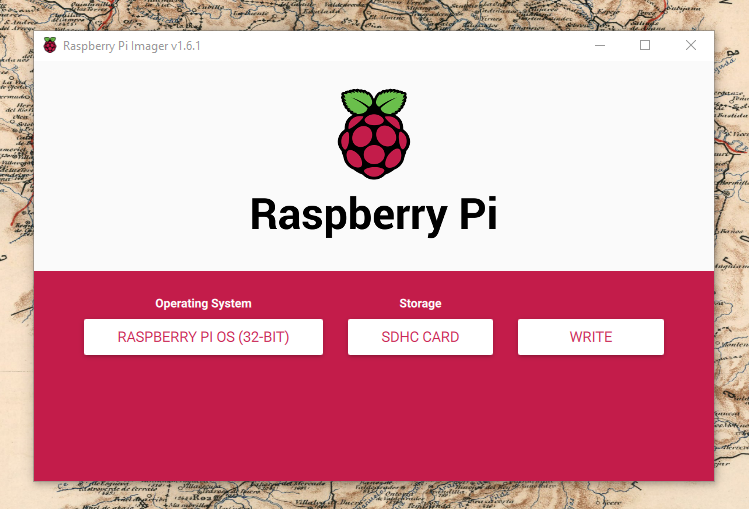
First, you will need to install the most up-to-date Raspberry Pi OS on your Raspberry Pi SD card. There's a tool called "Raspberry Pi Imager" that does it in no time and it's very straightforward to use. Get it here.
Once the flashing process finishes you can remove the SD card from the reader and insert it inside the Raspberry Pi to boot it up for the very first time.
This is your first time powering on your Raspberry Pi! it might take a while to start, it's normal, it has to automatically configure a lot of things, next time it will be faster but now.
You have to accomplish some manual steps to finish the first setup, and just after it boots you will see a start-up wizard popping up, it asks you to select:
- Your time zone.
- Language.
- WIFI network to connect to.
After you made your selection it will ask you to do a software upgrade, I recommend you to do it. It might take a while depending on your Raspberry Pi version and Internet speed.
Once the software updates are installed the Raspberry Pi asks you to reboot.
This is optional but very useful, it will allow you to access the Raspberry Pi using an SSH client, like Putty. It will save you from connecting the Pi to a keyboard, mouse, and screen every time you want to check or modify something.
Open a terminal window in your Raspberry Pi, here you can find how. And now type the following commands:
sudo systemctl enable ssh
sudo systemctl start ssh
This is going to be useful when we turn the rasp into a headless machine.
You have multiple ways to get the Raspberry Pi:
- Run a "/sbin/ifconfig" command inside the Raspberry Pi.
pi@raspberrypi:~ $ /sbin/ifconfig
lo: flags=73<UP,LOOPBACK,RUNNING>  mtu 65536
        inet 127.0.0.1  netmask 255.0.0.0
        inet6 ::1  prefixlen 128  scopeid 0x10<host>
        loop  txqueuelen 1000  (Local Loopback)
        RX packets 349  bytes 74736 (72.9 KiB)
        RX errors 0  dropped 0  overruns 0  frame 0
        TX packets 349  bytes 74736 (72.9 KiB)
        TX errors 0  dropped 0 overruns 0  carrier 0  collisions 0

wlan0: flags=4163<UP,BROADCAST,RUNNING,MULTICAST>  mtu 1500
        inet 192.168.2.161  netmask 255.255.255.0  broadcast 192.168.2.255
        inet6 fe80::4999:25a8:2a49:904  prefixlen 64  scopeid 0x20<link>
        ether b8:27:eb:1b:92:6d  txqueuelen 1000  (Ethernet)
        RX packets 116314  bytes 20980248 (20.0 MiB)
        RX errors 0  dropped 0  overruns 0  frame 0
        TX packets 7910  bytes 1097272 (1.0 MiB)
        TX errors 0  dropped 0 overruns 0  carrier 0  collisions 0
- Run a ping command from another computer connected to the same network, use the default Pi name: "raspberrypi"
C:\Users\manu>ping -4 raspberrypi

Pinging raspberrypi.local [192.168.2.159] with 32 bytes of data:
Reply from 192.168.2.159: bytes=32 time=88ms TTL=64
Reply from 192.168.2.159: bytes=32 time=5ms TTL=64
Reply from 192.168.2.159: bytes=32 time=5ms TTL=64
Reply from 192.168.2.159: bytes=32 time=5ms TTL=64
- Access your Home Router information, it usually shows a list of devices connected with the IP assigned.
So now that you have the IP you can use Putty to access it. You no longer need a screen!
login as: pi
[email protected]'s password:
Linux raspberrypi 5.10.17-v7+ #1403 SMP Mon Feb 22 11:29:51 GMT 2021 armv7l

The programs included with the Debian GNU/Linux system are free software;
the exact distribution terms for each program are described in the
individual files in /usr/share/doc/*/copyright.

Debian GNU/Linux comes with ABSOLUTELY NO WARRANTY, to the extent
permitted by applicable law.
Last login: Sat May  1 11:36:33 2021
pi@raspberrypi:~ $
Let's now talk about the software needed for this project.
Get the code I wrote from github: https://github.com/mrcatacroquer/Yayagram
You can place the "yayagram.py", "yayagram.conf" and "Adafruit_Thermal.py" files at the Pi Desktop.
This project use Telegram to send and receive messages using the Raspberry Pi. We need two components, one is a command-line interface to do all the Telegram actions, the other a wrapper in Python that uses the first application and simplifies its usage.
This is the command line for Telegram as the core of the telegram communications.
Execute the commands below to download and compile the project:
- git clone --recursive https://github.com/kenorb-contrib/tg.git && cd tg
- sudo apt-get install libreadline-dev libconfig-dev libssl-dev lua5.2 liblua5.2-dev libevent-dev libjansson-dev libpython-dev libpython3-dev libgcrypt-dev zlib1g-dev lua-lgi make
- ./configure
- make
The make command might take a few minutes to complete. If everything ends fine you should see this once the make finishes.
a - objs/auto/auto-fetch-ds.o
a - objs/auto/auto-free-ds.o
a - objs/auto/auto-store-ds.o
a - objs/auto/auto-print-ds.o
gcc objs/main.o objs/loop.o objs/interface.o objs/lua-tg.o objs/json-tg.o objs/python-tg.o objs/python-types.o libs/libtgl.a -L/usr/local/lib -L/usr/lib -L/usr/lib  -rdynamic -ggdb -levent -ljansson -lconfig -lz -levent   -lreadline -llua5.2  -lm -ldl -lssl -lcrypto -lpthread -lutil -ldl -o bin/telegram-cli
pi@raspberrypi:~/tg $
Now it's time for the Python wrapper, this library provides everything you need to interact with the telegram commands through the CLI TG application.
Run the following command to install it:
- pip3 install pytg
The output should look like this:
pi@raspberrypi:~/tg $ pip3 install pytg
Looking in indexes: https://pypi.org/simple, https://www.piwheels.org/simple
Collecting pytg
  Downloading https://www.piwheels.org/simple/pytg/pytg-0.4.10-py3-none-any.whl
Collecting luckydonald-utils>=0.17 (from pytg)
  Downloading https://files.pythonhosted.org/packages/36/31/e1f75be41cca1f9582551786deaa55c38d4cd07ab86264c6613038ef871d/luckydonald_utils-0.83-py3-none-any.whl (82kB)
    100% |████████████████████████████████| 92kB 1.2MB/s
Collecting DictObject (from pytg)
  Downloading https://www.piwheels.org/simple/dictobject/DictObject-1.1.1-py3-none-any.whl
Requirement already satisfied: pip in /usr/lib/python3/dist-packages (from luckydonald-utils>=0.17->pytg) (18.1)
Requirement already satisfied: setuptools in /usr/lib/python3/dist-packages (from luckydonald-utils>=0.17->pytg) (40.8.0)
Installing collected packages: DictObject, luckydonald-utils, pytg
Successfully installed DictObject-1.1.1 luckydonald-utils-0.83 pytg-0.4.10I use the Python "Adafruit_Thermal" library to print the Telegram messages using the thermal printer. First, we need to install some required dependencies:
sudo apt-get install build-essential libcups2-dev libcupsimage2-dev python-unidecode
Let me share as well a step-by-step tutorial with extra information about how to use a thermal printer using a Raspberry Pi.
Finally, we are going to use the serial port to communicate with the thermal printer. The serial port is not enabled by default, to enable it please run sudo raspi-config select the third option "Interface Options" and then "P6 Serial Port".
The wizard asks you Would you like a login shell to be accessible over serial?, select "No". There's a second question Would you like the serial port hardware to be enabled?, this time select "Yes". Then, reboot the Raspberry Pi.
Now it's time to bind the TG CLI tool to a real Telegram account. To do it please follow these instructions.
You need to change your directory to the /home/pi/tg/bin directory:
cd /home/pi/tg/bin/Run the telegram-cli application. This is your very first time running it so it will ask you for the Yaya phone number you want to use to connect to Telegram. You need to provide the country code as well.
pi@raspberrypi:~/tg/bin $ ./telegram-cli
Telegram-cli version 1.4.1, Copyright (C) 2013-2015 Vitaly Valtman
Telegram-cli comes with ABSOLUTELY NO WARRANTY; for details type `show_license'.
This is free software, and you are welcome to redistribute it
under certain conditions; type `show_license' for details.
Telegram-cli uses libtgl version 2.1.0
Telegram-cli includes software developed by the OpenSSL Project
for use in the OpenSSL Toolkit. (http://www.openssl.org/)
I: config dir=[/home/pi/.telegram-cli]
[/home/pi/.telegram-cli] created
[/home/pi/.telegram-cli/downloads] created
phone number:
The phone receives a validation code through Telegram as soon as you type enter.
Provide the code to the tool and the TG CLI app will store it for the future.
phone number: +34651XXXXXX
code ('CALL' for phone code): 17626
User Manu XXXXXXX updated flags -- [2021/05/01 17:19:23]
User Manu XXXXXXX offline (was online [2021/05/01 17:19:47])
If you want to change the phone number to use another one you just need to remove the following directory and all its content: /home/pi/.telegram-cli.
Create a directory to place the recordings the Yayagram is going to send. Notice the code uses the /home/pi/.telegram-cli/uploads/ directory by default, so use the following command to create it:
mkdir /home/pi/.telegram-cli/uploads/
Create a tg-test.py file with the following content. Well, not exactly it, replace @theTelegramContact with the real Telegram user name you want to use as the destination of the "Hello from Python API!" message.
from pytg import Telegram
tg = Telegram(
telegram="/home/pi/tg/bin/telegram-cli",
pubkey_file="/home/pi/tg/tg-server.pub")
sender = tg.sender
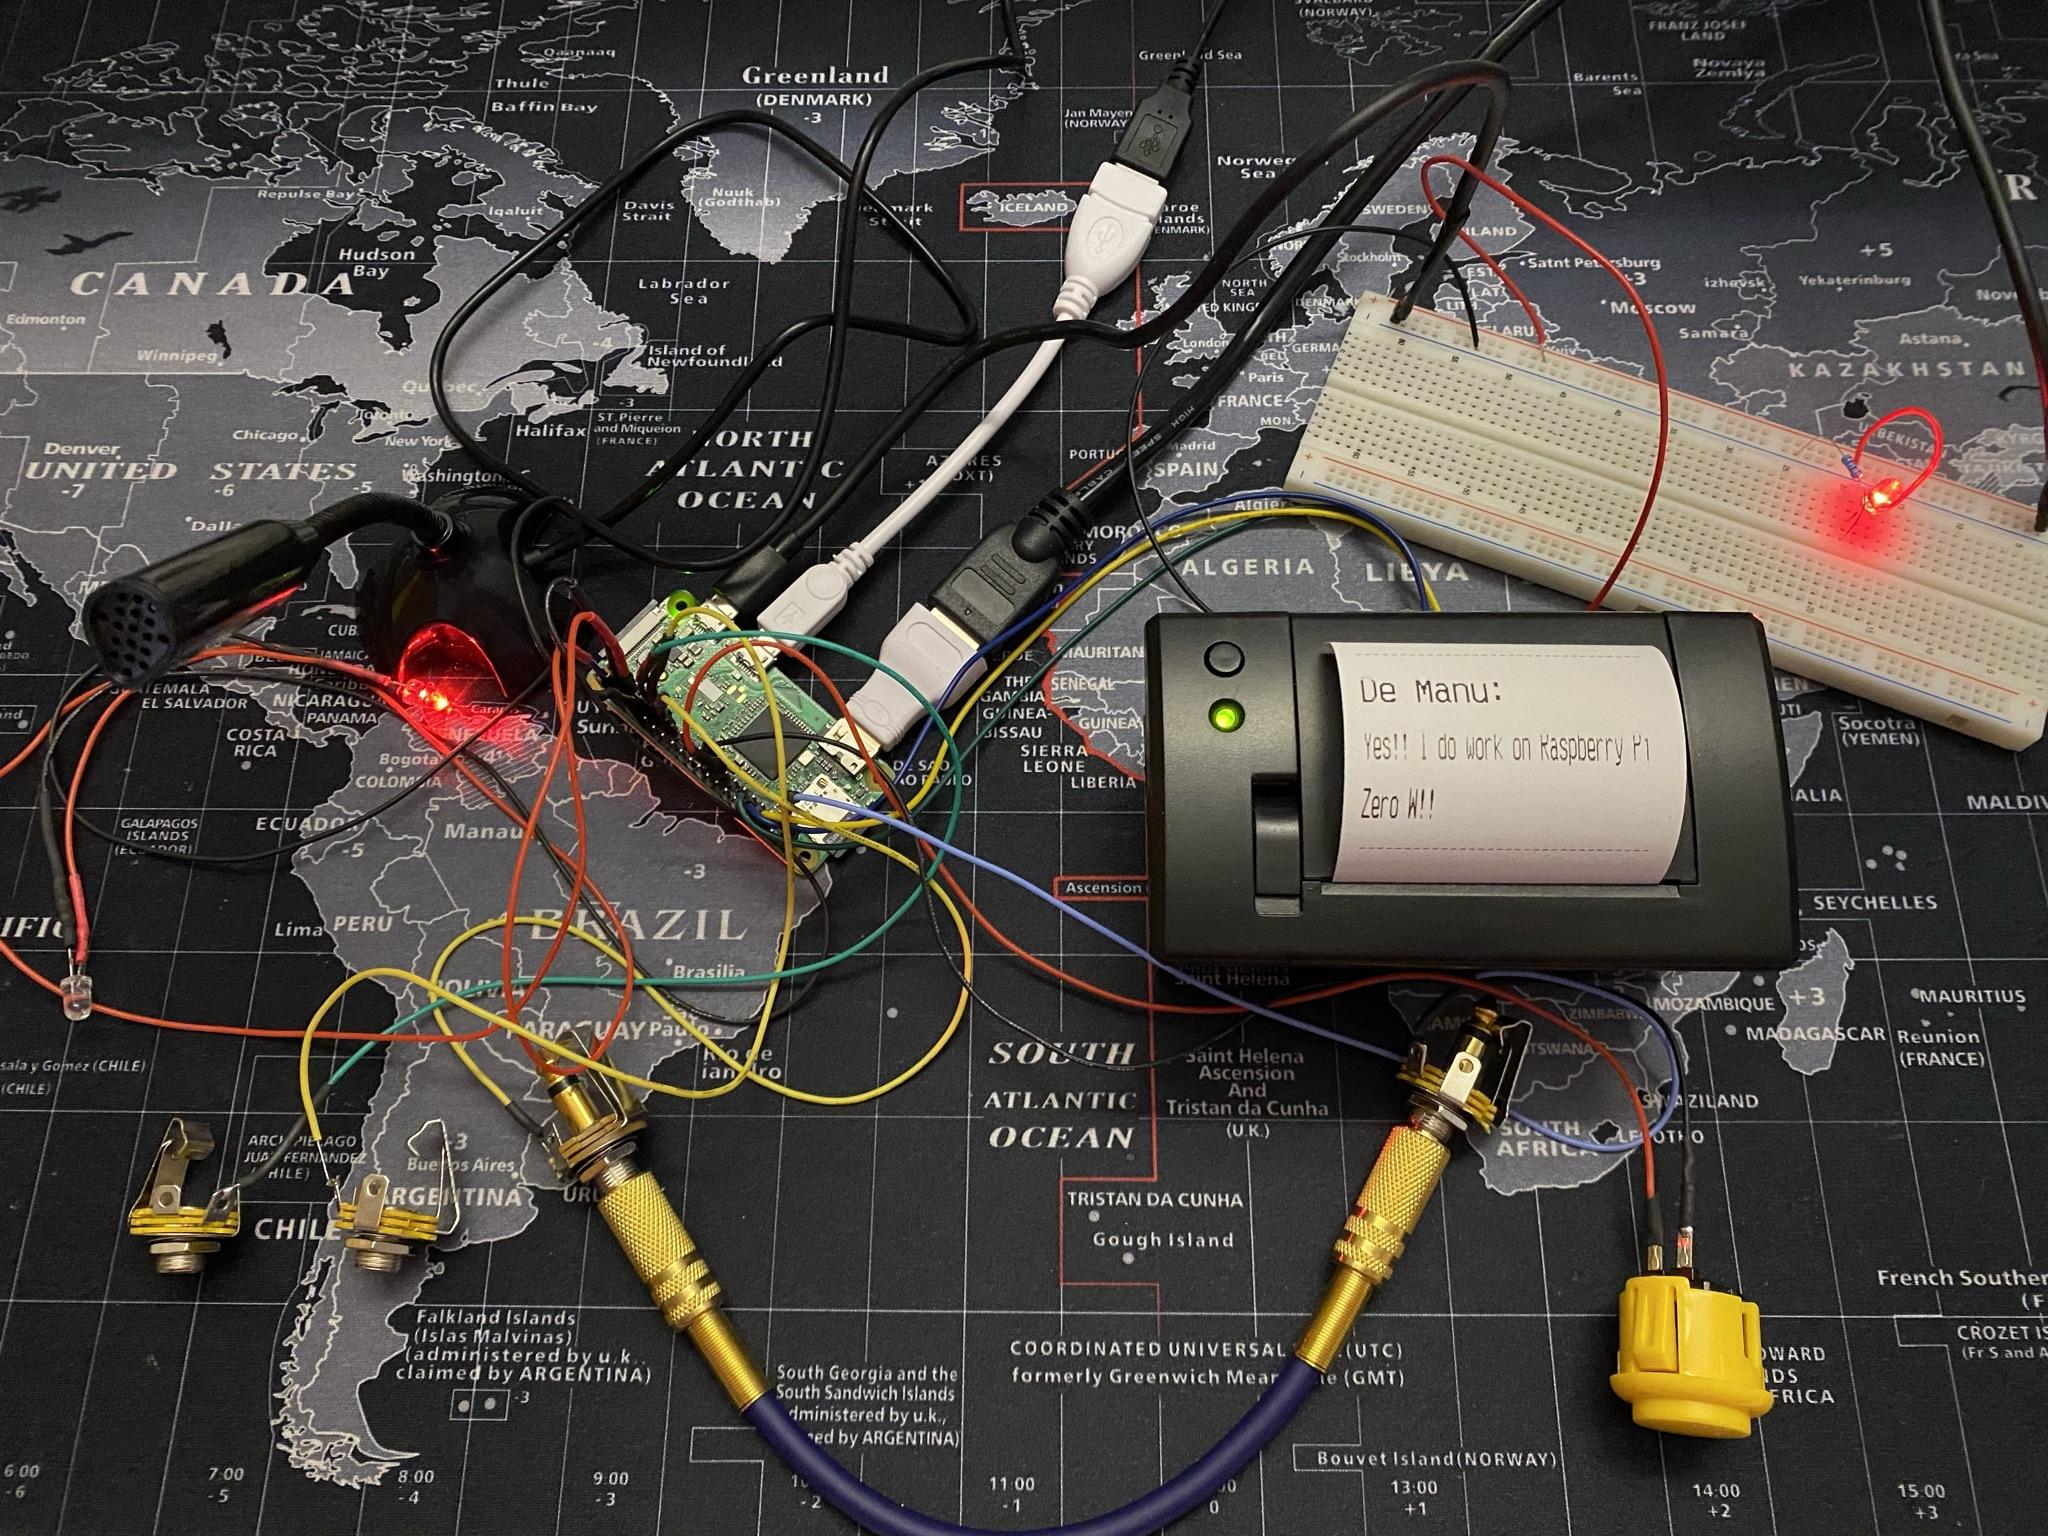
res = sender.msg("@theTelegramContact", "Hello from Python API!")You should see something like this on the destination phone:
On the hardware side, we are going to work with cables, connectors, LEDs, a button, and a microphone.
GPIO pins are going to be used to read the input signals. User the pinout command to check the GPIO ports you can use.
Never connect the 5V power directly to the GPIO as it only accepts 3.3V. Source
One socket is for the Yaya, and there will be multiple ones for the grandchildren Oh! and a special one to connect the Yaya with all the grandchildren at the same time. This is the type of sockets I'm using:

The Yaya socket is connected to the first pin, it's a 3.3V pin, so the current is going to flow from Pin1 to the grandchildren pins through the sockets and the cable. To know which grandchildren are selected we just need to check which one is receiving 3.3V.
Pin 1 (3.3V) -> Socket -> Cable -> Pin X (A given grandchildren)
Solder one end of a cable to the socket, like this:
Then, connect the other end to the first pin (PIN1). As I said before don't solder it directly to the board, use something in the middle, like this, for example:
And you have the first socket ready! Let's go now for the rest. You will need to do the same for all the destinations you want to use.
In my case I used 8 for the destinations, I used the following free GPIO pins:
- MARIA_PIN (PIN0)
- ANA_PIN (PIN5)
- LUCIA_PIN (PIN6)
- BEA_PIN (PIN9)
- IRENE_PIN (PIN11)
- FRAN_PIN (PIN13)
- ALL_PIN (PIN19)
- MANU_PIN (PIN26)
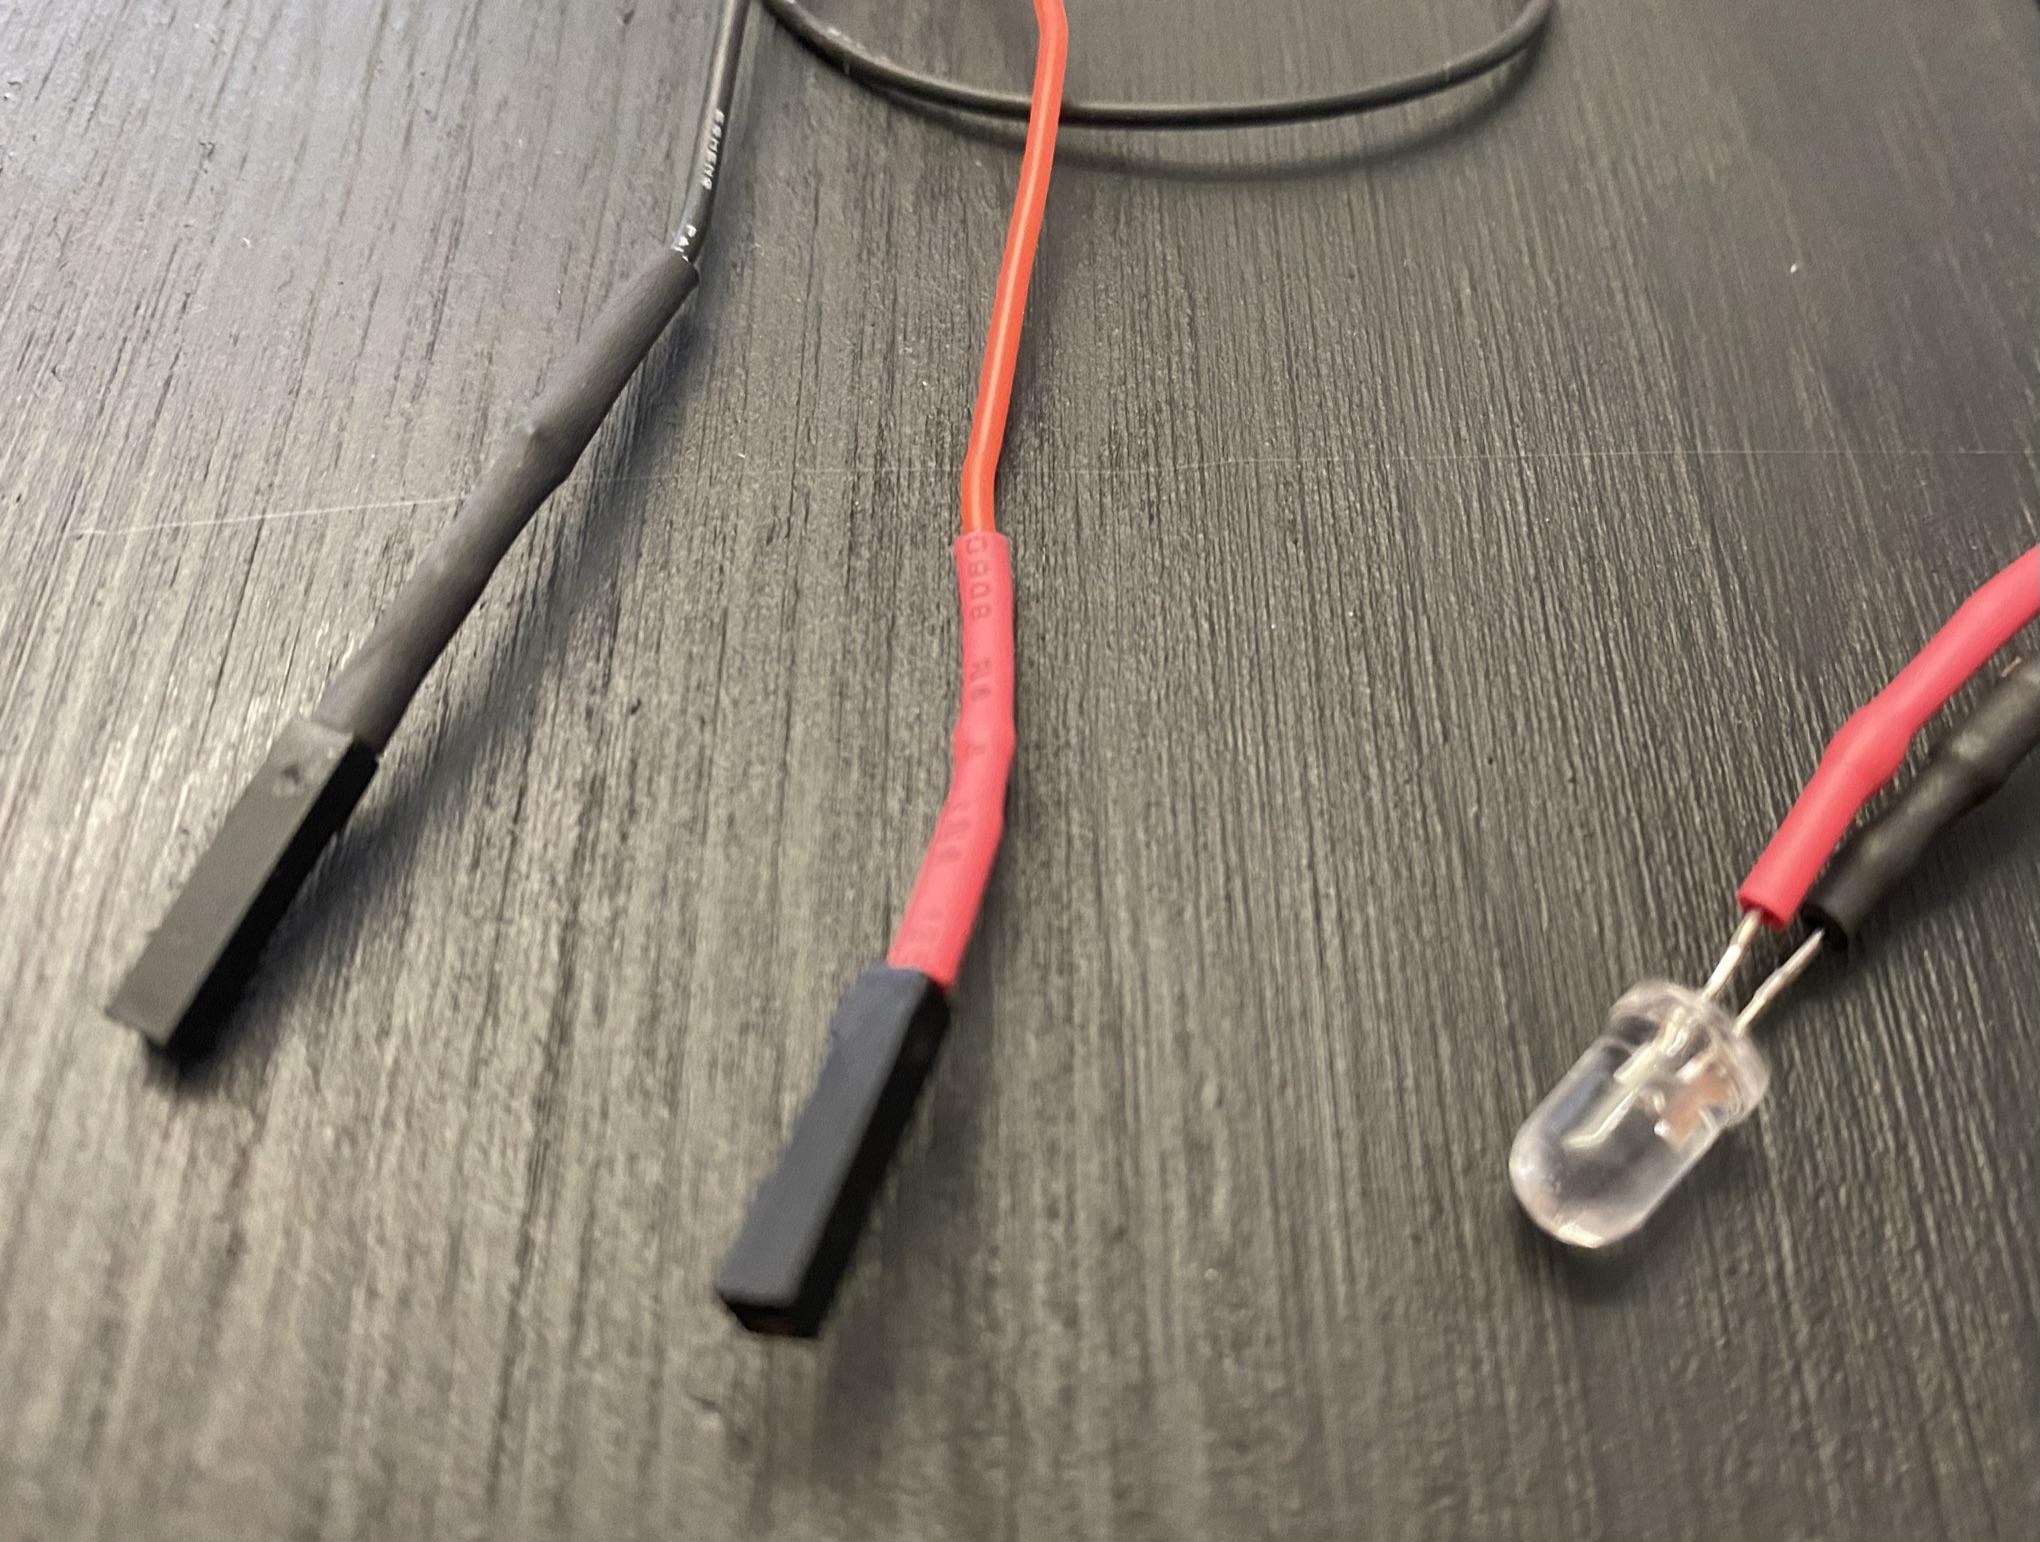
The cable setup is easy, I used the following connector, you need two, one for the source (the Yaya), another one for the destination (grandchildren).
The cable looks like this:
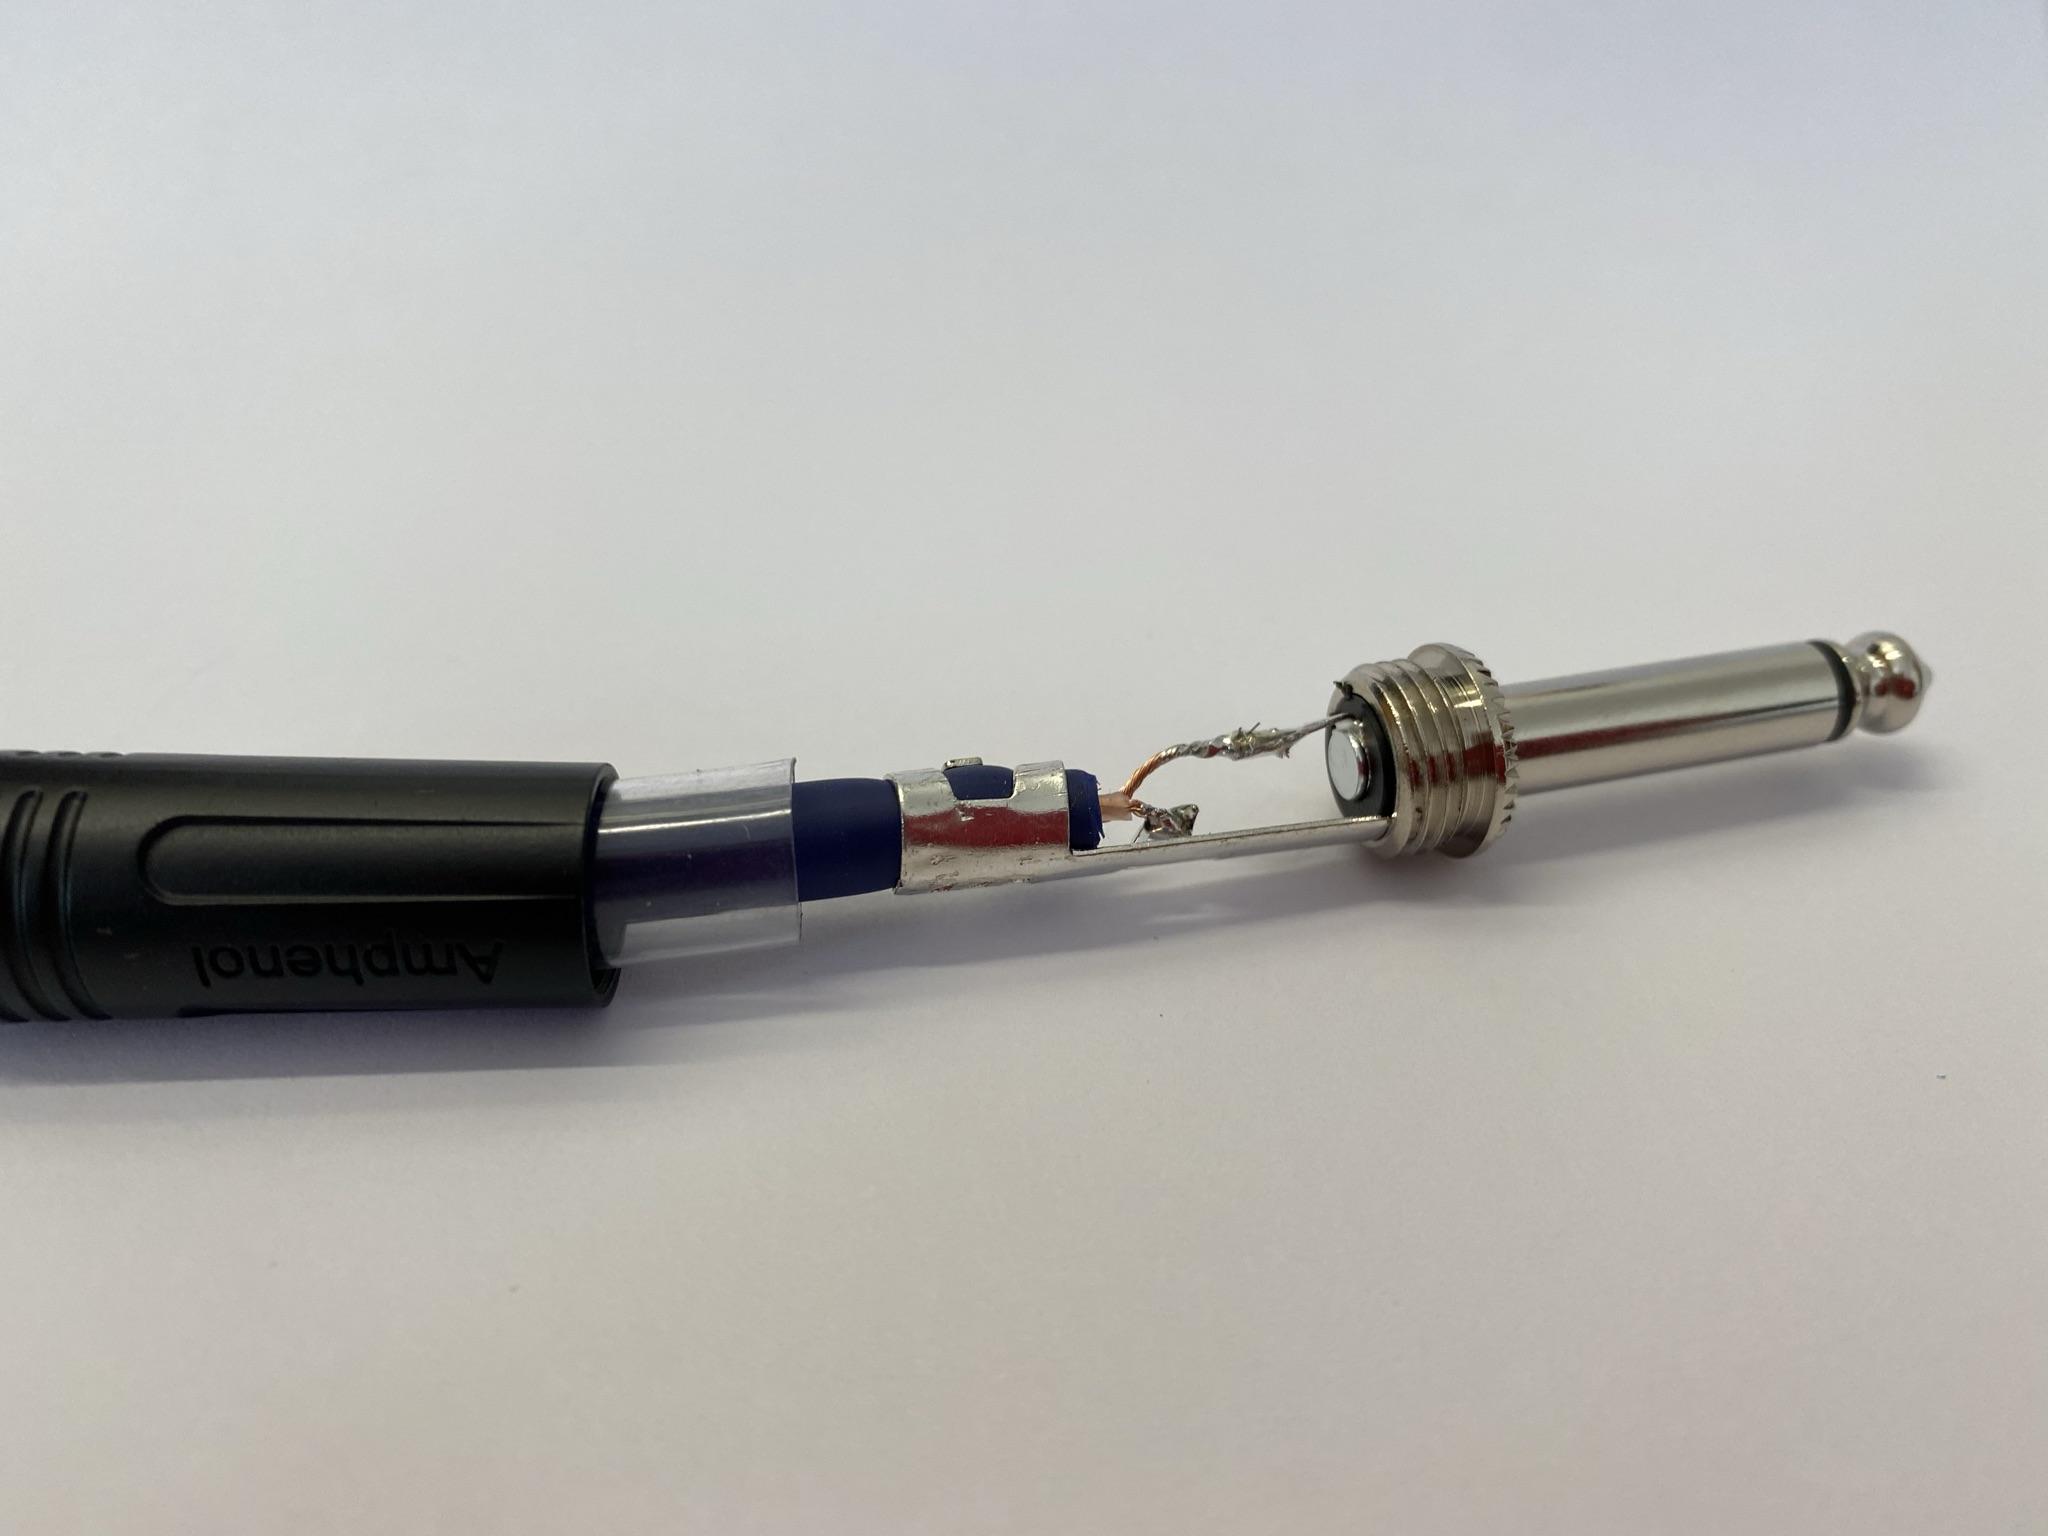
As you can see it has two more cables inside, solder them to the connector terminal.
This is how it looks after soldering them, do it at both ends of the cable.

Here you can read more about how to use a push-button using a Raspberry Pi.

The microphone is directly connected to a Raspberry Pi USB port.
Once you connect it, run the following command to check if it has been recognized by Linux:
arecord -l
It should give you something like the following:
pi@raspberrypi:~ $ arecord -l
**** List of CAPTURE Hardware Devices ****
card 2: Device [USB PnP Sound Device], device 0: USB Audio [USB Audio]
  Subdevices: 0/1
  Subdevice #0: subdevice #0
Write down the card and device numbers, we are going to use them later at the Yayagram configuration file. In my case, the values are card 2,device 0.
The code uses the arecord command to record the voice message, and you need to provide the card and device id to use the right mic, following the example above this would be the arecord command to use:
/usr/bin/arecord -D plughw:2,0 --format=S16_LE --rate=16000 --file-type=wav message.wav
Did you notice the plughw:2,0 parameter? That how you specify you want to use the card 2, device 0.
If the recording volume is low, or too high, you can adjust the gain for the mic. Here you read extended information about how to do it among a detailed guide to set up a USB mic.
Connecting the thermal printer to the Raspberry Pi is straightforward. The thermal printers usually have two connectors and five pins.
The power pins (two) must be connected to a power supply, I used one that provides 9V up to 3A and works fine. But check your printer as 5v might be enough. Just keep in mind it will require a few amps to work right.
The data pins (three) are going to be used for the TTL communication. It's easy, we have three cables, Ground, Rx and Tx.
That makes five pins in total, the one I used has the ports in this order:
- VH: 5-9VDC power the thermal printer can work with both currents.
- TTL GND: The ground pin for the TTL communication.
- TTL TX: The data coming out of the printer.
- TTL RX: The data coming into the printer.
- GND: The ground of the power supply.
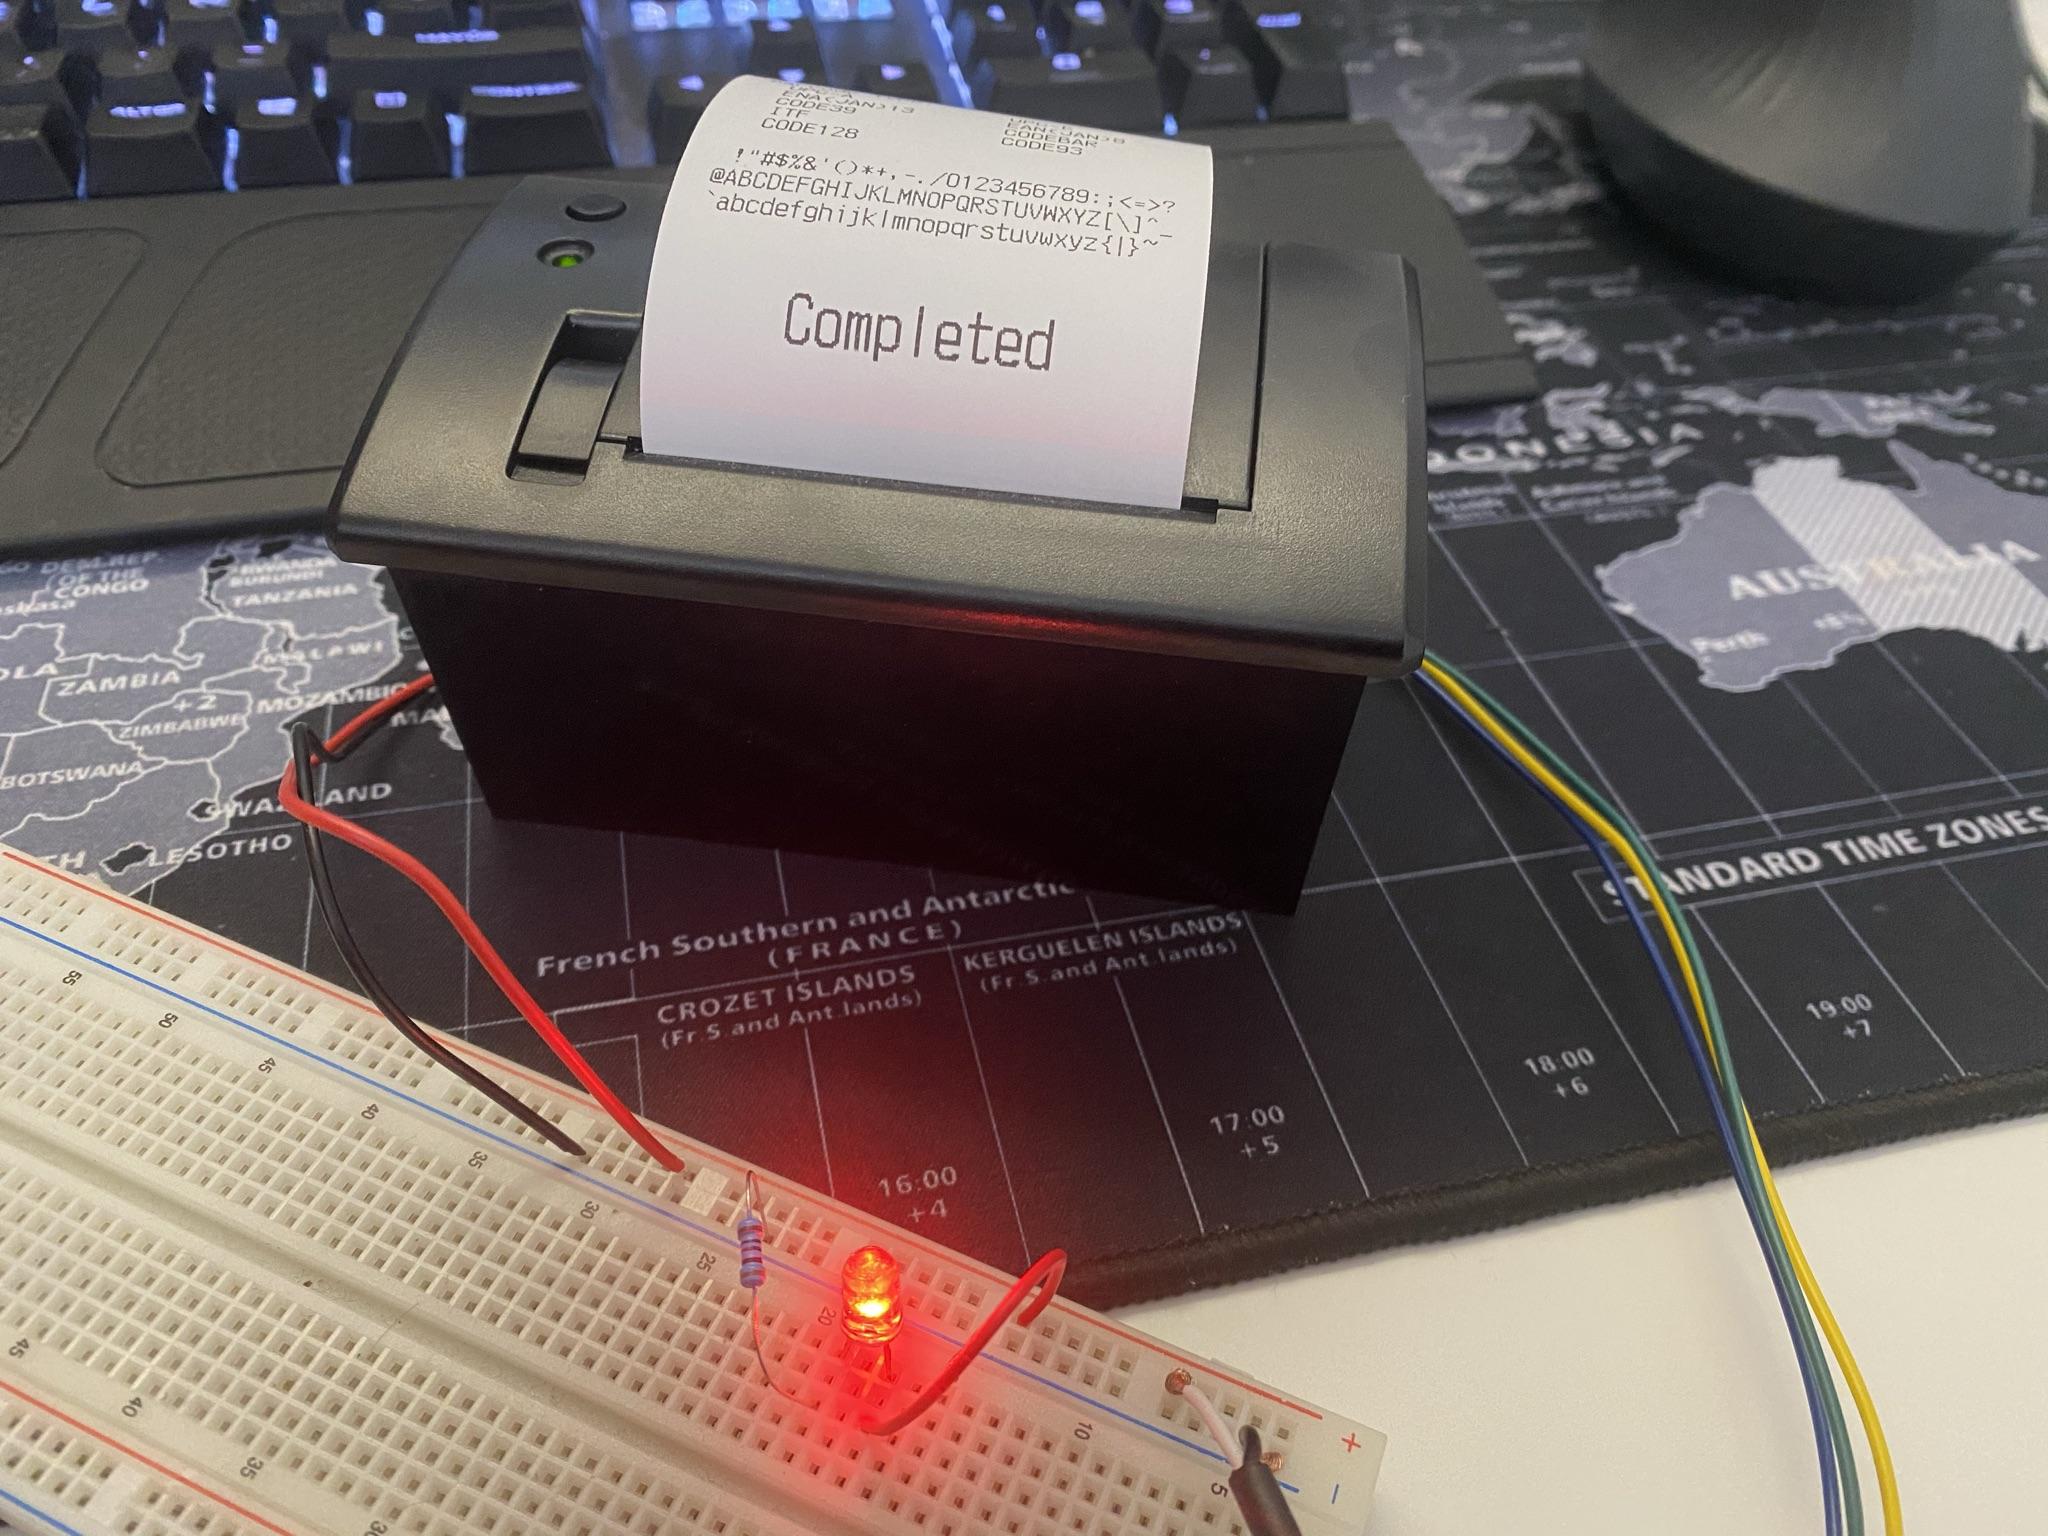
I have tested two different types of thermal printers, both work at 5v and 9v but the "test print" mode is different.
One print a "test page" if you press and hold the paper feed button while you connect the printer to the power. The other one prints the "test page" if you connect the printer to the power and then you press and hold the feed button for a couple of seconds. This is a good way to check if everything is fine with the printer.
Notice LEDs have polarity, so identify the positive leg and connect it to a GPIO pin, we will use it from the Python code to turn it on and off. The other LED leg can be connected to the resistor and later to the ground pin.
I use three LEDs in my Yayagram:
- Power led. Always connected, I used one of the 5V pins available.
- STA TUS_LED_PIN at PIN10
- RECORDING_LED_PIN at PIN17
Read this easy tutorial to learn more about how to use LEDs in a Raspberry Pi.
To execute the yayagram.py script on the Raspberry Pi and restart it in case of unexpected crashes we are going to create a Systemd service.
Here you can read more about how to do it with extra details, but I'm going to give you just what you need to get it running.
Create a file at "/etc/systemd/system" called yayagram.service, and add the following content:
[Unit]
Description=The Yayagram
After=multi-user.target network.target syslog.target

[Service]
Restart=on-failure
RestartSec=4
Type=idle
WorkingDirectory=/home/pi/Desktop
User=pi
ExecStart=/usr/bin/python3 /home/pi/Desktop/yayagram.py

[Install]
WantedBy=multi-user.target
Reload the services list:
sudo systemctl daemon-reload
Start the yayagram service:
sudo systemctl start yayagram.service
And, enable it so it starts the next time you reboot your Raspberry Pi:
sudo systemctl enable yayagram.service
The yayagram needs a "yayagram.conf" configuration file where the python script is located. This configuration file contains useful parameters to set up your Yayagram based on the pins you used that can be obviously different from the ones I used.
This is an example of a Yayagram with two grandchildren, a microphone, a push button, two LEDs, and a printer.
[printer]
baudrate = 9600
addr = /dev/serial0

[destinations]
dst_max = 2
dst0_pin = 6
dst1_pin = 5
all_pin = 13

[admin]
command_prefix = <!>
admin_lock = False

[recording]
recordings_path = /home/pi/.telegram-cli/uploads/
record_button_pin = 10
recording_led_pin = 26
plug_hw = 1,0
arecord_path = /usr/bin/arecord
recording_send_error_msg = An error occured while sending the voice message.

[global]
status_led_pin = 21
broadcast_message = Yayagram tiene un mensaje para todos las nietas y nietos!!
new_msg_for_you = Yayagram tiene un mensaje para ti!!
thank_you_for_msg = Thank you, your message has been printed :)
yayagram_locked = This Yayagram configuration is locked.
tg_cli_path = /home/pi/tg/bin/telegram-cli
tg_pub_path = /home/pi/tg/tg-server.pub
Let's review the takeaways of this config file.
[printer]
baudrate = 9600
addr = /dev/serial0
"baudrate" Is the printer baud rate. It's usually 9600 or 19200 bauds. "addr" is the printer path, it's usually "/dev/serial0" by default.
[destinations]
dst_max = 2
dst0_pin = 6
dst1_pin = 5
all_pin = 13
The most important part of this configuration section is the "dst_max" parameter, it's the number of grandchildren your Yayagram supports. Then, for each grandchild, you have to define their GPIO pins. As you can see this example uses pin #6 and #5 with the "dstX_pin" variables. Finally, the "all_pin" is the GPIO pin you use to connect the special socket to communicate with all the grandchildren at once.
That's all. Later, we will use some Telegram commands I wrote to easily adding grandchildren to the Yayagram.
[admin]
command_prefix = <!>
admin_lock = False
Nothing mandatory to change here. "command_prefix" is used to send the Yayagram commands to manage the grandchildren supported. "admin_lock" is used to prevent modifications to the configured grandchildren.
[recording]
recordings_path = /home/pi/.telegram-cli/uploads/
record_button_pin = 10
recording_led_pin = 26
plug_hw = 1,0
arecord_path = /usr/bin/arecord
recording_send_error_msg = An error occured while sending the voice message.
In this section, there're a lot of things to configure. "recordings_path" Is where the tool is going to store the recordings to send. Make sure the path exists. The "record_button_pin" and "recording_led_pin" are the GPIO pins used to connect the button and the led. The "plug_hw" parameter is the arecord card and device numbers, check above the "#Microphone" chapter to know more. "arecord_path" is the path to the "arecord" tool, change it if it's not located at the default path. Finally, "recording_send_error_msg" is an informative message to alert about failures recording and sending the voice message.
[global]
status_led_pin = 21
broadcast_message = Yayagram tiene un mensaje para todos las nietas y nietos!!
new_msg_for_you = Yayagram tiene un mensaje para ti!!
thank_you_for_msg = Thank you, your message has been printed :)
yayagram_locked = This Yayagram configuration is locked.
tg_cli_path = /home/pi/tg/bin/telegram-cli
tg_pub_path = /home/pi/tg/tg-server.pub
In this section first the "status_led_pin", a blinking led, choose the GPIO pin used. The rest of the configuration is informative messages you can use to customize the Telegram messages sent. Finally "tg_cli_path" and "tg_pub_path" are the paths to the "telegram-cli" tool location and the Telegramm pub file.
As retrieving the Telegram User ID and accessing the Raspberry to store is hard to accomplish, I created a simple set of commands to configure everything related.
Send this Telegram message to the Yaya contact and the Yayagram will add your user to the grandchildren board list. Each grandchild has to send this message to do the check-in.
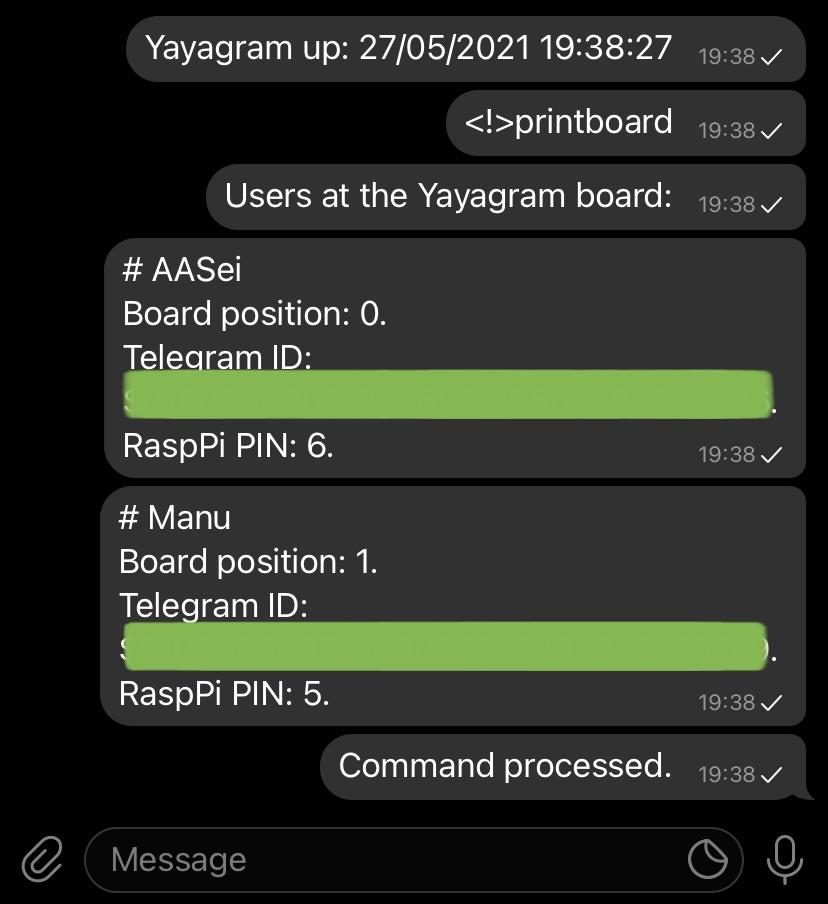
This command prints the list of grandchildren added to the Yayagram board. It's really useful because it prints the position of each grandchild, making it super easy to later label the jack sockets.
If you don't want to be at the Yayagram board you can send this message and the Yayagram will remove you from the list. Your spot can be used by another grandchild.
This command adds the person who sends the message as the "yayagram-superuser", this user has special permissions to lock and unlock the Yayagram board modifications. You can only set a superuser when there's none configured. The superuser also receives an automatic message each time the Yayagram is rebooted.
Only the superuser can run this command. It blocks the Yayagram from further modifications, no adding no removing grandchildren.
Only the superuser can run this command. It unblocks the Yayagram from further modifications, adding and removing grandchildren operations are back available.
Next steps:
- Use something like Comitup to configure the Wifi much easier.
- I would love to replace the thermal printer with a braille one. Blind people with limited access to technology would benefit from a device like that.
