pythonwebsite 后端
python web framework base on FastAPI.
-
可能本地缺少一些依赖,提前安装
apt install build-essential zlib1g-dev libncurses5-dev libgdbm-dev libnss3-dev libssl-dev libreadline-dev libffi-dev libsqlite3-dev wget libbz2-dev libjpeg-dev zlib1g-dev cronolog rsyslog logrotate -
下载Python源码: 任意目录执行
wget https://www.python.org/ftp/python/3.10.12/Python-3.10.12.tgz支持3.7+; 3.9下载wget https://www.python.org/ftp/python/3.9.2/Python-3.9.2.tgz -
解压到当前文件夹下
tar -xf Python-3.10.12.tgz -
配置:cd到目录下执行,
./configure --enable-optimizations prefix=/usr/local/python310- --enable-optimizations 标志用于优化二进制文件并运行多个测试
- prefix设置了install的安装目录
-
make -j 4- 使用 -j 标志加快进程。这指定了系统中的内核数。
nproc命令显示您的系统内核。
- 使用 -j 标志加快进程。这指定了系统中的内核数。
-
make install安装 -
/usr/local/python310/bin/python3 -V验证安装 -
设置poetry使用Python的环境,参看下一章
-
修改pyproject.toml,设置Python版本
[tool.poetry.dependencies]
python = "~3.10.12"
-
执行
poetry install下载安装依赖,并且启动项目
使用poetry管理python的包依赖和项目隔离。
python和其他语言java/nodejs等一样,都需要进项项目级别的包管理,但是python会有些不同。
- python 与java/JavaScript等语言的project隔离是不一样的。python的项目依赖包都是统一安装到site-packages目录下,如果不同project依赖了不同版本的同一模块,那么后安装的会卸载掉先安装的。所以python需要为每一个项目进行单独隔离,所以virtualenv应运而生。
- 那么讨论python的依赖管理一般就指 依赖管理+虚拟环境。最初的工具就是pip+virtualenv,pip用来做包管理,virtualenv用来做虚拟环境。那么就带来问题:
- 需要同时使用2个工具
pip freeze > requirements.txt,如果那次遗漏,那么后患无穷。 - 因此,pipenv诞生了。
- pipenv可以看成是pip+virtualenv两款工具的合体,它集合了pip的依赖包管理和virtualenv虚拟环境
管理于一身。另外,在依赖包记录方面使用Pipfile替代原来的requirements.txt。而且,它能够自动记录并更新记录文件,这样就不在需要手动执行命令来更新requirements.txt。但是他依然有很多缺陷:
- Lock速度缓慢
- 强行更新不相干依赖
- 依赖处理效果较差。
当当~当~当~~~!Poetry出现了
poetry是一款可以管理Python依赖、环境,同時可以用于Python工程打包和发布的一款第三方工具包。poetry通过配置文件pyproject.toml来完成依赖管理、环境配置、基本信息配置等功能。相当于把Python項目中的Pipfile、setup.py、setup.cfg、requirements.txt、MANIFEST.in融合到一起。通过pyproject.toml文件,不仅可以配置依赖包,还可以用于区分开发、测试、生产环境、配置源路径。
curl -sSL https://install.python-poetry.org | python3 -这里的Python3可以替换为我们自己的Python命名,比如curl -sSL https://install.python-poetry.org | /usr/local/python310/bin/python3 -如此安装完成之后,poetry会使用你提供的Python来运行poetry- 根据安装输出,修改bashrc或者profile,增加
export PATH="/root/.local/bin:$PATH" - 验证poetry
poetry -V - 卸载:
curl -sSL https://install.python-poetry.org | python3 - --uninstall
# $VENV_PATH 就是Python虚拟环境的路径,比如 /opt/pyenv/eojo
python3 -m venv $VENV_PATH
$VENV_PATH/bin/pip install -U pip setuptools
$VENV_PATH/bin/pip install poetry
---------------
python3 -m venv /opt/pyenv/eojo
/opt/pyenv/eojo/bin/pip install -U pip setuptools
/opt/pyenv/eojo/bin/pip install poetry- 卸载poetry直接删除
$VENV_PATH即可 - 记得修改PATH, 这样就可以直接访问 poetry
poetry completions bash > /etc/bash_completion.d/poetry.bash-completion
执行以上命令,然后关闭session再次进去linux bash即可发现poetry 可以使用自动补全
-
poetry init生成项目配置文件pyproject.toml -
如果是空的项目,可以使用
poetry new <project_name>开始 -
poetry最低使用python3.7版本,但是目前poetry1.6.1版本需要3.8+
-
poetry add xxxx,为项目添加依赖包。添加依赖会自动创建virtual env。 -
poetry remove pendulum,该remove命令从当前已安装软件包列表中删除软件包。 -
poetry intstall命令从当前项目中读取pyproject.toml文件,解析依赖项并安装它们。如果当前目录中有poetry.lock文件,它将使用那里的确切版本而不是解析它们。这可以确保使用该库的每个人都将获得相同版本的依赖项。如果没有poetry.lock文件,Poetry 会在依赖解析后创建一个文件。如果要在安装中排除一个或多个依赖项组,可以使用该--without选项。poetry install --without test,docs -
poetry update获取最新版本的依赖项并更新poetry.lock文件 -
poetry show -t可以查看当前环境安装的依赖,并且显示依赖关系 -
poetry shell该shell命令根据$SHELL环境变量在虚拟环境中生成一个 shell。如果尚不存在,则会创建它。可以使用deactive来退出虚拟环境 -
poetry env info获取当前激活的虚拟环境的基本信息 -
poetry config --list该config命令允许您编辑poetry的配置设置和存储库。(demo-py3.10) root@xview:~/workspace/demo# poetry config --list cache-dir = "/root/.cache/pypoetry" experimental.system-git-client = false installer.max-workers = null installer.modern-installation = true installer.no-binary = null installer.parallel = true virtualenvs.create = true virtualenvs.in-project = null virtualenvs.options.always-copy = false virtualenvs.options.no-pip = false virtualenvs.options.no-setuptools = false virtualenvs.options.system-site-packages = false virtualenvs.path = "{cache-dir}/virtualenvs" # /root/.cache/pypoetry/virtualenvs virtualenvs.prefer-active-python = false virtualenvs.prompt = "{project_name}-py{python_version}"
-
--verbose (-v|vv|vvv):增加消息的详细程度:“-v”用于正常输出,“-vv”用于更详细的输出,“-vvv”用于调试。 -
--help (-h):显示帮助信息。 -
poetry source add --priority=default aliyun https://mirrors.aliyun.com/pypi/simple/添加阿里云的pypi源为默认源;优先去阿里云查找包,找不到时去隐式内置源https://pypi.org/ 找; 此命令也会自动添加配置项到pyproject.toml[[tool.poetry.source]] name = "aliyun" url = "https://mirrors.aliyun.com/pypi/simple" priority = "default"
但是为了更清晰表示源的优先级,把pypi隐式内置源也添加到配置文件,
[[tool.poetry.source]] name = "aliyun" url = "https://mirrors.aliyun.com/pypi/simple" priority = "default" [[tool.poetry.source]] name = "PyPI" priority = "primary"
poetry查找包时的顺序是:
- default source, 默认来源,
- primary sources, 主要资源,
- implicit PyPI (unless disabled by another default source or configured explicitly), 隐式 PyPI(除非被另一个默认源禁用或显式配置),
- secondary sources (DEPRECATED), 二手来源(已弃用),
- supplemental sources. 补充来源。
-
切换Python环境
poetry env use /full/path/to/python
低版本poetry(如1.1.4) 安装会很慢(从github上拉取文件),建议手动下载poetry的[安装文件](Releases · python-poetry/poetry (github.com)) ,可以到百度网盘下载(链接: https://pan.baidu.com/s/1Luy4GKYVRHiL9HnKZF_ZBg 提取码: hgac)。下载完成之后,使用
python3.7 get-poetry.py --file poetry-1.1.4-linux.tar.gz安装。
当前的最新版本已经到了1.6.1, 这个版本的安装很快,基本上不需要手动下载github包
最好在 ~/.pip/pip.conf配置好国内pip源
[global]
index-url = https://mirrors.aliyun.com/pypi/simple/
trusted-host = mirrors.aliyun.com
如果当前环境存在多个python版本,比如python2.7/python3.5/python3.8 3个python环境,那么poetry 引用的python版本可能并不是你期望的,比如运行poetry命令出现:
/root/.poetry/lib/poetry/_vendor/py2.7/subprocess32.py:149: RuntimeWarning: The _posixsubprocess module is not being used. Child process reliability may suffer if your program uses threads. "program uses threads.", RuntimeWarning)
Python 2.7 will no longer be supported in the next feature release of Poetry (1.2). You should consider updating your Python version to a supported one.
Note that you will still be able to manage Python 2.7 projects by using the env command. See https://python-poetry.org/docs/managing-environments/ for more information.
可以使用以下步骤指定,参看https://github.com/python-poetry/poetry/issues/655#issuecomment-532608560,官网建议使用pyenv来做python多版本控制,具体可以参看:https://python-poetry.org/docs/managing-environments/
:
-
查看当前多个python版本的入口,可以使用type、whereis等命令,比如:
root@xview:~# type python
python 已被录入哈希表 (/usr/bin/python)
root@xview:~# type python2.7
python2.7 是 /usr/bin/python2.7
root@xview:~# type python3.5
python3.5 是 /usr/bin/python3.5
root@xview:~# type python3
python3 是 /usr/bin/python3
root@xview:~# type python3.8
python3.8 是 /usr/local/bin/python3.8
-
使用指定的python版本安装poetry:
python3.8 get-poetry.py --file poetry-1.1.4-linux.tar.gz -
修改
~/.poetry/bin/poetry第一行#!/usr/bin/env python ---> 改为 #!/usr/bin/env python3.8
-
执行poetry命令,则不再出现python2.7的告警
使用poetry的另一个问题是大陆访问pypi速度太慢,在使用pip时,我们可以通过添加源来解决,尽管poetry也可以使用pip的镜像源下载,然而在分析包之间的依赖关系时似乎依然是走的pypi,要解决这个问题,我们可以在每个项目下的pyproject.toml文件内写入配置文件,比如使用ali 源。
[[tool.poetry.source]]
name = 'aliyun'
url = 'http://mirrors.aliyun.com/pypi/simple/'
python项目的配置文件有多种,比如
- python自带xxx.py文件作为配置文件,比如 Django、flask的setting.py
- 外部的配置文件,通常使用
configparser库来解析- json:在js项目中可能比较常用
- xml: 其可读性和写法都比较繁琐,基本弃用
- yaml: 利用空格来定义变量层次结构,更易读;建议使用Python _Confuse_库来解析yaml
- ini: ini文件非常适合较小的项目,但是这些文件仅支持1级深的层次结构
- conf:
- conf其实没有一个固定的标准,比如mysql的配置文件my.cnf其实就是一个ini文件;conf可以是一个ini文件或者其应用能识别的更丰富格式的文件
- 跟ini一样有些限制
- toml:
- 明确的value类型,不再需要类似
getboolean()这样测操作才可以获取正确的Value; - 支持更丰富的数据类型:DateTime,本地时间,数组,float甚至十六进制值
- TOML文件中带括号的部分称为表,TOML支持**“嵌套表”**的概念
- 明确的value类型,不再需要类似
- 数据库存储配置项
- mysql
- redis
以上方案推荐ini/python/toml。
- python文件:
- 优点:使用简单,配置文件作为一个python的model被import;可以直接在配置文件内使用python的一些语法
- 缺点:不符合标准项目构建流程,比如linux平台一般配置文件位于/etc目录下
- 适合项目规模:小型
- conf/ini文件
- 优点:简单
- 缺点:只支持一级层次;
- 适合项目规模:小型
- toml
- 优点:更丰富的数据类型支持和更多项目元数据配置
- 缺点:需要支持parse
- 适合项目规模:全面
结论:小型项目建议采用conf/ini类型,略复杂项目建议采用toml。
常用的conf解析类库有:
-
python 内置 configparser
- 可以解析conf、ini文件;写入新的配置
-
openstack社区出品oslo.config
-
解析conf文件;写入新的配置
-
支持环境变量
-
支持command-line
-
支持变量引用,比如
# (string value)
rabbit_host = controller

# (integer value)
rabbit_port = 5672

rabbit_hosts = $rabbit_host:$rabbit_port
-
-
- 解析多种格式
toml|yaml|json|ini|py文件;写入配置;默认值;校验 - 支持环境变量
- 支持多中开发环境(default, development, testing, production)
- 内置 Django and Flask 相关支持
- 支持cli命令
- 解析多种格式
结论:推荐使用dynaconf+toml,一步到位。
-
添加包依赖
poetry add dynaconf -
在项目应用目录下运行
dynaconf init,默认生成3个文件config.py必选文件,我们的应用通过import config来使用配置项.secrets.toml可选文件,可以存放一些敏感数据,比如密码、私钥和token等settings.toml可选文件,配置项文件。一般我们把配置项放到这个文件。dynaconf支持toml|yaml|json|ini(conf) |py等多种格式,建议采用toml。文件格式选型,建议查看上一节。
-
项目引入settings.
from dynaconf import Dynaconf

settings = Dynaconf(
    envvar_prefix="DYNACONF",
    settings_files=['settings.toml', '.secrets.toml'],
)
以上是默认生成的config.py. 这里的配置项settings_files指向的
settings.toml文件是相对于当前执行应用的时候的目录,原文解释如下:In the above example, dynaconf will try to load
settings.tomlfrom the same directory where the program is located, also known as.and then will keep traversing the folders in backwards order until the root is located.root is either the path where the program was invoked, or the O.S root or the root specified in
root_path.由于是一个相对于程序执行时所在的当前目录为查找起始路径,有时候会发现
settings.toml可能load会出现文件无法正确匹配,导致配置项找不到。所以为了一定可以找到配置项,建议在settings.toml后添加一个绝对路径作为备选。当然按照settings_files配置项内容顺序,后边的配置项会覆盖前边的。以下是本程序的示例设置:from dynaconf import Dynaconf settings = Dynaconf( envvar_prefix="DYNACONF", settings_files=['./eojo/conf/settings.toml', '/etc/eojo/settings.toml'], )
-
配置文件内字符串替换(参数引用)
settings.toml
[default]
db_name = "mydb.db"

[development]
db_path = "@format {env[HOME]}/{this.current_env}/{env[PROGRAM_NAME]}/{this.DB_NAME}"
dynaconf支持
@formatand@jinja2种方式进行字符串替换。jinja需要单独安装依赖包,format内置,相当于python的str.format。但是验证下来发现,替换字符串时,必须使用对应配置项的大写,如上例。
在 Python 中,一般情况下我们可能直接用自带的 logging 模块来记录日志,包括我之前的时候也是一样。在使用时我们需要配置一些 Handler、Formatter 来进行一些处理,比如把日志输出到不同的位置,或者设置一个不同的输出格式,或者设置日志分块和备份,感觉显得略微繁琐一些。
使用loguru可以更方便的管理log, loguru有如下feature:
- Ready to use out of the box without boilerplate 开箱即用,无需配置
- No Handler, no Formatter, no Filter: one function to rule them all 不需要handler/formatter/filter/function配置,add实现一切
- Easier file logging with rotation / retention / compression 支持 rotation/retention/压缩
- Modern string formatting using braces style
使用
{}做字符串替换占位符 - Exceptions catching within threads or main 捕获程序崩溃和线程内的异常堆栈
- Pretty logging with colors 使用 markup tags 支持带颜色显示的logger message
- Asynchronous, Thread-safe, Multiprocess-safe 支持异步、线程安全、多进程安全
- Fully descriptive exceptions 更完整的异常堆栈信息(小心暴露你的敏感信息哦)
- Structured logging as needed 支持json序列化异常对象
- Lazy evaluation of expensive functions 延迟赋值
- Customizable levels 支持自定义level
- Better datetime handling 更加方便的时间格式设置
- Suitable for scripts and libraries 脚本和第三方库更方便的使用logger
- Entirely compatible with standard logging 兼容标准库的logging
- [Personalizable defaults through environment variables](https://loguru.readthedocs.io/en/stable/overview.html#personalizable-defaults-through-en vironment-variables) 通过环境变量来设置个性化参数
- Convenient parser
parse()方法可以方便的解析log日志内容 - Exhaustive notifier
使用
notifiers组件可以方便的结合loguru实现邮件等方式进行消息通知
Restfull web服务,其API文档是一个重要的组成部分。FastAPI集成了自动化实现文档的功能,主要的技术实现是基于pydantic进行数据模型等接口定义,然后生成swagger JSON定义文档,结合 Swagger UI 即可得到自动生成的交互式 API 文档,另外还支持 ReDoc格式的。
- Python 3.6 及更高版本
- 数据校验
- 数据输入/输出类型转换
-
SQLAlchemy ORM 添加数据库描述字段
有2个字段可以作为描述字段:
- doc:只是在python侧做文档描述,不进入DB
- comment: 创建表时,会把该字段写入SQL
可以知道我们使用comment会更合适
-
pydantic的schema model 每个字段都有description字段,最后会生成在线文档的字段描述字段。那么是否可以只写一次该描述文字,就可以在DB和schema都可以看到呢?研究发现,还是自己实现吧。
通过查看FastAPI的源码,可以知道在FastAPI实例初始化时就会进行schema model的解析并且生成openapi.json文件。所以普通的继承和重写是不能实现的,python有一神器:metaclass。
MetaClass元类,本质也是一个类,但和普通类的用法不同,它可以对类内部的定义(包括类属性和类方法)进行动态的修改。可以这么说,使用元类的主要目的就是为了实现在创建类时,能够动态地改变类中定义的属性或者方法。自定义SchemaMetaclass,实现对schema model 类创建时,把db model的comment字段的value设置到 schema model的description字段。
- schema model必须添加参数,可以知道从那个 DB model查找comment。这里使用 Config.orm_model属性
- 有可能schema model存在继承关系,所以查找需要递归查找Config.orm_model属性
- scheme model的所有字段的定义需要设置Filed()定义
- 之后可以继续优化,比如自动设置默认值和字符串最长(max_length)
定制openAPI 文档。
-
抽出OpenAPI文档全局设置参数
-
使用本地swagger-ui文件
-
提供加载静态文件路由
# main.py
from fastapi import FastAPI
from fastapi.staticfiles import StaticFiles
from eojo.openapi import custom_openapi


app = FastAPI(docs_url=None, redoc_url=None)  # docs url 重新定义
custom_openapi(app)  # 设置自定义openAPI

app.mount("/static", StaticFiles(directory="eojo/static"), name="static")
# openapi.py

from fastapi.openapi.utils import get_openapi
from fastapi.openapi.docs import (
    get_redoc_html,
    get_swagger_ui_html,
    get_swagger_ui_oauth2_redirect_html,
)


OpenAPISchema = {
    "title": "My app",
    "version": "1.0.0",
    "description": "python web framework base on FastAPI.",
    "openapi_tags": [{
        "name": "desktop",
        "description": "Manage desktops."
    }]
}


def custom_openapi(app):
    """
    重新定义swagger的一些参数,包括文档全局设置(title/version等)以及使用本地静态资源。
    """
    def my_openapi():
        if app.openapi_schema:
            return app.openapi_schema
        openapi_schema = get_openapi(
            title=OpenAPISchema["title"],
            version=OpenAPISchema["version"],
            description=OpenAPISchema["description"],
            routes=app.routes,
            tags=OpenAPISchema["openapi_tags"]
        )
        app.openapi_schema = openapi_schema
        return app.openapi_schema

    app.openapi = my_openapi

    @app.get("/docs", include_in_schema=False)
    async def custom_swagger_ui_html():
        return get_swagger_ui_html(
            openapi_url=app.openapi_url,
            title=OpenAPISchema["title"] + " - Swagger UI",
            oauth2_redirect_url=app.swagger_ui_oauth2_redirect_url,
            swagger_js_url="/static/swagger-ui-bundle.js",
            swagger_css_url="/static/swagger-ui.css",
            swagger_favicon_url="/static/favicon.ico"
        )

    @app.get(app.swagger_ui_oauth2_redirect_url, include_in_schema=False)
    async def swagger_ui_redirect():
        return get_swagger_ui_oauth2_redirect_html()

    @app.get("/redoc", include_in_schema=False)
    async def redoc_html():
        return get_redoc_html(
            openapi_url=app.openapi_url,
            title=OpenAPISchema["title"] + " - ReDoc",
            redoc_js_url="/static/redoc.standalone.js",
            redoc_favicon_url="/static/favicon.ico"
        )
alembic 是一个做数据库版本管理的工具。
- 配置文件位于: {PROJECT_NAME}/db/migrations/alembic.ini 会自动获取配置文件里关于db的设置
- 配置项主要为:
sqlalchemy.url = mysql+pymysql://xview:xview@localhost:3306/xview?charset=utf8 - 生成增量版本: `alembic revision --autogenerate -m "2.0.3"' # 2.0.3 是message,标记本次升级的描述
- 升级到最新版本: `alembic upgrade head'
- 升级到 下一个 版本:
alembic upgrade +1 - 打印升级到最新版本的 SQL 脚本:
alembic upgrade head --sql - 降级到 前一个 版本:
alembic downgrade -1
修改alembic的env.py文件,设置db url为项目的配置文件中设置的url
def run_migrations_online():
    # .... 一些代码省略...
    connectable = engine_from_config(
        {"sqlalchemy.url": settings.db.url},  # 使用dynaconf文件的配置替换alembic.ini的配置
        prefix='sqlalchemy.',
        poolclass=pool.NullPool)
# .... 一些代码省略...据国家大气研究中心的查尔斯·奈特称,一般的雪花大约由10^19个水分子组成。在雪花形成过程中,会形成不同的结构分支,所以说大自然中不存在两片完全一样的雪花,每一片雪花都拥有自己漂亮独特的形状。雪花算法表示生成的id如雪花般独一无二。
snowflake是Twitter开源的分布式ID生成算法,结果是一个long型的ID。
其核心**是:
- 第一位 占用1bit,其值始终是0,没有任何意义。在计算机的表示中,第一位是符号位,0表示整数,第一位如果是1则表示负数,我们用的ID默认就是正数,所以默认就是0,那么这一位默认就没有意义。
- 时间戳占用41位,具体到毫秒,41位的二进制可以使用69年,因为时间理论上永恒递增,所以根据这个排序是可以的。
- 机器标识占用10位,可以全部用作机器ID,也可以用来标识机房ID + 机器ID,10位最多可以表示1024台机器。
- 递增计数序列号占用12位,也就是同一台机器上同一时间,理论上还可以同时生成不同的ID。每个节点每毫秒从0开始不断累加,最多可以累加到4095,一共可以产生4096个ID。
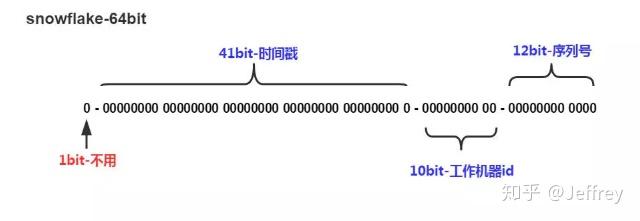
SnowFlake算法在同一毫秒内最多可以生成多少个全局唯一ID呢:: 同一毫秒的ID数量 = 1024 X 4096 = 4194304
核心**:分布式,唯一。
-
有业务含义,并且可自定义。 雪花算法的 ID 每一位都有特殊的含义,我们从 ID 的不同位数就可以推断出对应的含义。此外,我们还可根据自身需要,自行增删每个部分的位数,从而实现自定义的雪花算法。
-
ID 单调增加,有利于提高写入性能。 雪花算法的 ID 最后部分是递增的序列号,因此其生成的 ID 是递增的,将其作为数据库主键 ID 时可以实现顺序写入,从而提高写入性能。
-
不依赖第三方系统。 雪花算法的生成方式,不依赖第三方系统或中间件,因此其稳定性较高。
-
解决了安全问题。 雪花算法生成的 ID 是单调递增的,但其递增步长又不是确定的,因此无法从 ID 的差值推断出生成的数量,从而可以保护业务隐私。
- 强依赖机器时间
由于算法中用长度41位来表示时间戳,我们的时间计算通常是从1970年开始的,只能使用69年,为了不浪费,其实我们可以用时间的相对值,也就是以项目开始的时间为基准时间,往后可以使用69年,比如现在是2023年,那么往后推69年,就可以使用到2092年。获取唯一ID的服务,对处理速度要求比较高,所以我们全部使用位运算以及位移操作。
在获取时间的时候,可能会出现时间回拨的问题,什么是时间回拨问题呢?就是服务器上的时间突然倒退到之前的时间。
- 人为原因,把系统环境的时间改了。
- 有时候不同的机器上需要同步时间,可能不同机器之间存在误差,那么可能会出现时间回拨问题。
解决方案
-
回拨时间小的时候,不生成 ID,循环等待到时间点到达。
-
上面的方案只适合时钟回拨较小的,如果间隔过大,阻塞等待,肯定是不可取的,因此
- 要么超过一定大小的回拨直接报错,拒绝服务,
- 另一种方案是利用拓展位,回拨之后在拓展位上加1就可以了,这样ID依然可以保持唯一。但是这个要求我们提前预留出位数,要么从机器id中,要么从序列号中,腾出一定的位,在时间回拨的时候,这个位置
+1。
结合以上理论知识,以及EOJO项目的情况,64位做一下调整
- 首位不变,保持为0
- 时间戳占用41位,具体到毫秒,
- 机器标识占用8位,其中数据中心1位,机器id 7位.之所以这么设计是因为eojo目前设计的是由gunicorn启动的多进程程序。雪花算法如果需要支持多进程时不生成重复的id,则需要在多进程保持唯一性,所以可以设计以进程的id的最后2位作为机器id传入。因为一般服务启动时的进程都是连续的,比如 316115/316116/316117/316118/316119, 所以后2位就够了。为了支持后2位的数字,需要7位的二进制来支持。
- 时间回拨占用2位
- 递增计数序列号占用12位
import os
import pathlib
import time

from loguru import logger

from eojo.conf.config import settings

# 64位ID的划分,其中有22位自由分配
WORKER_ID_BITS = 7  # 机器标识,7bit
DATACENTER_ID_BITS = 1  # 数据中心,1bit
FIX_SYSTEM_CLOCK_BITS = 2  # 时间回拨拓展位,2bit
SEQUENCE_ID_BITS = 12  # 累计序列号,12bit

# 最大取值计算
MAX_WORKER_ID = -1 ^ (-1 << WORKER_ID_BITS)  # 最大机器数,2**7-1 0b1111111, 0b代表正数,-0b代表负数
MAX_DATACENTER_ID = -1 ^ (-1 << DATACENTER_ID_BITS)  # 最大数据中心,2**1-1 0b1
MAX_FIX_SYSTEM_CLOCK = -1 ^ (-1 << FIX_SYSTEM_CLOCK_BITS)  # 最大支持的时钟回拨次数,2**2-1 0b11
SEQUENCE_MASK = MAX_SEQUENCE_ID = -1 ^ (-1 << SEQUENCE_ID_BITS)  # 最大序列号,2**12-1, 总共可以表示4096个ID

# 移位偏移计算
WORKER_ID_SHIFT = SEQUENCE_ID_BITS
FIX_SYSTEM_CLOCK_SHIFT = SEQUENCE_ID_BITS + FIX_SYSTEM_CLOCK_BITS
DATACENTER_ID_SHIFT = SEQUENCE_ID_BITS + FIX_SYSTEM_CLOCK_BITS + WORKER_ID_BITS
TIMESTAMP_LEFT_SHIFT = SEQUENCE_ID_BITS + FIX_SYSTEM_CLOCK_BITS + WORKER_ID_BITS + DATACENTER_ID_BITS

# 开始时间截 (2023-01-01)
TWEPOCH = 1672531200000
root_path = pathlib.Path(__file__).parent.parent.resolve()  # 使用绝对路径,防止环境不同导致的异常


class SnowflakeGenerator(object):
    """
    用于生成IDs
    """
    def __init__(self, datacenter_id, worker_id, sequence=0, fix_system_clock=0):
        """
        初始化
        :param datacenter_id: 数据中心(机器区域)ID
        :param worker_id: 机器ID
        :param sequence: 递增序号
        :param fix_system_clock: 时钟回拨的次数
        """
        if worker_id > MAX_WORKER_ID or worker_id < 0:
            raise ValueError(f'worker_id:{worker_id}越界,支持 0 - {MAX_WORKER_ID}')

        if datacenter_id > MAX_DATACENTER_ID or datacenter_id < 0:
            raise ValueError(f'datacenter_id:{datacenter_id}越界,支持 0 - {MAX_DATACENTER_ID}')

        self.worker_id = worker_id
        self.datacenter_id = datacenter_id
        self.sequence = sequence
        self.fix_system_clock = fix_system_clock

        self.last_timestamp = self._read_last_timestamp()  # 上次计算的时间戳

        self._save_last_timestamp(self._gen_timestamp())  # 实例启动时写入当前时间

    @staticmethod
    def _save_last_timestamp(_last_timestamp):
        """
        上次的时间戳写入文件
        :return:int timestamp
        """
        file_path = root_path.parent.joinpath("last_timestamp.txt")
        with open(file_path, 'w') as file:  # 覆盖写
            file.write(str(_last_timestamp))

    @staticmethod
    def _read_last_timestamp():
        """
        从文件读取上次的时间戳
        :return:int timestamp
        """
        try:
            version_path = root_path.parent.joinpath("last_timestamp.txt")
            with open(version_path, 'r') as file:
                _last_timestamp = int(file.read().rstrip())
        except Exception as e:
            logger.error(f"读取last_timestamp.txt失败,{str(e)}")
            _last_timestamp = -1  # 默认值为-1,则一定可以生成
        return _last_timestamp

    @staticmethod
    def _gen_timestamp():
        """
        生成整数时间戳
        :return:int timestamp
        """
        return int(time.time() * 1000)

    def gen_id(self, current_timestamp: int = None):
        """
        获取新ID
        :return:
        """
        timestamp = current_timestamp or self._gen_timestamp()

        if timestamp > self.last_timestamp:
            self.sequence = 0
        else:
            if timestamp < self.last_timestamp:  # 时钟回拨
                self.fix_system_clock = (self.fix_system_clock + 1) & MAX_FIX_SYSTEM_CLOCK
                logger.warning(f"系统时钟回拨,fix_system_clock 加 1: {self.fix_system_clock}")
                if self.fix_system_clock == 0:  # 时钟回拨位到达上限;此时,计数不变,时间等待到下一毫秒,保证id唯一
                    timestamp = self._til_next_millis(self.last_timestamp)

            self.sequence = (self.sequence + 1) & SEQUENCE_MASK
            if self.sequence == 0:  # 序列号到达上限;此时,计数不变,时间等待到下一毫秒,保证id唯一
                timestamp = self._til_next_millis(self.last_timestamp)

        self.last_timestamp = timestamp

        new_id = ((timestamp - TWEPOCH) << TIMESTAMP_LEFT_SHIFT) | (self.datacenter_id << DATACENTER_ID_SHIFT) | \
                 (self.worker_id << WORKER_ID_SHIFT) | self.fix_system_clock << FIX_SYSTEM_CLOCK_SHIFT | self.sequence
        return new_id

    def _til_next_millis(self, last_timestamp):
        """
        等到下一毫秒
        """
        timestamp = self._gen_timestamp()
        while timestamp <= last_timestamp:
            timestamp = self._gen_timestamp()
        return timestamp

    def melt(self, snowflake_id, twepoch=TWEPOCH):
        """
        翻译id个部分组成的明文
        """
        sequence_id = snowflake_id & MAX_SEQUENCE_ID
        fix_system_clock_id = (snowflake_id >> SEQUENCE_ID_BITS) & MAX_FIX_SYSTEM_CLOCK
        worker_id = (snowflake_id >> SEQUENCE_ID_BITS >> FIX_SYSTEM_CLOCK_BITS) & MAX_WORKER_ID
        datacenter_id = (snowflake_id >> SEQUENCE_ID_BITS >> FIX_SYSTEM_CLOCK_BITS >> WORKER_ID_BITS) & MAX_DATACENTER_ID
        timestamp_ms = snowflake_id >> SEQUENCE_ID_BITS >> FIX_SYSTEM_CLOCK_BITS >> WORKER_ID_BITS >> DATACENTER_ID_BITS
        timestamp_ms += twepoch

        return timestamp_ms, int(datacenter_id), int(worker_id), int(fix_system_clock_id), int(sequence_id)


def local_datetime(timestamp_ms):
    import datetime
    """convert millisecond timestamp to local datetime object."""
    return datetime.datetime.fromtimestamp(timestamp_ms / 1000)


# 数据中心id由配置文件获取,默认是0
# 机器id取进程id的最后2位
IDWorker = SnowflakeGenerator(settings.default.snowflake_datacenter_id, int(str(os.getpid())[-2:]))


if __name__ == '__main__':
    from concurrent.futures import ThreadPoolExecutor

    def ge_id(*args):
        print(*args)
        for i in range(5):
            t0 = int(time.time() * 1000)
            # if i % 2 == 1:
            #     t0 = int(time.time() * 1000 - 10000)  # 模拟时钟回拨
            _new_id = IDWorker.gen_id(t0)

            print(f"new_id: {_new_id}, 时间:{t0}, id翻译: {IDWorker.melt(_new_id)}")


    with ThreadPoolExecutor(max_workers=5) as executor:
        for i in range(2):
            executor.submit(ge_id, f"线程{i}")
contextvars在Python 在 3.7 的时候引入,从名字上很容易看出它指的是 "上下文变量(Context Variables)"。
值得一提的是threading.local,他可以实现隔离线程之间的数据状态。但是如果要管理协程之间的数据隔离怎么办呢?那就是contextvars.
另外,contextvars也可以实现代替threading.local,并且在高并发环境中更建议使用 contextvars。
本项目用contextvars管理request请求的上下文环境变量,更方便进行log追踪,比如req-id/request信息(method/url/request param/body/request ip等)
import json
import shortuuid
from contextvars import ContextVar, Token
from typing import Optional, Any, Dict, Iterator
from starlette.middleware.base import BaseHTTPMiddleware
from starlette.requests import Request
from starlette.types import Message

request_id_var: ContextVar[Optional[str]] = ContextVar('request_id', default=None)


REQUEST_ID_HEADER_KEY = "X-Request-ID"

@contextmanager
def request_cycle_context(
    initial_data: Optional[dict] = None,
) -> Iterator[None]:
    """Creates and resets a starlette-context context.

    Used in the Context and Raw middlewares, but can also be used to
    create a context out of a proper request cycle, such as in unit
    tests.
    ref https://github.com/tomwojcik/starlette-context/blob/v0.3.6/starlette_context/__init__.py
    """
    if initial_data is None:
        initial_data = {}
    token: Token = _request_context_var.set(initial_data.copy())
    yield
    _request_context_var.reset(token)


class RequestContextMiddleware(BaseHTTPMiddleware):
    """
    在request中新增X-Request-ID header,方便日志追踪;以及其他request信息
    """

    async def set_body(self, request):
        """
        必须新增这个方法,否则不能访问request.body()
        但是看起来可能不那么美观,可以使用fastapi dependency代替
        ref https://github.com/encode/starlette/issues/495
        """
        receive_ = await request.receive()

        async def receive() -> Message:
            return receive_

        request._receive = receive

    async def dispatch(self, request: Request, call_next):

        # 默认值类似于`req-BioLA5VxyV8dih4BCZWmf5`
        req_id = f"req-{shortuuid.uuid()}"
        request_id_var.set(request.headers.get(REQUEST_ID_HEADER_KEY, req_id))

        await self.set_body(request)
        request_info = {
            "req_id": req_id,
            "request_ip": request.client.host,
            "request_params": json.dumps({
                "method": request.method,
                "url": str(request.url),
                "headers": dict(request.headers.items()),
                "params": str(request.query_params),
                "body": (await request.body()).decode()
            }).encode()
        }

        with request_cycle_context(request_info):
            response = await call_next(request)
            request_id = request_id_var.get()
            if request_id:
                response.headers[REQUEST_ID_HEADER_KEY] = request_id
            return response


async def add_request_info_to_request_context(request: Request):
    """
    使用fastapi的dependency设置request信息到contextvar
    本方法的dependency和RequestContextMiddleware 不能同时使用。
    否则需要修改request_cycle_context中context初始化的方法
    """
    import json
    request_info = {
        "request_ip": request.client.host,
        "request_params": json.dumps({
            "method": request.method,
            "url": str(request.url),
            "headers": dict(request.headers.items()),
            "params": str(request.query_params),
            "body": (await request.body()).decode()
        }).encode()
    }

    with request_cycle_context(request_info):
        # yield allows it to pass along to the rest of the request
        # ref https://github.com/tomwojcik/starlette-context/blob/v0.3.6/docs/source/fastapi.rst
        yield


from fastapi import FastAPI
app = FastAPI(docs_url=None, redoc_url=None)
app.add_middleware(RequestContextMiddleware)在使用contextvars.ContextVar过程中,发现以下问题:
- 如果 context_var 在 get 之前没有先 set,那么会抛出一个 LookupError,所以 contextvar.ContextVar 支持默认值
- 不能直接在fastapi/starlette 的middleware 直接操作request.body()。具体可以参看github: encode/starlette#495 .修复方法有2个:第一个是在middleware增加 set_body 方法,如上; 另一个是使用fastaapi 的dependency
- 以上的有关 contextvar的用法参考https://github.com/tomwojcik/starlette-context
架构设计的本质是:降本增效。分层可以进行一定程度的逻辑隔离,各司其职,简化开发流程,便于维护,实现降本增效。
-
schema(资源)层:本层在java等体系中称之为VO(View Object),用于展示层,作用是把前端展示的数据进行封装。在这里,我称之为视图层或者资源层。这一层会把API的response的数据结构进行控制。因为python是弱类型语言,response可以随意修改其数据结构,所以定义一个数据结构进行显示控制,很有必要。
资源是RestFul风格的API强调的一个概念。这个资源应该是针对业务进行的抽象对象,与数据库设计的表可能是一一对应,也可能是1个资源对应多个表。比如一个学生资源,可能会包含学生的基本信息(姓名、性别、年龄等)和课程信息(科目、分数等);学生信息和课程信息在数据库会是2个表,但是在资源上是一个。
资源层的schema class会设置 每个字段的属性(类型、长度、正则等)以及必填等,这些校验项会在API层对request/response数据进行校验。
资源层对应的数据结构会在API层进行填充。
本层的实现技术基于pydantic。
-
API层:处理入参和出参校验。进行入/出参的参数校验,包括必填(选填)参数、参数类型(数字、字符串、枚举等)、参数限制(长度、大小氛围、正则等)等;以及url的设置,http method,http response code等。
这一层还可以有一些中间件或者说是拦截器等的组件来进行一些请求前或者请求后的操作,比如:请求前的token校验、权限校验等;请求后的异常处理和消息通知等
API层会关注response的组成结果,实例化资源层定义的资源对象。每个资源一般会定义一个或者多个第三层的数据模型(数据库表)。
本层的实现技术基于fastAPI。
-
业务层:经过API层过滤之后,进入业务层的数据一定是符合预期的,规范的;这样可以进行相应的业务处理,比如一个订单请求,在这一层可能涉及到的有订单数据生成、减库存、购物车数据变动等等。
- 得到的数据是符合预期的,规范的
- 业务层应该专注于业务处理,不必关注数据怎么入库
- 业务层需要暴露一些接口给其他业务层调用
- 不同的业务模块应该且最好只能通过业务层的接口进行互相import和调用
- 业务层的方法应多使用SOLID设计模式
本层的技术实现没有明确定义。
-
数据/模型层:这一层定义了数据字典或者称之为数据结构,并且和数据库连接(DBAPI)连通,进行数据的入库操作。这一层应该无关业务只有数据。数据库连接应该随用随放,不要持有太久;注意SQL优化等。
本层的技术实现基于sqlalchemy。
redis/redis-py: Redis Python Client (github.com) 4.2.0rc1+ 版本以上已经开始支持asyncio. 可以考虑使用使用新版本的redis-py. 但是对于 python3.7来说,redsi5.0版本是最后一个版本
redis-py 5.0 will be the last version of redis-py to support Python 3.7, as it has reached end of life. redis-py 5.1 will support Python 3.8+.
FastAPI 是基于startlet实现的ASGI framework,Starlette使用 Uvicorn (daphne, or hypercorn)作为 ASGI server, Uvicorn 使用 uvloop 来实现事件回环监听,来代替python asyncio内置的事件回环。那么基于fastAPI实现的api应该尽可能的使用这个异步的特性。所以db的实现就有同步和异步2中方式。
sqlalchemy有1.4.x版本和2.0.x版本。推荐使用2.0版本,主要是因为2.0版本已经把async转正。
如果你用的语法还是1.4版本,可以使用一下命令看到SQLAlchemy给你的语法建议
具体链接为:SQLAlchemy 2.0 - Major Migration Guide — SQLAlchemy 2.0 Documentation
SQLALCHEMY_WARN_20 = 1
python - W
always::DeprecationWarning
test3.py使用session,注意使用with语法
-
SQLAlchemy1.4版本支持asyncio。但是建议使用2.0以上版本。因为1.4版本官方依然写着
betaAsynchronous I/O (asyncio) — SQLAlchemy 1.4 Documentation
The asyncio extension as of SQLAlchemy 1.4.3 can now be considered to be beta level software. API details are subject to change however at this point it is unlikely for there to be significant backwards-incompatible changes.
SQLAlchemy 1.4.3 的 asyncio 扩展现在可以被认为是 beta 级软件。API 详细信息可能会发生变化,但此时不太可能有明显的向后不兼容更改。
-
driver要使用asyncmy(aiomysql据说SQLAlchemy不在支持) 而不能在使用pymysql
The aiomysql dialect is not currently tested as part of SQLAlchemy’s continuous integration. As of September, 2021 the driver appears to be unmaintained and no longer functions for Python version 3.10, and additionally depends on a significantly outdated version of PyMySQL. Please refer to the asyncmy dialect for current MySQL/MariaDB asyncio functionality. aiomysql 方言目前尚未作为 SQLAlchemy 持续集成的一部分进行测试。截至 2021 年 9 月,该驱动程序似乎未维护,不再适用于 Python 版本 3.10,并且还依赖于明显过时的 PyMySQL 版本。请参考 asyncmy 方言了解当前的 MySQL/MariaDB asyncio 功能。
根据官方文档 What’s New in SQLAlchemy 1.4? — SQLAlchemy 2.0 Documentation
介绍,SQLAlchemy的内部是通过使用 greenlet
库来实现的异步。支持面向IO:AsyncEngine.connect()
/AsyncConnection.execute()
和面向ORM:AsyncSession
class
/AsyncSession.execute()
2种方式来实现异步:
import asyncio

from sqlalchemy import Column
from sqlalchemy import Integer
from sqlalchemy import MetaData
from sqlalchemy import String
from sqlalchemy import Table
from sqlalchemy.ext.asyncio import create_async_engine

meta = MetaData()

t1 = Table(
    "t1", meta, Column("id", Integer, primary_key=True), Column("name", String)
)


async def async_main():
    # engine is an instance of AsyncEngine
    engine = create_async_engine(
        "mysql+asyncmy://user:pass@host/dbname",
        echo=True,
    )

    # conn is an instance of AsyncConnection
    async with engine.begin() as conn:
        # to support SQLAlchemy DDL methods as well as legacy functions, the
        # AsyncConnection.run_sync() awaitable method will pass a "sync"
        # version of the AsyncConnection object to any synchronous method,
        # where synchronous IO calls will be transparently translated for
        # await.
        await conn.run_sync(meta.drop_all)
        await conn.run_sync(meta.create_all)

        # for normal statement execution, a traditional "await execute()"
        # pattern is used.
        await conn.execute(
            t1.insert(), [{"name": "some name 1"}, {"name": "some name 2"}]
        )

    async with engine.connect() as conn:
        # the default result object is the
        # sqlalchemy.engine.Result object
        result = await conn.execute(t1.select())

        # the results are buffered so no await call is necessary
        # for this case.
        print(result.fetchall())

        # for a streaming result that buffers only segments of the
        # result at time, the AsyncConnection.stream() method is used.
        # this returns a sqlalchemy.ext.asyncio.AsyncResult object.
        async_result = await conn.stream(t1.select())

        # this object supports async iteration and awaitable
        # versions of methods like .all(), fetchmany(), etc.
        async for row in async_result:
            print(row)


asyncio.run(async_main())import asyncio
from sqlalchemy import Column
from sqlalchemy import ForeignKey
from sqlalchemy import Integer
from sqlalchemy import String
from sqlalchemy.ext.asyncio import AsyncAttrs
from sqlalchemy.ext.asyncio import AsyncSession
from sqlalchemy.ext.asyncio import create_async_engine
from sqlalchemy.future import select
from sqlalchemy.orm import DeclarativeBase
from sqlalchemy.orm import relationship
class Base(AsyncAttrs, DeclarativeBase):
pass
class A(Base):
__tablename__ = "a"
id = Column(Integer, primary_key=True)
data = Column(String)
bs = relationship("B")
class B(Base):
__tablename__ = "b"
id = Column(Integer, primary_key=True)
a_id = Column(ForeignKey("a.id"))
data = Column(String)
def run_queries(session):
"""A function written in "synchronous" style that will be invoked
within the asyncio event loop.
The session object passed is a traditional orm.Session object with
synchronous interface.
"""
stmt = select(A)
result = session.execute(stmt)
for a1 in result.scalars():
print(a1)
# lazy loads
for b1 in a1.bs:
print(b1)
result = session.execute(select(A).order_by(A.id))
a1 = result.scalars().first()
a1.data = "new data"
async def async_main():
"""Main program function."""
engine = create_async_engine(
"mysql+asyncmy://user:pass@host/dbname",
echo=True,
)
async with engine.begin() as conn:
await conn.run_sync(Base.metadata.drop_all)
await conn.run_sync(Base.metadata.create_all)
async with AsyncSession(engine) as session:
async with session.begin():
session.add_all(
[
A(bs=[B(), B()], data="a1"),
A(bs=[B()], data="a2"),
A(bs=[B(), B()], data="a3"),
]
)
# we have the option to run a function written in sync style
# within the AsyncSession.run_sync() method. The function will
# be passed a synchronous-style Session object and the function
# can use traditional ORM patterns.
await session.run_sync(run_queries)
await session.commit()
asyncio.run(async_main())-
engine和session分别执行fetchall()
- engine返回值形如
[('default_uuid', 'admin',...)], 元组内是<class 'sqlalchemy.engine.row.Row'>类型数据 - session返回值形如
[(<dc.models.user.User object at 0x7f556282bad0>,)]元组内是<class 'sqlalchemy.engine.row.Row'> 类型数据
可以看出session方式更适合于查询orm对象时使用
- engine返回值形如
-
另外注意scalar的使用,可以更方便,比如
result.scalars().fetchall()返回值形如[<dc.models.user.User object at 0x7ff4090c4910>]去掉了内部的tuple封装;但也要注意如果查询的不是一个完整的对象,而是部分指定字段,scalars可能并不方便。 -
sqlalchemy.orm.exc.DetachedInstanceError这个异常往往是引用了session之外的对象属性造成的。sqlalchemy.orm.exc.DetachedInstanceError: Instance <Desktop at 0x7f249d225310> is not bound to a Session; attribute refresh operation cannot proceed (Background on this error at: http://sqlalche.me/e/14/bhk3)
解决方案:设置expire_on_commit为false.
sessionmaker(bind=eng, expire_on_commit=False)expire_on_commit参数的含义是:该字段控制SQLAlchemy的对象刷新机制。默认是true,即在session调用commit之后会主动将同一个session在commit之前查询得到的ORM对象的_sa_instance_state.expire属性设置为true,这样再次读取该对象属性时将重载这个对象,方法是重新调用查询语句。如果设置为false,那么获取属性将不再重新调用查询语句,直接从缓存获取,那么也就不会用到session,也就不会再出现DetachedInstanceError.但是这样做是有一定的风险的,因为有脏数据的情况,可能会造成数据不一致。async def create_admin_and_privilege_dao(create_admin, privilege_list): # 使用事务。自动commit以及关闭session async with AsyncSession(DB_Engine, expire_on_commit=False) as session: async with session.begin(): session.add(create_admin) if privilege_list: session.add_all(privilege_list) # dao调用 await create_admin_and_privilege_dao(admin, privilege_list) from loguru import logger logger.info(admin.__dict__) # 输出 {'_sa_instance_state': <sqlalchemy.orm.state.InstanceState object at 0x7fb55761d600>, 'account': 'ssss', 'phone': '17628298765', 'desc': '', 'password': '01e7d3787639714b610ec89a5afaad9d', 'uuid': '3518c31e75664087bd6965c394598f58', 'user_type': <UserTypeEnum.normal_admin: 'normal_admin'>, 'creator_uuid': 'default_uuid', 'privileges': [], 'display_name': '', 'company': '', 'enabled': True, 'created_at': datetime.datetime(2023, 8, 18, 12, 2, 36, 604688), 'updated_at': datetime.datetime(2023, 8, 18, 12, 2, 36, 604697)}
可以看到上例中,create_admin对象在被session insert之后,在with语法之外,依然可以访问create_admin属性,且更新了create_admin中created_at、updated_at、enabled这些入参中没有设置的默认字段。
uvicorn 参数:
pool_size=5
max_overflow=10
worker=1
| 同步 | ||||||
|---|---|---|---|---|---|---|
| 并发 | 请求个数 | 平均时长 | 最小时长 | 最大时长 | QPS | error % |
| 100 | 1000 | 658 | 118 | 1215 | 130.9586171 | 0 |
| 200 | 1000 | 1314 | 119 | 2404 | 129.2490629 | 0 |
| 500 | 1000 | 3009 | 218 | 4904 | 124.8127808 | 0 |
| 1000 | 1000 | 4587 | 197 | 7589 | 130.9586171 | 0 |
| 异步(limit_concurrency=10) | ||||||
| 并发 | 请求个数 | 平均时长 | 最小时长 | 最大时长 | QPS | error %(503 Service Unavailable) |
| 5 | 1000 | 38 | 31 | 113 | 116.2925922 | 0 |
| 10 | 1000 | 39 | 28 | 86 | 205.3809817 | 0.121 |
| 15 | 1050 | 43 | 28 | 81 | 242.2145329 | 0.29047619 |
| 20 | 1000 | 46 | 28 | 81 | 308.9280198 | 0.412 |
| 50 | 1000 | 52 | 28 | 93 | 485.9086492 | 0.637 |
| 100 | 1000 | 95 | 28 | 1082 | 425.3509145 | 0.641 |
| 200 | 1000 | 56 | 28 | 88 | 756.429652 | 0.785 |
| 1000 | 1000 | 104 | 54 | 317 | 823.723229 | 0.878 |
可以看到。异步的qps 比同步要高很多,同步平均在125左右,而异步随着并发数增加,qps 升高。当然异步由于对mysql连接需求量过大,可能导致连接池满,所以加了并发限制(limit_concurrency=10),超出并发能力的会直接返回503 Service Unavailable。
exception和正常的response进行封装成统一的返回格式:
{
  "data": {},
  "message": "message.",
  "code": "API_200_000_9999"
}code有4部分组成,中间以_分割,比如:API_200_000_9999
第一部分:字符串,标识是API类型还是其他类型。目前只有API,未来可能有SOCKET等其他类型
第二部分:3位,HTTP code, 比如200,400,500
第三部分:3位,业务编号,比如000标识系统统一编号,001标识桌面,002标识用户
第四部分:4位,错误码,比如0000标识未知错误,0001标识参数校验失败这里不使用OAuth2的token方案。因为OAth2的token方案相对复杂,且考虑到与第三方对接。尤其token refresh的过程:
- login得到access_token 和 refresh_token,refresh_token比access_token的有效期更长
- 客户端请求使用access_token,如果过期,客户端使用refresh_token再次请求得到新的access_token。 当然这里也可以返回新的refresh_token,新的refresh_token可以有新的过期时间
- 如果access_token过期,并且refresh_token也过期,那么需要重新登录。
以上方案略显复杂。重新设计如下:
-
login得到access_token。 token的生成方式有多种,比如jwt;非对称加密字符串;但是 jwt加密字符串过长且jwt本身的方案特性本系统没有采用; 非对称AES加密又消耗时间过长,经验证加密一个字符串需要500ms左右。这行的话login API的耗时要达到1s,太长。所以简化为: 生成带有uuid的字符串,然后使用base64加密得到token。这样token可以保持唯一性(因为uuid),也可以在客户端反解出来得到token 的内容;
-
客户端使用access_token请求,成功之后,会更新过期时间,token不变,新的过期时间为当前时间+有效时长(默认5分钟)
-
只要客户端一直请求(请求之间间隔最长不超过5分钟),那么token就一直有效
此方案优点:
- token请求之后,在不间断操作下会一直有效,不用客户端不断refresh
- 逻辑简单
- token包含了一些信息,可以进行解密读取
缺点:
- 需要保存会话信息,即需依赖redis这样的server端存储token和其过期时间点
- lock
- cache
- tools工具包
- UUID
- md5
- Symmetric Encryption、Symmetric Decryption 对称加密解密
- format_datetime 时间格式转化
- 使用python执行一些系统命令
- 使用socket判断
ip:port是否可用 - ip和数字互转
- 随机字符串生成
- 获取本地ip/mac
使用fastapi的 test client进行http请求。
在项目根目录,比如/root/workspace/fastAPI/目录下执行 pytest即可执行单元测试。
poetry build 即可得到wheel 包
基础框架搭建好之后,自然要考虑到怎么做扩展。
我们现在的目录结构如下:
.
├── docs
├── eojo
│   ├── api
│   │   ├── desktop.py
│   │   ├── __init__.py
│   │   ├── token.py
│   │   └── user.py
│   ├── base
│   │   ├── cache.py
│   │   ├── code.py
│   │   ├── constant.py
│   │   ├── db.py
│   │   ├── exception.py
│   │   ├── __init__.py
│   │   ├── lock.py
│   │   ├── response.py
│   │   ├── router.py
│   │   ├── schema.py
│   │   ├── tools.py
│   │   └── utils.py
│   ├── conf
│   │   ├── config.py
│   │   ├── __init__.py
│   │   ├── loginit.py
│   │   ├── rsa
│   │   │   ├── private_key.pem
│   │   │   └── public_key.pem
│   │   └── settings.toml
│   ├── db
│   │   ├── __init__.py
│   │   └── migrations
│   │       ├── alembic.ini
│   │       ├── env.py
│   │       ├── README
│   │       ├── script.py.mako
│   │       └── versions
│   │           └── bc5f7d589ae8_init.py
│   ├── error_code
│   │   ├── desktop.py
│   │   └── user.py
│   ├── exception
│   │   ├── desktop.py
│   │   ├── __init__.py
│   │   └── user.py
│   ├── i18n
│   │   ├── en.py
│   │   └── zh.py
│   ├── __init__.py
│   ├── main.py
│   ├── manager
│   │   ├── desktop.py
│   │   ├── __init__.py
│   │   ├── token.py
│   │   └── user.py
│   ├── models
│   │   ├── desktop.py
│   │   ├── __init__.py
│   │   └── user.py
│   ├── openapi.py
│   ├── schema
│   │   ├── common.py
│   │   ├── desktop.py
│   │   ├── __init__.py
│   │   ├── token.py
│   │   └── user.py
│   ├── static
│   │   ├── favicon.ico
│   │   ├── redoc.standalone.js
│   │   ├── swagger-ui-bundle.js
│   │   └── swagger-ui.css
│   └── test
│       ├── __init__.py
│       ├── test_desktop.py
│       └── test_user.py
├── poetry.lock
├── pyproject.toml
├── README.md
└── setup.py
第一步一般思考数据模型的建立,对应需要什么样的数据库表结构。在这一步,需要在eojo/models目录下建立相应的模型,并且可以使用alembic生成对应的数据库版本文件。数据模型注意一下几点:
- 字段需要索引的需要加上索引
- 注释描述字段使用comment,这样数据库也可以看到描述信息
- 继承TimestampMixin直接可以为数据库添加created_at和updated_at字段
- 继承ModelDB可以有增删改查等相应的db操作,还有as_dict方法可以转model对象为字典
- 字段尽可能不为 null, 可以提供默认值
数据库模型确定之后,开始考虑API设计。API设计包括:API url/api request 设计/response 结构设计。
- API url 请遵循restful 风格规范,比如复数,使用method代替一些出现在url的词语等
- api request 包含request query字段、request params字段和request body,需要遵循fastAPI规范
- request query和request params在API接口上进行装饰器声明
- request body 需要声明schema模型
- response 模型需要声明schema模型
schema模型设计需要注意:
-
schema模型使用的是pydantic进行的数据校验,完整文档请参考pydantic官网
-
本框架对pydantic进行一定程度的修改
-
增加了SchemaMetaclass元类。
- schema模型定义时,metaclass=SchemaMetaclass
- 并且配置config,指定orm_mode = True和orm_model = Desktop
如此就可以实现:
- schema定义的字段如果跟数据库model定义的字段同名,那么本框架在生成swagger 文档时,会自动合并schema字段的description字段和数据模型的comment字段。目的是可以重复使用字段的描述
- schema模型的定义一般会有好几个比如:xxBase/xxUpdate/xxCreate 并且会存在继承关系,那么只要父类的元类为SchemaMetaclass,其子类都会合并描述字段
- 为了方便处理,schema的每个字段必须是:Field定义,即使什么额外的属性都没有,比如:is_default: Optional[bool] = Field()
-
-
schema模型一般对于业务,所以schema与数据模型往往不是一一对应
有了数据模型作为后端存储,schema模型作为输入输出的规范,API自然而然就已经确定了,只需要在eojo/api下新增对应的API即可。
- router配置路由和是否需要token校验
- 本系统统一了正常response和异常response的结构,统一为 {“data”: {}, "code":"", "message": ""}, 为了能够得到openAPI的自动文档,这里使用了pydantic的genericModel;所以所有的API的response model都是MyBaseSchema的实例
- 在main.py拦截异常:RequestValidationError 和 HTTPException,重新返回为MyBaseSchema格式
- 新加的router要在main.py进行注册:app.include_router(xx.router)
- openAPI也要进行相应更新:openapi.py,增加openapi_tags内容
接下来就是最主要的业务部分。
业务部分接受经过校验的入参,需要返回能够被自动转为schema的输出。
manager 之间的引用最好使用manager对外暴露的方法。
异常主要是manager层会比较多。每个异常应该在 eojo/exception目录下建立对应的py文件
- 每个exception继承eojo.base.exception.MyBaseException
- 每个exception要设置code、message、status_code。
- code来源于 error code的定义,具体可以参考error_code章节
- 每个异常API返回的response中,code码对应i18n文件中的设置
- 客户端需要获取到I18n文件,从中找到code对应的翻译,显示在页面上
- message一般是英文描述,作为辅助定位,一般不展示在页面上
每加一个API都应在test添加具体的测试代码。每次API的修改都应该迅速跑一下test,不断的迭代式开发。
至此,一个新的API就扩展完成了。

