Hi, This is course page of CoderDost Youtube Channel React JS 2023 Course Course Link ,
-
Git Commands
-
use
git clone <repository_url> -
checkout branch according to Chapter number
git checkout react-1 -
run
npm installinside the root directory before running the code
-
-
If you are not comfortable with git, directly download the branch as Zip.
-
Choose branch related to the Chapter e.g.
react-1 -
run
npm installinside the root directory before running the code
-
-
Assignment 1 : If we delete
node_modules. How to run our app again successfully ? -
Assignment 2 : How to remove double
console.logsfrom React ? [ it is not needed in real life to remove them, its just an assignment problem ]. [ Hint: Some special Component at top level is of App is causing it ]. We explore more about - why this is needed in later videos.
-
Assignment 3 : Create a Page with multiple React Apps. Both React Apps should be independent of each other.
-
Assignment 4 : Try to build a react app using other toolchains like
Vite
- De-structuring Assignment : Long Video | Object De-structure Short Video | Array De-structure Short Video
- Import/Export : Long Video | Short Video
-
Assignment 1 : Create a simple React app for RESUME Builder. It will be static website. You have to make components like Resume as top level and under it - Skills, Education, Experience etc as components. All resume data will be under 1 big JavaScript object like which you can us in components via props. You can fix the number of items in Skills, Education, Experience or any section. Example you can say that only 3 experience items is allowed.
 resume = {
    experience : [ { year:2012, company:'xyz', role:'something' }],
    education:[ ],
    skills : [ 'react js', 'node js']
    .....
    ...
    }
You can choose any simple HTML layout and convert it to React Components
Example Link : Resume HTML
-
Assignment 2 : Create a Parent Component called Border which can provide some CSS border to any component nested into it. [Hint : You will need to use
childrenprops here < Border> < Component > < Border />
- De-structuring Assignment : Long Video | Object De-structure Short Video | Array De-structure Short Video
- Import/Export : Long Video | Short Video
- Spread Operator : Long Video | Short Video
- Assignment 1 : Make a simple component which can conditionally render a list with number or alphabets or bullets in HTML for number. e..g. use a prop like
layoutfor this. Also use a propitemsfor array of items in list.
< List layout="numbered" items={items}/>
< List layout="alpha"  items={items}/>
< List layout="bullet"   items={items}/>
-
Assignment 2 : This is continuation of previous assignment RESUME Builder
- In this part you have to make some conditional rendering. Suppose if any section doesn't exist you have to remove that section from Resume. Example if
skillsis empty array than don't displayskillssection in Resume. - You have to use
mapin most places where there are arrays. Like Skills, Education, Experience if there are 3 entries, usemapto display 3 experience items. You don't need fix number of items. Any array can have 1 to 10(or some Limit) any number of items. You can put some Limit, so that your layout is not affected. - Conditionally put some styling to Resume. Like
lighttheme ordarktheme or any other way you can switch the CSS layouts.
 resume = {
    experience : [ { year:2012, company:'xyz', role:'something' }],
    education:[ ],
    skills : [ 'react js', 'node js']
    .....
    ...
    }
You can choose any simple HTML layout and convert it to React Components
- In this part you have to make some conditional rendering. Suppose if any section doesn't exist you have to remove that section from Resume. Example if
Example Link : Resume HTML
- Ternary Operator : Video
- Logical AND (&&) : Video
- Higher Order functions (map, filter, reduce) : Video
- Import/Export : Long Video | Short Video
-
Assignment 1 : Make a simple page with 1 Image, 1button, 1 form Input text box and try to apply these events .
- Image : onMouseOver : when you hover on image. Image should increase in size. Think of any way where you can do it. Also, try that when you "move out" the mouse, it should be back to normal size.
- Button : onDoubleClick: when you doubleClick a button. show some alert box. Also make a console.log for single click event. Is console.log printed twice on double click ? check this ?
- Input Textbox : onFocus, onBlur are 2 events which occur when you enter or exit an input text box by click of mouse etc. Use it to display some console.log, which print "focused on the textbox", "out of textbox".
- onCopy, onCut, onPaste are 3 events which you can use on any text value etc. try to use it on a paragraph and just alert the user that something is copied, cut or pasted.
-
Assignment 2 : Make a form using
< Form>tag and put an textbox and button inside this form. try to click the button after entering into textbox. Does form reloads ? Can you try to stop is usinge.preventDefault. Try it. -
Assignment 3 : use an Input Textbox : after you enter some text. try to press ENTER button and show the an alert or console.log. You can capture the onKeyPress event, button how you will you make it work only for "Enter" ? It should not work on pressing of other keys. [Hint: Explore the synthetic event object ]
-
Assignment 4 : This is continuation of previous assignment RESUME Builder.
- Add a print button to print the current resume. You can use a DOM method
window.printto print the PDF.
- Add a print button to print the current resume. You can use a DOM method
-
Assignment 5 : Can you try the challenge of passing the function in one Prop like
onPlayand the message inside that function to be accessed from other propmessage[ As shown in Chapter Video ]
-
Assignment 6 : Using event bubbling concept print the name of Parents to Child of any clicked element. It should be order in "GrandParent >Parent > Child" this kind of order. Where "Child" represents the current clicked element.
-
Assignment 7 : Make a custom event called onClose. this event should close the current browser tab. you can apply it to a button on click or anywhere.
-
Assignment 1 : Make a digital CLOCK Component using useEffect Hook. We need to only update the time Upto seconds in it. HH:MM:SS format can be used. Can you make it send a Console.log at end of every minute ?
-
Assignment 2 : Implement a simple TIMER that displays the elapsed time since the start button was pressed, and it can be stopped and reset. Like a stopwatch.
- Assignment 1 : Create a Dropdown (< Select >) menu which is formed by a
nationsarray. You can push to this array new items using a 2 input textbox (for country name and code) and button. On selection of the any option from dropdown, its value should be displayed on console.log
const  nations  = [
{ name:  'India', value:  'IN' },
{ name:  'Pak', value:  'PK' },
{ name:  'Bangladesh', value:  'BG' },
]
-
Assignment 2 : FILTERED LIST : Make a List of something using an Array (a list can of cricket player /countries/ movie name etc). Now make this list it searchable, you have to put a input textbox at top of list. When you type in textbox it should only show you items matching from text typed. For example - If you type only "in" it should show things like "India" / "China" as both have
inin it. -
Assignment 2.1 : FILTERED LIST : Make above List as separate components for List, Input form and pass the states from each other using concepts learnt till now.
-
Assignment 3 :
This is continuation of previous assignment RESUME Builder. Now you have to make a separate component ResumeEditor which has a FORM. This form will have many input boxes. Each one related to one section. For example you can have one input box or experience section. Another input box for skill section and like this. Every input box should have an Add button in front of it. Once you press this add button that information is stored in the state , which you can update at top of the App level. Now this state should update the Resume Component and its child you have built.
-
first component will be your RESUME document which is only for reading purpose.
-
second component will be this FORM
-
you have to manage the state in between
-
only Add functionality is required in this assignment
-
you can change input boxes according to your need depending on your format of Resume. You can have multiple textboxes also for same section. Like for date + experience item etc.
-
Assignment 4 : Try this challenge : https://beta.reactjs.org/learn/state-a-components-memory#challenges
Todo app can be used to maintain a list of your pending daily items. A Simple todo list must have these features
- You can add any new item to TODO list
- You can click on any item to mark it as done, if you have done that by mistake - you can click again to undo.
- You can delete any item (completed or pending)
- You get a total of completed items and overall items on the list.
- You can move list items "Up" or "Down" using buttons.
KEYBOARD BASED Features :
- use ENTER key on keyboard to add a new item.
- when you click on an item, it should be selected (you can change style to show it is selected)
- If you press the DELETE key on the keyboard after selecting the list item it should delete that list item. If you have not selected any item the last item should be deleted.
- You can select list item and press UP arrow key to Move It Up. And you can press the DOWN key to move it down.
Other Features :
- Pin element to Top of List : On double click make element reach top of list. You can show a different color also to show that element is pinned.
- Show the date & time at which list item was added.
- Order by : Todo Item names, Date added, Completed.
- Due date feature : Add a due date of task of any todo item. You will need to add another input box for this at top. Whenever you are in 24 hour limit of due date - Task outline will be shown in ORANGE color. e.g if a task is due on 23 May - from 22nd May it should show in ORANGE outline color. If a due date is passed task should show RED Outline.
- Use some component like
https://github.com/react-component/progressto show a progress bar at top of list. This progress bar will show how much of total percent of tasks are completed. - Delete item via swipe gesture - like swipe to right on mobile phone. [Hint: You have to find an event type for this ]
Advanced Features :
- Use localStorage in browser using libraries like
https://github.com/localForage/localForageto make your todo list permanent in browser. This will have your list stored in browser database and will not delete it on refresh or closing of browser. LocalStorage Video LocalForage Video
ANIMATION BASED Features [optional] :
- Enter Animation : Animate list item on adding.
- Exit Animation : Animate list item at removal.
-
Assignment 1 : The method shown in this video was just to introduce useEffect hook. However that was not the correct use of useEffect hook. Can you change the code to remove useEffect and still have the editVideo functionality. [ Hint : use the concept that Component is rendered every time prop changes ]
-
Assignment 2 : This is continuation of previous assignment RESUME Builder.
- Add functionality to delete the items from resume.
- Add functionality to update the items from resume.
- you have to manage the state in between
- you can change input boxes according to your need depending on your format of Resume. You can have multiple textboxes also for same section. Like for date + experience item etc.
- Check the output can be printed perfectly in PDF.
-
Assignment 1 : Try this challenge : https://beta.reactjs.org/learn/extracting-state-logic-into-a-reducer#challenges
-
Assignment 2 : Convert your RESUME BUILDER Application from
useStatetouseReducerby converting states logic to a common reducer. Your reducer can have as many switch cases as you want. You can also divide them based on sections.ADD_SKILL,ADD_EXPERIENCEetc. to make logic even simpler for developer.
- REDUX - Understand it in Simple way Video
-
Assignment 1 : Try this challenge : https://beta.reactjs.org/learn/passing-data-deeply-with-context#challenges
-
Assignment 2 : Add a Context to your RESUME BUILDER to change font-size, font-color and some other font-properties. Also add a form to changed these property at top of App.
-
Assignment 3 : Add a Context to your RESUME BUILDER to change Dark Mode and Light Mode. You can also use a
React Switchkind of library to make it more user friendly to switch.
- Assignment 1 : Make a useCounter Hook: To keep track of a number that can be incremented or decremented.
const [count, increment, decrement] = useCounter(0);
- Assignment 1 : Try this challenge:
https://beta.reactjs.org/learn/referencing-values-with-refs#challenges
-
Assignment 2 : Try this challenge:
https://beta.reactjs.org/learn/manipulating-the-dom-with-refs#challenges -
Assignment 3 : Make a useWindowSize Hook: which returns size of current browser window.
const [width, height] = useWindowSize();
- Complete DOM Course playlist Video
- Assignment 1 : Try this challenge :
https://beta.reactjs.org/learn/synchronizing-with-effects#challenges
- Assignment 2 : Try this challenge :
https://beta.reactjs.org/learn/removing-effect-dependencies#challenges
- Assignment 3 : Try this challenge :
https://beta.reactjs.org/learn/reusing-logic-with-custom-hooks#challenges
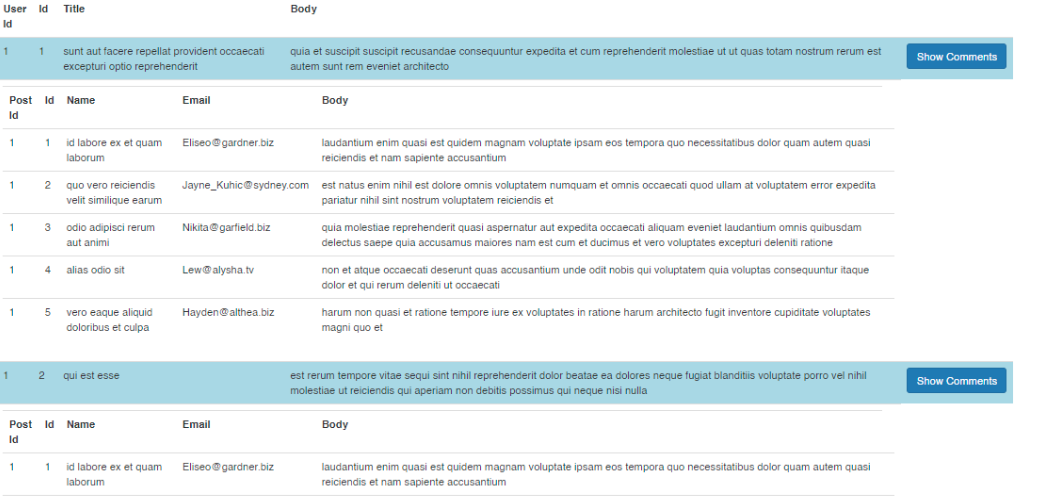
- Assignment 4 Use JSON Placeholder API (link given below).
-
You have to create a button which can get some posts and show them in a List.
-
You have to a show comments button on each list item. On click of show comments, Post's comments should be fetched below that list item. [ Comments are available for each post in API]
-
When you click on a particular list item's show comments, it should expand and show comments, otherwise it should collapse and hide the comments.
-
Try to optimize by :
- Only getting comments of required Post items (not all at a time)
- Storing somehow the old comments of closed list items. So you will not fetch them again, when your show comments again.
-
-
Assignment 1 : Implement a component that displays a list of items. The component should memoize the list of items to prevent unnecessary re-rendering.
-
Assignment 2: How to use memoization in the JSON Placeholder API assignment in previous problem. Can you try to optimize it using useMemo/useCallback ?
-
Assignment 3: useMemo and useCallback are same hook. useCallback is just a convenient hook way to write useMemo for functions. Prove this using useMemo in place of useCallback in any previous problem. [ Hint : you will have to change the useMemo callback and return the function definition ]
- Assignment 1 :
Try to apply
useDeferredValueanduseTransistionhooks on API based components. Either make a new one or use any existing code you have from other assignments. You can useChrome Network throttlingfrom Devtools > Performance Tabs and use Slow 3G option to see the effects
- Assignment 1 :
Try to use
window.printfunctionality as show in code without flushSync and see if really make a difference. Also, try the same onalertfunctionality, can it also work ?
