Giter Site home page Giter Site logo

openimagedebugger / openimagedebugger Goto Github PK

View Code? Open in Web Editor NEW
196.0 8.0 39.0 1.96 MB

An advanced in-memory image visualization plugin for GDB and LLDB on Linux, with experimental support for MacOS and Windows. Previously known as gdb-imagewatch.

License: MIT License

Python 16.78% MATLAB 0.15% C++ 78.30% C 2.11% CMake 2.66%
debugging gdb lldb plugin image cpp qt opencv eigen python linux macos windows imagewatch

openimagedebugger's Introduction

Open Image Debugger: Enabling visualization of in-memory buffers on GDB/LLDB

Open Image Debugger is a tool for visualizing in-memory buffers during debug sessions, compatible with both GDB and LLDB. It works out of the box with instances of the OpenCV Mat class and Eigen matrices, but can also be customized to work with any arbitrary data structure.

Features

  • GUI interactivity:
    • Scroll to zoom, left click+drag to move the buffer around;
    • Rotate buffers 90° clockwise or counterclockwise;
    • Go-to widget that quickly takes you to any arbitrary pixel location;
  • Buffer values: Zoom in close enough to inspect the numerical contents of any pixel.
  • Auto update: Whenever a breakpoint is hit, the buffer view is automatically updated.
  • Auto contrast: The entire range of values present in the buffer can be automatically mapped to the visualization range [0, 1], where 0 represents black and 1 represents white.
  • The contrast range can be manually adjusted, which is useful for inspecting buffers with extreme values (e.g. infinity, nan and other outliers).
  • Link views together, moving all watched buffers simultaneously when any single buffer is moved on the screen
  • Supported buffer types: uint8_t, int16_t, uint16_t, int32_t, uint32_t, float and double
  • Supported buffer channels: Up to four channels (Grayscale, two-channels, RGB and RGBA)
  • GPU accelerated
  • Supports large buffers whose dimensions exceed GL_MAX_TEXTURE_SIZE.
  • Supports data structures that map to a ROI of a larger buffer.
  • Exports buffers as png images (with auto contrast) or octave/matlab matrix files (unprocessed).
  • Auto-load buffers being visualized in the previous debug session
  • Designed to scale well for HighDPI displays
  • Works on Linux, macOS X and Windows (experimental)

Supported OSes

  • OID is developed with Ubuntu as the main target. The goal is to support the two latest LTS versions at a given time.
    • Ubuntu is also used as a basis for the minimum versions of the dependencies: we try to support the default versions of the packages you get via apt install
  • There are currently no plans to support other Linux distros. OID may or may not compile on your favorite distro, your mileage may vary.
  • Support for MacOS and Windows are somewhat experimental now - the code should be able to compile (see https://github.com/OpenImageDebugger/OpenImageDebugger/releases), but the binaries are not actively tested - in fact we currently have no automated tests at all for any OS - help is more than welcome in this regard. Also, we haven't come up with a simple installation/usage guides for these OSes yet.

Requirements

  • A C++17 compliant compiler
  • GDB 7.10+ or LLDB 6+
  • Qt 5.12.8+
  • CMake 3.10.0+
  • Python 3.8.10+ development packages
  • OpenGL 2.1+ support

Note: this list might get out-of-date by accident. For a more accurate list of requirements, please check what is used in https://github.com/OpenImageDebugger/OpenImageDebugger/blob/main/.github/workflows/build.yml.

Installation

Ubuntu Linux dependencies

On Ubuntu, you can install most of the dependencies with the following command:

sudo apt install build-essential libpython3-dev python3-dev cmake

Building the Open Image Debugger

Clone the source code to any folder you prefer and initialize the submodules:

git clone https://github.com/OpenImageDebugger/OpenImageDebugger.git
cd OpenImageDebugger
git submodule init
git submodule update

Now run the following commands to build it:

cmake -S . -B build -DCMAKE_INSTALL_PREFIX=/path/to/installation/folder
cmake --build build --config Release --target install -j 4

GDB integration: Edit the file ~/.gdbinit (create it if it doesn't exist) and append the following line:

source /path/to/OpenImageDebugger/oid.py

LLDB integration: Edit the file ~/.lldbinit (create it if it doesn't exist) and append the following line:

command script import /path/to/OpenImageDebugger/oid.py

MacOS Installation

For information on how to build the plugin on MacOS, refer to the wiki page Building on MacOS.

Testing your installation

After compiling the plugin, you can test it by running the following command:

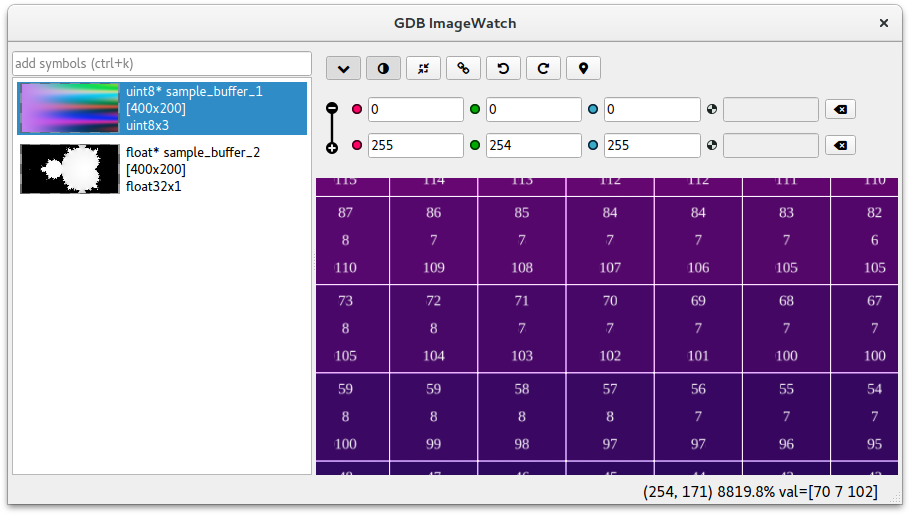
python /path/to/OpenImageDebugger/oid.py --test

If the installation was succesful, you should see the Open Image Debugger window with the buffers sample_buffer_1 and sample_buffer_2.

Troubleshooting

QtCreator configuration

If you are using QtCreator, you can change your Qt version under Tools->Options->Build & Run->Kits. Make sure you have Qt >= 5.6 selected.

Using plugin

When the debugger hits a breakpoint, the Open Image Debugger window will be opened. You only need to type the name of the buffer to be watched in the "add symbols" input, and press <enter>.

Auto-contrast and manual contrast

The (min) and (max) fields on top of the buffer view can be changed to control autocontrast settings. By default, Open Image Debugger will automatically fill these fields with the mininum and maximum values inside the entire buffer, and the channel values will be normalized from these values to the range [0, 1] inside the renderer.

Sometimes, your buffer may contain trash, uninitialized values that are either too large or too small, making the entire image look flat because of this normalization. If you know the expected range for your image, you can manually change the (min) and (max) values to focus on the range that you are interested.

Locking buffers

Sometimes you want to compare two buffers being visualized, and need to zoom in different places of these buffers. If they are large enough, this can become a very hard task, especially if you are comparing pixel values. This task is made easier by the lock buffers tool (which is toggled by the button with a chain icon).

When it is activated, all buffers are moved/zoomed simultaneously by the same amount. This means you only need to align the buffers being compared once; after activating the lock buffers mode, you can zoom in anywhere you wish in one buffer that all other buffers will be zoomed in the same location.

Quickly moving to arbitrary coordinates

If you need to quickly move to any pixel location, then the go to functionality is what you are looking for. Press Ctrl+L and two input fields corresponding to the target destination in format <x, y> will appear at the bottom right corner of the buffer screen. Type the desired location, then press enter to quickly zoom into that location.

Exporting bufers

Sometimes you may want to export your buffers to be able to process them in an external tool. In order to do that, right click the thumbnail corresponding to the buffer you wish to export on the left pane and select "export buffer".

Open Image Debugger supports two export modes. You can save your buffer as a PNG (which may result in loss of data if your buffer type is not uint8_t) or as a binary file that can be opened with any tool.

Loading exported buffers on Octave/Matlab

Buffers exported in the Octave matrix format can be loaded with the function oid_load.m, which is available in the matlab folder. To use it, add this folder to Octave/Matlab path variable and call oid_load('/path/to/buffer.dump').

Basic configuration

The settings file for the plugin can be located under $HOME/.config/OpenImageDebugger.ini. You can change the following settings:

  • Rendering
    • maximum_framerate Determines the maximum framerate for the buffer rendering backend. Must be greater than 0.
  • UI - thanks to @a-hromov for the contribution
    • list_position Determines the position of symbols list.
      • left Default value.
      • right
      • top
      • bottom
    • minmax_compact Changes the position of min/max intensity controller.
      • true Places min/max intensity controller in the same row with the toolbar.
      • false Places min/max intensity controller below the toolbar. Default value.
    • colorspace Selects the order of colorspace channels on the UI.
      • rgba Default value.
      • bgra

Advanced configuration

By default, the plugin works with several data types, including OpenCV's Mat and CvMat and Eigen's Matrix.

If you use a different buffer type, you can create a python parser inside the folder resources/oidscripts/oidtypes. This is actually pretty simple and only involves implementing a class according to the interface TypeInspectorInterface defined in resources/oidscripts/oidtypes/interface.py. This interface only defines the methods get_buffer_metadata() and is_symbol_observable().

The function get_buffer_metadata() must return a dictionary with the following fields:

  • display_name Name of the buffer as it must appear in the Open Image Debugger window. Can be customized to also show its typename, for instance.
  • pointer Pointer to the buffer
  • width Width of the ROI
  • height Height of the ROI
  • channels Number of color channels (Must be in the range 1 <= channels <= 3)
  • type Identifier for the type of the underlying buffer. The supported values, defined under resources/oidscripts/symbols.py, are:
    • OID_TYPES_UINT8 = 0
    • OID_TYPES_UINT16 = 2
    • OID_TYPES_INT16 = 3
    • OID_TYPES_INT32 = 4
    • OID_TYPES_FLOAT32 = 5
    • OID_TYPES_FLOAT64 = 6
  • row_stride Number of pixels you have to skip in order to reach the pixel right below any arbitrary pixel. In other words, this can be thought of as the width, in pixels, of the underlying containing buffer. If the ROI is the total buffer size, this is the same of the buffer width.
  • pixel_layout String describing how internal channels should be ordered for display purposes. The default value for buffers of 3 and 4 channels is 'bgra', and 'rgba' for images of 1 and 2 channels. This string must contain exactly four characters, and each one must be one of 'r', 'g', 'b' or 'a'. Repeated channels, such as 'rrgg' are also valid.
  • transpose_buffer Boolean indicating whether or not to transpose the buffer in the interface. Can be very useful if your data structure represents transposition with an internal metadata.

The function is_symbol_observable() receives a symbol and a string containing the variable name, and must only return True if that symbol is of the observable type (the buffer you are dealing with).

It is possible to debug your custom inspector methods by using the python decorators @interface.debug_buffer_metadata and @interface.debug_symbol_observable in the methods get_buffer_metadata and is_symbol_observable, respectively. This will print information about all analyzed symbols in the debugger console every time a breakpoint is hit.

openimagedebugger's People

Contributors

brunoalr avatar csantosbh avatar dakhouya avatar dependabot[bot] avatar github-actions[bot] avatar hesmar avatar jensac avatar jodlbauer avatar kameamea avatar solosuper avatar thataigeek avatar wl2776 avatar

Stargazers

 avatar  avatar  avatar  avatar  avatar  avatar  avatar  avatar  avatar  avatar  avatar  avatar  avatar  avatar  avatar  avatar  avatar  avatar  avatar  avatar  avatar  avatar  avatar  avatar  avatar  avatar  avatar  avatar  avatar  avatar  avatar  avatar  avatar  avatar  avatar  avatar  avatar  avatar  avatar  avatar  avatar  avatar  avatar  avatar  avatar  avatar  avatar  avatar  avatar  avatar  avatar  avatar  avatar  avatar  avatar  avatar  avatar  avatar  avatar  avatar  avatar  avatar  avatar  avatar  avatar  avatar  avatar  avatar  avatar  avatar  avatar  avatar  avatar  avatar  avatar  avatar  avatar  avatar  avatar  avatar  avatar  avatar  avatar  avatar  avatar  avatar  avatar  avatar  avatar  avatar  avatar  avatar  avatar  avatar  avatar  avatar  avatar  avatar  avatar  avatar

Watchers

 avatar  avatar  avatar  avatar  avatar  avatar  avatar  avatar

openimagedebugger's Issues

Error while building with Qt < 5.11

Environment

  • OID version (commit or tag): accda16
  • OS and Version: ubuntu 18.04
  • Which debugger [gdb and/or lldb] and respective versions: gdb
  • Python version: 3.6.9

Describe the bug

While building in my environment, I'm getting compilation errors regarding horizontalAdvance when using Qt < 5.11
According to Qt horizontalAdvance was introduce in Qt 5.11 https://doc.qt.io/qt-5/qfontmetrics.html#horizontalAdvance
In the OpenImageDebugger documentation the requirements state that we should use Qt 5.6+.

To Reproduce

Steps to reproduce the behavior:

git clone https://github.com/OpenImageDebugger/OpenImageDebugger.git
cd OpenImageDebugger
git submodule init
git submodule update

cmake -S . -B build -DCMAKE_INSTALL_PREFIX=./install
cmake --build build --config Release --target install -j 4

Expected behavior

Build complete

Actual behavior

Build fail

Error messages/stack traces

/opt/OpenImageDebugger/src/ui/gl_text_renderer.cpp: In member function ‘void GLTextRenderer::generate_glyphs_texture()’:
/opt/OpenImageDebugger/src/ui/gl_text_renderer.cpp:168:31: error: ‘class QFontMetrics’ has no member named ‘horizontalAdvance’
         int advance_x     = g.horizontalAdvance(*p);
                               ^~~~~~~~~~~~~~~~~
/opt/OpenImageDebugger/src/ui/gl_text_renderer.cpp:196:27: error: ‘class QFontMetrics’ has no member named ‘horizontalAdvance’
         int advance_x = g.horizontalAdvance(*p);

INFO: Could not activate hooks for any IDEs Stop hook #1 added.

  • v1.17.26:
  • Windows 11:
  • lldb(LLVM 17.0):
  • VS2019:
  • Python 3.11:

Describe the bug

Thank you for developing such a practical tool.

In fact, I particularly want to use it for debugging in VScode on the Windows platform.

However, I tested VSCode and QtCreator and both showed the following errors, so there was no GUI display either.

[OpenImageDebugger] INFO: Could not activate hooks for any IDEs
Stop hook # 1 added

I really hope you can take the time to solve this problem. Thank you very much.

This issue is similar to it. #6

Mac M1 compile and execute problem

Hi guys,
I would like to use OpenImageDebugger with vscode in Mac M1. And my OS is macOS Sonoma 14.4.1.
I follow tutorial OpenImageDebugger/OpenImageDebugger wiki - Building on MacOS. But I suffered issue which qmak cannot detect .pro file.
So I try to run cmake commands:

cmake -S . -B build -DCMAKE_INSTALL_PREFIX=/path/to/installation/folder
cmake --build build --config Release --target install -j 4

It can compile code, but I got error message [1] 23641 segmentation fault python3 oid.py --test when I test my compiled result with

python3 /path/to/OpenImageDebugger/oid.py --test

And then I run oid.py line by line. I got the error message modulenotfounderror: no module named 'lldb'.

I also try newest binary released, it will got same error message [1] 23641 segmentation fault python3 oid.py --test.

Anyone can give some suggestions?

An error occurred while compiling

Hello, I had some errors when compiling version 1.9.7. My system is Ubuntu20.04, and the python version is 3.9. The QT version is 5.12. I cannot use the source code to compile. There are errors like the ones in the attachment. I followed them exactly. Configuration according to the installation manual, but some unexpected situations occurred.

Specific error:

/usr/bin/ld: /usr/local/lib/libpython3.9.a(boolobject.o): **relocation R_X86_64_PC32 against symbol `_Py_FalseStruct' can not be used when making a shared object; recompile with -fPIC**
/usr/bin/ld: 最后的链结失败: bad value
collect2: error: ld returned 1 exit status
make[2]: *** [src/oidbridge/CMakeFiles/oidbridge_python3.dir/build.make:177:src/oidbridge/liboidbridge_python3.so] 错误 1
make[1]: *** [CMakeFiles/Makefile2:170:src/oidbridge/CMakeFiles/oidbridge_python3.dir/all] 错误 2
make: *** [Makefile:130:all] 错误 2

I tried adding the compilation option add_compile_options(-fPIC) to the CMakeLists script, but it didn't work.

I tried to use the software compiled by the author directly, but the error said that I could not find the so library of QT5.15, the QT version you compiled was 5.15, and some of my environment relied on QT5.12, which was inconvenient to replace.

I think it is better to use the source code to compile, do you have relevant suggestions? Thank you very much

AttributeError: 'NoneType' object has no attribute 'GetSelectedTarget'

Environment (please complete the following information):

  • OID version (commit or tag) 99fe039
  • OS and Version Manjaro 23.1.0 Linux 6.6.1-1-MANJARO
  • Which debugger [gdb or lldb] and version gdb
  • Python version 3.11

Describe the bug

Similar to #26

I'm running GDB with the Vscode C++ integration. I manually execute -exec source /home/thomas/projects/OpenImageDebugger/bin/OpenImageDebugger/oid.py in the vscode debug terminal (-exec flag is vscode specific, ignore it).

It returns

Exception in thread Thread-2 (event_loop):
Traceback (most recent call last):
  File "/usr/lib/python3.11/threading.py", line 1038, in _bootstrap_inner
    self.run()
  File "/usr/lib/python3.11/threading.py", line 975, in run
    self._target(*self._args, **self._kwargs)
  File "/home/thomas/projects/OpenImageDebugger/bin/OpenImageDebugger/oidscripts/debuggers/lldbbridge.py", line 72, in event_loop
    self._check_frame_modification()
  File "/home/thomas/projects/OpenImageDebugger/bin/OpenImageDebugger/oidscripts/debuggers/lldbbridge.py", line 52, in _check_frame_modification
    process = self._get_process(self.get_lldb_backend())
              ^^^^^^^^^^^^^^^^^^^^^^^^^^^^^^^^^^^^^^^^^^
  File "/home/thomas/projects/OpenImageDebugger/bin/OpenImageDebugger/oidscripts/debuggers/lldbbridge.py", line 102, in _get_process
    return debugger.GetSelectedTarget().process
           ^^^^^^^^^^^^^^^^^^^^^^^^^^
AttributeError: 'NoneType' object has no attribute 'GetSelectedTarget'
[OpenImageDebugger] Info: Could not activate hooks for any IDEs

image

Am I doing something wrong? I usually don't work with C++ or GDB, so it might be a rookie mistake. But it also complains about lldb even tho I use gdb.

TensorFlow & python3 support

Is the OpenImageDebugger working with python3 and with AI/ML frameworks such as TensorFlow or PyTorch? If so, is there any example of its use with these frameworks (TensorFlow, PyTorch)?
Thank you.

Invalid plotting of OpenCV matrices

Environment

  • OID version (commit or tag): head of main branch (b151cd9)

  • OS and Version:
    Ubuntu 22.04 with all updates.

    ❯ uname -a
     Linux omen 6.5.0-17-generic #17~22.04.1-Ubuntu SMP PREEMPT_DYNAMIC Tue Jan 16 14:32:32 UTC 2 x86_64 x86_64 x86_64 GNU/Linux
    
  • Which debugger [gdb and/or lldb] and respective versions:

    ❯ gdb --version
    GNU gdb (Ubuntu 12.1-0ubuntu1~22.04) 12.1
    Copyright (C) 2022 Free Software Foundation, Inc.
    License GPLv3+: GNU GPL version 3 or later <http://gnu.org/licenses/gpl.html>
    This is free software: you are free to change and redistribute it.
    There is NO WARRANTY, to the extent permitted by law.
    
  • Python version: 3.10.12

Describe the bug

  1. Screwed markup of pixel values for matrices of odd size (7x7, 15x15)
    image image

    At the same time matrices of even sizes (10x10, 16x16) are displayed correctly
    imageimage

  2. Matrices do not appear in the left column of the OID window (the one that is below "add symbols" input box) on pressing Enter. They appear in that window after clicking on that left column with a mouse or pressing Tab key or switching to another window with Alt-Tab.

To Reproduce

  1. clone and build https://github.com/wl2776/oid_debug_sample (it uses Conan for handling project dependencies. See README.md inside)

  2. $ cd build
    $ make -j
    $ gdb sample
    Reading symbols from sample...
    (gdb) source /usr/local/OpenImageDebugger/oid.py
    [OpenImageDebugger] Info: Could not activate hooks for any IDEs
    (gdb) break 19
    Breakpoint 1 at 0x37731: file /home/wl2776/work/oid_debug_sample/sample.cpp, line 19.
    (gdb) run
    Starting program: /home/wl2776/work/oid_debug_sample/build/sample
    [Thread debugging using libthread_db enabled]
    Using host libthread_db library "/lib/x86_64-linux-gnu/libthread_db.so.1".
    
    Breakpoint 1, main () at /home/wl2776/work/oid_debug_sample/sample.cpp:19
    19          mh.update();
    
  3. Switch to OID window and enter mh.v[0], then mh.v[1]
    The bug: matrices do not appear in the left list after entering their names and pressing Enter. They appear after click on this list column with left mouse button, or pressing Tab key, or switching to another window with Alt-Tab.

  4. Click on mh.v[1] in the left column to see its details. You see first figure above. Click on mh.v[0]. You see the second figure above.

  5. GDB console shows:

    (gdb) 0x5555558aeb80:   0x00000000
    0x5555558aee00: 0x3f800000
    (gdb) n
    20          return 0;
    

Expected behavior

Matrices appear in the list below add symbols input box immediately after a user presses Enter.
Pixel values are shown inside pixels.

Actual behavior

See bug description

Error messages/stack traces

No errors

Screenshots

See bug description.

Additional context

I've tried to fix it myself, but I'm not familiar with Qt at this level. Also, it is still not very clear for me, how python inside a debugger communicates with the Qt application (I've realized that they use TCP, but other details are still hidden from me).

Refactor documentation

The Readme file is too big. We should either break it into smaller .md files or move the building instructions to the wiki.

View arbitrary image data from pointer

Hi. This project looks extremely interesting.

Would it be hard to add a way to view a generic block of memory as an image? Filling in the needed info for width/height/stride/pixelformat just like you can specify the min/ax rgba values?

Implement treeview to visualize class member variables that are images

From csantosbh/gdb-imagewatch#41
nolyn commented on Aug 30, 2018

Thanks, I think this will be very helpful.

I have typically some objects with have several images as members. I added some giwtypes to display one of them. Displaying all of them is not possible I believe, since the backend only checks if the parent was already processed, which is the case after the first member was found. I thought about changing the backend such, that all variables are parsed down to all members and then only add giwtypes for the basic types. But I think that would require substantial changes, probably treeview instead of list and some mechanism would be required to avoid endless loops if a variable has a pointer to itself or its parent. At that time I had no idea how to debug it and created this issue. At the moment I have no time xD. I hope I will have some time in the future to look into it.

List supported version of dependencies

Hi @fushi219 ! thanks for the report and for the suggested fix.

Last time I checked there were some breaking API changes on lldb side, so newer versions might not work. Personally, I haven't had the time to work on OID lately, but my plan is to at least have a list of explicitly supported versions of the dependencies in the README.md file. I will create an issue for that and put it on the backlog.

Originally posted by @brunoalr in #26 (comment)

Cannot view Eigen::MatrixXf when using CodeLLDB

Thank you for your work, and it helps me a lot.
When using CodeLLDB debug C++ project and I add cv::Mat items , it works well. But when I add Eigen::MatrixXf, it reports some error
image
In addtion, my QT version is 5.7. When I build the project, I met an error and fix it, replace a function with “width()”.

Drop drone.io builds

Right now there's no need to leverage all the flexibility of drone.io. The maintenance efforts are bigger then the benefits for us.

No module named 'lldbbridge'

Environment

OS: Manjaro 21.0.2 Ornara
GCC: 10.2.0
GDB: 10.1
LLDB: 11.1.0
CMake: 3.20.1
Qt: 5.15.2
IDE: Qt Creator 4.14.2

How I built and configured OID

# in OID source path
mkdir build && cd build
cmake .. -DCMAKE_BUILD_TYPE=release -DCMAKE_INSTALL_PREFIX=./Install
make -j12
make install
echo "source $PWD/Install/OpenImageDebugger/oid.py" > ~/.gdbinit

Run python3 oid.py --test, and the test passed (the OID window showed up).

Problem

When I start debugging in qtcreator, the image watch window doesn't show up. So I logged error_traces in register_ide_hooks in oid.py, and get this error message:

  File "/home/user/Packages/OpenImageDebugger/build/Install/OpenImageDebugger/oid.py", line 80, in register_ide_hooks
    initializer(debugger, event_handler)
  File "/home/user/Packages/OpenImageDebugger/build/Install/OpenImageDebugger/oidscripts/ides/qtcreator.py", line 68, in register_symbol_fetch_hook
    lldb_fetch_hook(debugger, event_handler)
  File "/home/user/Packages/OpenImageDebugger/build/Install/OpenImageDebugger/oidscripts/ides/qtcreator.py", line 41, in lldb_fetch_hook
    imp = __import__('lldbbridge')
ModuleNotFoundError: No module named 'lldbbridge'

Add support to VSCode WSL remote

I am using vscode+wsl2 on windows, I install OpenImageDebugger successfully, and run python3 /path/to/OpenImageDebugger/oid.py --test can see the Open Image Debugger window with the buffers sample_buffer_1 and sample_buffer_2. I modified. ~/.gdbinit with add "source /path/to/OpenImageDebugger/oid.py", all is ok, I wirte a c++ demo only read and show a image with opencv, When the debugger hits a breakpoint, the Open Image Debugger window is not opened. what's the problem? Can someone help me.
QQ截图20230612104005

OpenCV matrix inside `std::vector` is not displayed in LLDB

Environment

  • OID version (commit or tag): head of main branch (b151cd9)
  • OS and Version: MacOS Sonoma 14.2.1, Ubuntu 22.04
  • Debugger and versions:
    lldb: 17.0.6 on MacOS, 14.0.0 on Ubuntu.
  • Python version: 3.11.7 on MacOS, 3.10.12 on Ubuntu

Describe the bug

OpenCV matrices, stored in STL containers like std::vector or std::map, are not displayed.

To Reproduce

Same setup as in #215. Compile sample project, run it in LLDB and try to inspect variables, storing OpenCV matrices.

  1. Clone and build sample project
    git clone https://github.com/wl2776/oid_debug_sample
    cd oid_debug_sample
    conan install . -b missing -s \&:build_type=Debug -s build_type=Release -of build
    cd build
    cmake .. --preset conan-debug
    make -j
    
  2. lldb sample
  3. breakpoint set -l 18 -s sample.cpp
  4. run
  5. When debugger stops on the breakpoint, switch to OID window and try to display mh.v[0]

Expected behavior

Matrix is shown

Actual behavior

Matrix is not displayed

Error messages/stack traces

None.

Additional context

I've added call to print inside the method Mat.is_symbol_observable (file resources/oidscripts/oidtypes/opencv.py)

It shows that type of variable mh.v[0] is std::__1::vector<cv::Mat, std::__1::allocator<cv::Mat> >::value_type.

Currently this method tries to match this type with regex, requiring that type name ends with cv::Mat.

Add observable symbols in (this) class.

Hey all,

currently when displaying an image. oid looks at the current local debug variables, if they are observable and if yes, it is going to list them in oid.

Now with object-oriented programming these variables are often located in a class. Is it possible to traverse all nested variables to make them observable?

Add support for newer lldb API

If I remember correctly, last time I checked, LLDB's Python API went through some breaking changes (TODO: insert reference here) and that led to oid not working on Ubuntu 20.04 anymore.

double type support bug

when trying to watch the following matrix:
cv::Mat mat(1432,6,CV_64FC1);
I get a memory corruption error and the window closes.

Add support for persistent settings

From #36:

Some other things that would be nice: persistent settings between runs and/or persistent list of variables (or parse known image variables from scope).

Late initialization of image structs

Thank you very much for providing this long-missing plugin.
I am using it in C and remote GDB.
I see the following issue:

  1. I define a pointer to an image structure, but do not allocate memory (at this point the pointer points to 0x000.
  2. Later in my program I allocate memory and now the pointer points to valid memory.
  3. When OID starts, I try to inspect the image structure. But OID tries to access the initial address (0x0000) and not the updated one.

It looks like OID does not refresh all symbols upon breakpoint stop, so it cannot "discover" pointer updates?
I understand this would take too long if done in every step, but maybe a button on the GUI could be added to refresh all symbols on demand?

Extract from GDB console:
253,314 ~"[OpenImageDebugger] Error: Could not plot variable\n"
253,314 ~"Cannot access memory at address 0x4\n"
253,315 &"Traceback (most recent call last):\n"
253,315 &" File "/usr/local/OpenImageDebugger/oidscripts/oidwindow.py", line 211, in call buffer_metadata = self._bridge.get_buffer_metadata(self._variable)\n"
253,315 &" File "/usr/local/OpenImageDebugger/oidscripts/debuggers/gdbbridge.py", line 59, in get_buffer_metadata\n buffer_metadata = self._type_bridge.get_buffer_metadata(\n"
253,315 &" File "/usr/local/OpenImageDebugger/oidscripts/typebridge.py", line 40, in get_buffer_metadata\n return module.get_buffer_metadata(symbol_name,\n"
253,316 &" File "/usr/local/OpenImageDebugger/oidscripts/oidtypes/ImageC.py", line 23, in get_buffer_metadata\n width = int(picked_obj['noCols'])\n"
253,316 &"gdb.MemoryError: Cannot access memory at address 0x4\n"

Can we make it as a vs code plug-in?

Hi dear developer. I have follewed your project about 2 years from gdb-imagewatch. It is an awesome work! I love it!
Recently I have been looking for a image-watch like plug-in on VS Code, but turn out nothing. I wonder if we can use your project to make a plug-in to do OpenCV mat memory view inside VS Code.
Do you have a plan to do it or can you accept someone else to do this work?

How to use on Mac

Hi, thank you for opening this project.
I'm trying to use OpenImageDebugger on Mac, but there is little instruction on how to use.
Does Qt Creator still needs? Or I can use xcode to debug?
For xcode, the error message is:

[OpenImageDebugger] Info: Could not activate hooks for any IDEs
Traceback (most recent call last):
  File "/Users/zengcancan/Softwarebag/OpenImageDebugger/installPath/OpenImageDebugger/oidwindow.app/Contents/MacOS/oid.py", line 79, in register_ide_hooks
    initializer(debugger, event_handler)
  File "/Users/zengcancan/Softwarebag/OpenImageDebugger/installPath/OpenImageDebugger/oidwindow.app/Contents/MacOS/oidscripts/ides/qtcreator.py", line 68, in register_symbol_fetch_hook
    lldb_fetch_hook(debugger, event_handler)
  File "/Users/zengcancan/Softwarebag/OpenImageDebugger/installPath/OpenImageDebugger/oidwindow.app/Contents/MacOS/oidscripts/ides/qtcreator.py", line 41, in lldb_fetch_hook
    imp = __import__('lldbbridge')
ModuleNotFoundError: No module named 'lldbbridge'

And for Qt Creator, nothing happens when I debug. My Qt Creator version is 4.11.0, and the version of Qt is 5.14.0.
I set the debuger of Qt Creator to LLDB, below is the configuration.
image

Windows version crushes with error message: The procedure entry point ?edit@QAbs.........

Hello

  • OID version v1.9.8
  • OS and Version Windows 10
  • Which debugger [gdb or lldb] and version
  • Python version

Describe the bug
There is no explanation on how to run windows version....
When try open oidwindow.exe crash window appears

To Reproduce
Just run it

Expected behavior
I think that some dependencies are missing... but due to lack of documentation can't say what exactly. Or what the correct way to run the application.

image

Thanks in advance,
Alexey

Eigen matrices are not working, python crashes in gdb (solution is a one liner)

Environment

  • OID version (commit or tag): v1.9.20
  • OS and Version: ubuntu 20.4
  • Which debugger [gdb and/or lldb] and respective versions: gdb 9.2
  • Python version: 3.8.10

Describe the bug

The installation was very well documented and there were no problems.
I tried this tool out with a very small C++ file with small Eigen matrices. And although the variables are detected in the gui of OID correctly, they can not be plotted, because python crashed in the background.

To Reproduce

Steps to reproduce the behavior:

  1. debug a cpp file with eigen matrices with gdb
  2. Select the variable in the gui

Expected behavior

The matrix entries should be shown as an image.

Actual behavior

No image is shown, only a traceback in gdb is shown.

Error messages/stack traces

Please include error messages and/or stack traces in plain text format, preferrably using

[OpenImageDebugger] Error: Could not plot variable
'gdb.Value' object has no attribute 'template_argument'
Traceback (most recent call last):
  File "/home/errr0/Downloads/vs_code/OpenImageDebugger/install/OpenImageDebugger/oidscripts/oidwindow.py", line 211, in __call__
    buffer_metadata = self._bridge.get_buffer_metadata(self._variable)
  File "/home/errr0/Downloads/vs_code/OpenImageDebugger/install/OpenImageDebugger/oidscripts/debuggers/gdbbridge.py", line 59, in get_buffer_metadata
    buffer_metadata = self._type_bridge.get_buffer_metadata(
  File "/home/errr0/Downloads/vs_code/OpenImageDebugger/install/OpenImageDebugger/oidscripts/typebridge.py", line 40, in get_buffer_metadata
    return module.get_buffer_metadata(symbol_name,
  File "/home/errr0/Downloads/vs_code/OpenImageDebugger/install/OpenImageDebugger/oidscripts/oidtypes/eigen3.py", line 93, in get_buffer_metadata
    eigen_stride = int(picked_obj.type.template_argument(2).template_argument(1)) # error: 'gdb.Value' object has no attribute 'template_argument'
AttributeError: 'gdb.Value' object has no attribute 'template_argument'

AttributeError: 'NoneType' object has no attribute 'GetSelectedTarget'

Thanks for the great job!

My system environment is:

MacOS Big Sur 11.3.1 (20E241), python3.8 in X code.

Following: https://github.com/OpenImageDebugger/OpenImageDebugger/wiki/Building-on-MacOS, I successfully compile the project.

However, after import the oid.py script, the lldb test program output as:

(lldb) Exception in thread Thread-1:
Traceback (most recent call last):
File "/Applications/Xcode.app/Contents/Developer/Library/Frameworks/Python3.framework/Versions/3.8/lib/python3.8/threading.py", line 932, in _bootstrap_inner
self.run()
File "/Applications/Xcode.app/Contents/Developer/Library/Frameworks/Python3.framework/Versions/3.8/lib/python3.8/threading.py", line 870, in run
self._target(*self._args, **self._kwargs)
File "/Users/x/workspace/OpenImageDebugger/install/OpenImageDebugger/oidwindow.app/Contents/MacOS/oidscripts/debuggers/lldbbridge.py", line 69, in event_loop
self._check_frame_modification()
File "/Users/x/workspace/OpenImageDebugger/install/OpenImageDebugger/oidwindow.app/Contents/MacOS/oidscripts/debuggers/lldbbridge.py", line 49, in _check_frame_modification
process = self._get_process(self.get_lldb_backend())
File "/Users/x/workspace/OpenImageDebugger/install/OpenImageDebugger/oidwindow.app/Contents/MacOS/oidscripts/debuggers/lldbbridge.py", line 99, in _get_process
return debugger.GetSelectedTarget().process
AttributeError: 'NoneType' object has no attribute 'GetSelectedTarget'

Any suggestions? Thanks a lot!

Support for mixed planar and interleaved formats, such as YUV420 : NV21, YV12

This is a feature request for supporting mixed planar + interleaved types, such as YUV420, where then intensity channel is typically planar and the chroma is presented as interleaved cr, cb data. Typically such format has also different plane size for chroma samples (i.e. the intensity channel Y is typically has representation resolution and chroma channels half the size, for more information see for example https://www.fourcc.org/yuv.php. What I have been working with 95 % of data is in NV12, NV21, YV12, or 420p formats.

I have not been able to figure out how to make description for such data with the current interface. Currently I use only gray channel for showing the intensity of these image types. Or if color images are needed I convert the data in code to other type and debug with those that are supported - but this requires code changes and is not desirable.

This feature probably needs some interface redesigning, namely support for per plane pixel and plane stride. Also there arise need for yuv -> rgb conversion for presenting the color data on display. It should be noted that there are many standards for doing this conversion (eg BT.601 full/studio, BT.709. etc). In my case I would be happy with BT.601 fullswing, but some one else might want to use something else.

The tool is very useful also as it is and will use it even without this feature also in the future, this would be just very nice to have. If the above can be realized with the current interface somehow, would be also nice to know.

Some other things that would be nice: persistent settings between runs and/or persistent list of variables (or parse known image variables from scope).

Recommend Projects

  • React photo React

    A declarative, efficient, and flexible JavaScript library for building user interfaces.

  • Vue.js photo Vue.js

    🖖 Vue.js is a progressive, incrementally-adoptable JavaScript framework for building UI on the web.

  • Typescript photo Typescript

    TypeScript is a superset of JavaScript that compiles to clean JavaScript output.

  • TensorFlow photo TensorFlow

    An Open Source Machine Learning Framework for Everyone

  • Django photo Django

    The Web framework for perfectionists with deadlines.

  • D3 photo D3

    Bring data to life with SVG, Canvas and HTML. 📊📈🎉

Recommend Topics

  • javascript

    JavaScript (JS) is a lightweight interpreted programming language with first-class functions.

  • web

    Some thing interesting about web. New door for the world.

  • server

    A server is a program made to process requests and deliver data to clients.

  • Machine learning

    Machine learning is a way of modeling and interpreting data that allows a piece of software to respond intelligently.

  • Game

    Some thing interesting about game, make everyone happy.

Recommend Org

  • Facebook photo Facebook

    We are working to build community through open source technology. NB: members must have two-factor auth.

  • Microsoft photo Microsoft

    Open source projects and samples from Microsoft.

  • Google photo Google

    Google ❤️ Open Source for everyone.

  • D3 photo D3

    Data-Driven Documents codes.